You've finished the edit. The wedding film is cut, the holiday montage has its music, or the school recital is trimmed and ready. Now someone wants it on a disc they can put in the living-room DVD player: a grandparent, a client, a relative without a streaming setup. That's where many people get stuck. If you copy an MP4 onto a blank DVD, the TV player usually shows an error or a list of files, not a movie.
This guide starts where your editing stops. You'll take a finished video file and use Nero Video to build a real DVD-Video disc with a menu the viewer can move through with a remote. You'll also check that it fits the disc, burn it, and test it on a player before you hand it over.
Is your video still unfinished? Do the editing first, then come back. For a quick edit with a theme and titles, see How to Make a Movie Fast with Nero Video's Express Editing Mode. If you need a full timeline with transitions and keyframes, see How to Edit Videos Like a Pro with Nero Video's Advanced Mode.
DVD-Video vs. Data DVD: Why Your MP4 Won't Play on a DVD Player
Both kinds of disc use the same blank media, but what goes onto the disc is different.
A data DVD stores files the same way a USB drive does. An MP4 on a data DVD is still an MP4, so only a device that can open that file type, usually a computer, will play it. Most standalone DVD players look for something else.
A DVD-Video disc uses a fixed structure that set-top players are built to read. The video is converted, normally to MPEG-2 at standard-definition DVD resolution, and saved in a VIDEO_TS folder with VOB, IFO, and BUP files. Those files also hold the menus and navigation that respond to a remote control. Nero's own guide makes the same point: copying an MP4 to a disc won't make it play in a DVD player, because the video first has to be converted to DVD-Video format.
This has one result you should know about before you start. DVD-Video is a standard-definition format. A 4K or 1080p source will be converted down to DVD resolution. It will still look fine on a TV, but it won't look as sharp as the original file. If you need to keep full HD, you'd need Blu-ray instead, which this guide doesn't cover.
Data DVD | DVD-Video | |
|---|---|---|
What's on the disc | Your original files (MP4, MOV, JPG…) | Converted video in a |
Plays in standalone DVD players | Usually not | Yes |
Disc menu and remote navigation | No | Yes |
Best for | Backups and archives | Watching on a TV |
Nero tool | Nero Burning ROM / Nero Express | Nero Video |
If you only want to archive files, a data DVD is fine. Our Windows 11 DVD burning guide covers that. The rest of this article is about the disc you watch on a TV.
What You'll Need
A finished video file. For example, the MP4 you exported from Nero Video or another editor. You can add several files if you want more than one title on the disc.
Nero Video on a Windows PC. The Microsoft Store listing, Movie Maker – Video Editor by Nero, includes disc creation for DVD, AVCHD, and Blu-ray.
A DVD burner. Most new laptops don't have an optical drive, so you may need an external USB DVD writer.
Blank recordable DVDs. DVD-R or DVD+R discs are the safest choice for older players. A single-layer disc holds about 4.7 GB, and a dual-layer (DVD-DL) disc holds about 8.5 GB.
A way to test the disc. A standalone DVD player connected to a TV is the best test. Nero DVD Player on a PC is a good second check.
Step 1: Start a DVD-Video Project from the Create Disc Section
Open Nero Video. The home screen has three task areas: Capture & Import, Edit & Export File, and Create Disc. Because your video is already edited, skip the editing modes and go straight to Create Disc. Then choose DVD, followed by DVD-Video.

Nero Video then guides you through four screens in a fixed order: Content → Edit Menu → Preview → Burn Options. You can go back to an earlier screen at any time, but you can't skip one. In practice this is useful, because it means you always see the menu preview before you can burn.
Step 2: Import Your Finished Video on the Content Screen
On the Content screen, add your finished video file. You can either drag it in from File Explorer or use the import option. Each video you add becomes a title on the disc. You can reorder titles, preview them, and combine them if you want them to play as one continuous movie.

How many titles you add changes the menu. With one video, you get a simple menu with a Play button. With several videos, such as "Ceremony," "Reception," and "Speeches," the main menu shows one button for each, so viewers can go straight to the part they want.
Note on chapters: Nero Video can also add chapter markers inside a title. That's a separate workflow and isn't covered here. This guide focuses on titles and the main disc menu.
Step 3: Check Disc Capacity with the Full-O-Meter
At the bottom of the Content screen, the Full-O-Meter bar shows how much of the disc your project will use. If the bar goes into the red zone, the project won't fit on the selected disc with the current settings.
First, make sure the project is set to the disc you actually plan to use, either a single-layer DVD (about 4.7 GB) or a dual-layer DVD-DL (about 8.5 GB). If it still doesn't fit, you can open Options → Recording Format Options. Nero Video often starts with Keep source quality, which tries to keep as much quality as possible but can go over the disc's capacity on longer projects. Switching to Fit to disc makes Nero adjust the encoding so the content fits. The cost is a lower bitrate.

Fit to disc works well if you're only slightly over. If the project is far too long for one disc, squeezing it in will cause blocky images and smeared motion. In that case, it's better to use a dual-layer disc or split the project across two discs.
Choose PAL or NTSC for Where the Disc Will Be Played
In the same Recording Format Options area, check the video standard and aspect ratio. DVD-Video discs are made in one of two TV standards:
NTSC (720×480, about 30 frames per second) is used in North America, Japan, and parts of South America.
PAL (720×576, 25 frames per second) is used in most of Europe, Australia, and much of Asia and Africa.
Choose the standard for the country where the disc will be watched, not where you're making it. Many modern players can handle both, but older players and TVs may show a black-and-white picture, rolling images, or nothing at all when the standard is wrong. If the video is going abroad, ask the recipient which standard their player uses. For aspect ratio, pick 16:9 for widescreen footage, which covers almost anything shot on a phone or camera in the last ten years.

Step 4: Choose and Customize a Disc Menu Theme
Click Next to open the Edit Menu screen. This is where you design what the viewer sees when the disc loads.
On the Templates tab, browse the built-in menu themes and click one to apply it. Each template already includes a background, a button layout, text styles, and animation, so a single click gives you a working menu.

On the Customize tab, you can make the menu your own.
Background: Choose Picture or Video and select your own file, such as a still from the event, a family photo, or a short looping clip. If you use a moving background, keep it calm so the buttons stay easy to read on a TV.
Text: Click the disc title and the button labels to rename them. "Play Movie" is clearer than "Title 1."
Background audio and button colors: You can add a short music loop and set the highlight and activation colors, which show the viewer which button is selected on the remote.
Do you need a menu at all? For one short clip, you can choose Do not create a menu so the video starts as soon as the disc is inserted. For anything longer, or for a disc with several titles, a menu makes the disc much easier to use. It also lets viewers go back to the start without ejecting the disc.
Step 5: Preview Menu Navigation with the Virtual Remote
Click Next to open the Preview screen. Nero Video plays your disc as a DVD player would and shows an on-screen remote control, so you can test the menu the way a viewer will.

Don't treat the preview as a single still image. Test it like a viewer would:
Does the main menu load and look right? Check that text isn't cut off at the edges. TVs often crop the outer part of the picture.
Move between buttons with the arrow keys. Is the highlighted button always easy to see?
Press each button. Does each one start the correct title?
Use the Menu button during playback. Does it return you to the main menu?
Let a title play to the end. Does the disc go back to the menu instead of stopping on a black screen?
If anything looks wrong, click Back to return to Edit Menu or Content and fix it. Changes cost nothing at this stage. After you burn a write-once disc, they don't.
Step 6: Burn the DVD-Video Disc
Click Next to open Burn Options, then insert a blank DVD.
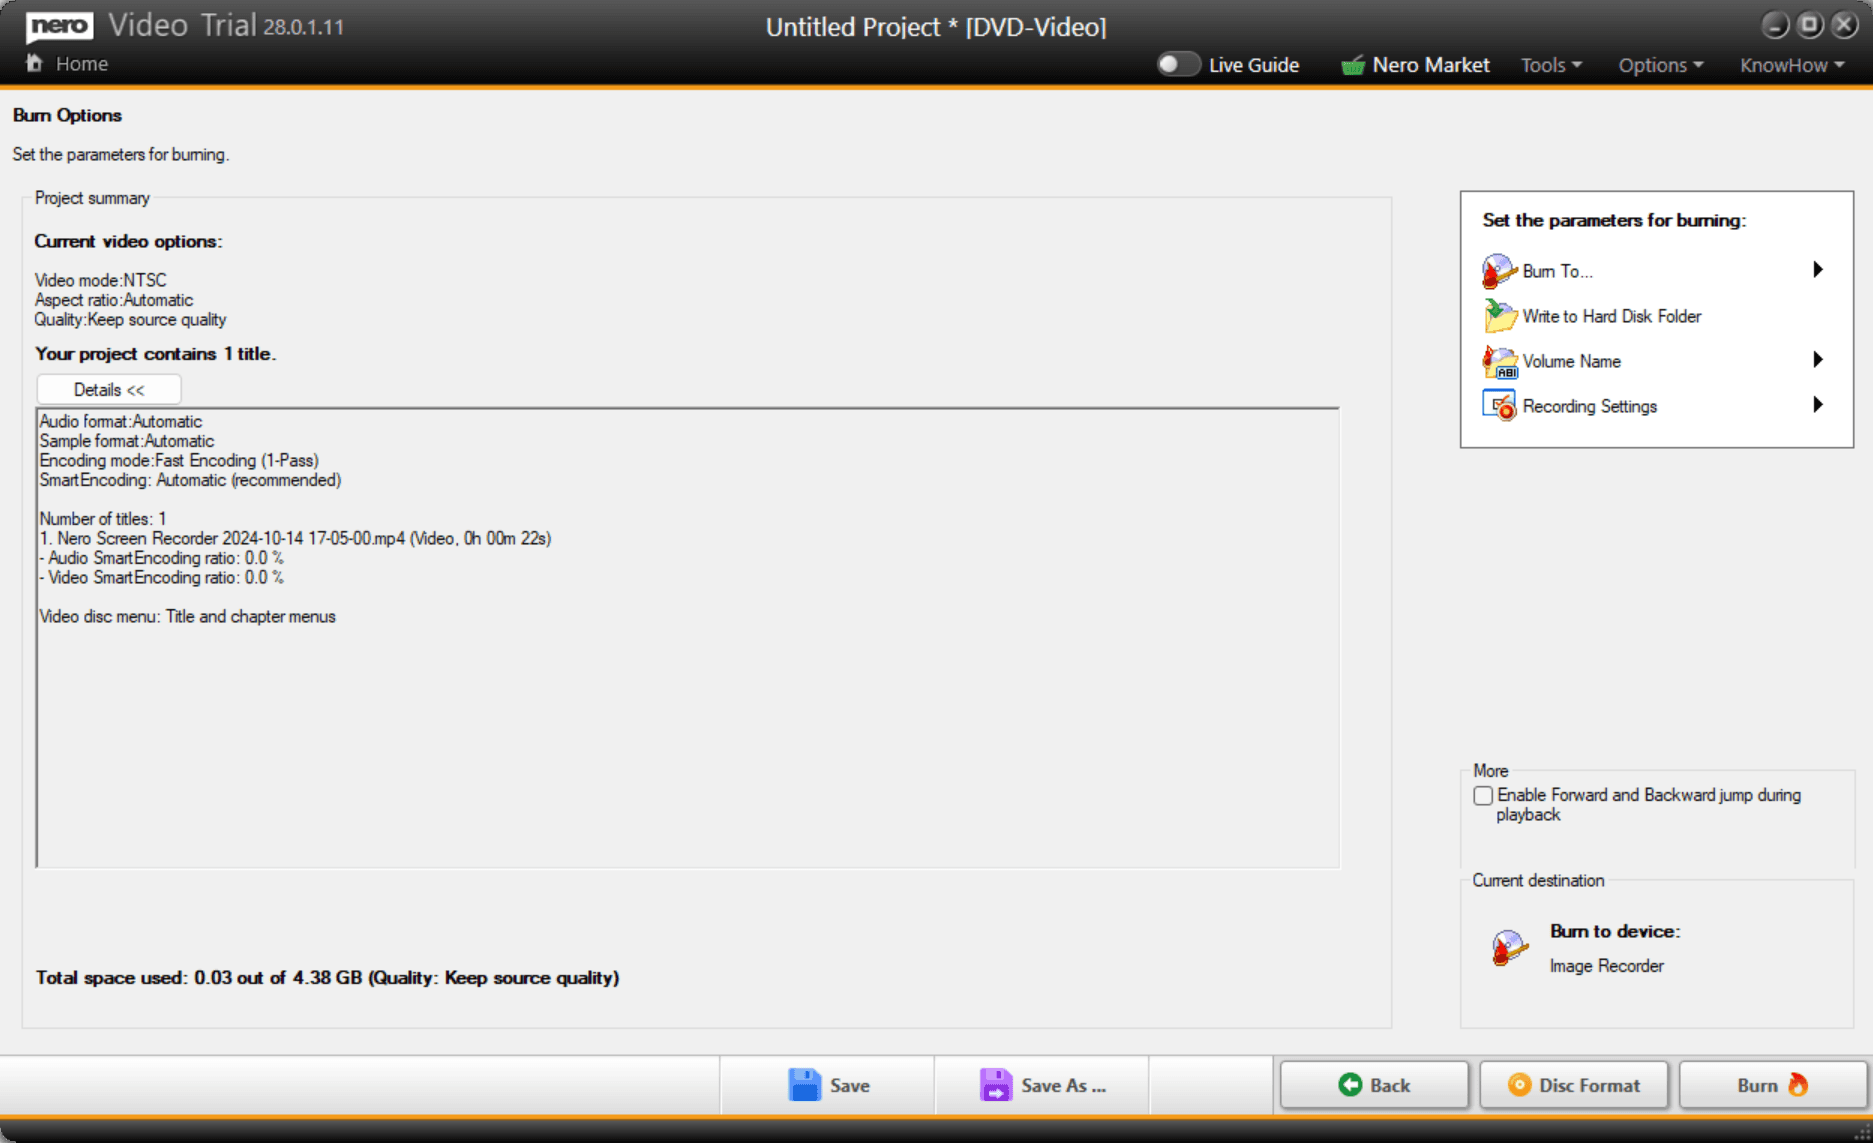
Under Write to, select your DVD burner. If you'd like to make the disc later or burn several copies, you can instead write the project to a hard-disk folder or an image file.
Give the disc a clear volume name, for example
SMITH_WEDDING_2026.Choose a moderate writing speed. For home-burned discs meant for older players, a slower speed is often more reliable than the maximum.
Click Burn.
Nero Video first converts your video to DVD-Video format, then builds the menus, then writes the disc. The conversion step takes most of the time and depends on how long your video is and how fast your PC is. If your source file already matches DVD specifications, Nero's SmartEncoding can skip re-encoding the parts that are already compatible, which saves time. Don't eject the disc or put the PC to sleep until Nero says the burn is complete.
When do you need Nero Burning ROM or Nero Express? For this workflow, Nero Video handles both authoring and burning. You'd only need a separate burning app if you saved the project as a
VIDEO_TSfolder or image file and want to burn it later or make several copies. Nero Burning ROM can burn a DVD-Video folder that's already been authored, but it doesn't convert MP4 or other video files itself. You can get it here: Download Nero Burning ROM.
Step 7: Test the Disc on a Real DVD Player
A disc that plays on the PC that burned it hasn't been fully tested yet. Before you give it away or make more copies, test it where it will actually be watched.
On a standalone DVD player: Insert the disc and run through the same checks as in Step 5, this time with the real remote. Make sure the menu loads, each button starts the right title, the Menu button brings you back, and the picture fills the screen correctly. Also check for any stutter or freezes, especially near the end of the disc, where burn errors tend to show up first.
On a Windows PC: If you don't have a DVD player available, you can test in Nero DVD Player, which plays DVD-Video discs and supports menu and chapter navigation. Windows 11 doesn't include built-in DVD movie playback, so you'll need a dedicated player app for this. For setup help, see How to Play DVDs on Windows 11.
If the Disc Doesn't Play
The player says "No Disc" or "Unknown Disc": Try a DVD-R instead of a DVD+R, or the other way round. Some older players only read one type. Also make sure you created a DVD-Video project and not a data disc.
The picture is black and white, rolling, or missing: The PAL/NTSC setting doesn't match the player or TV. Go back to Recording Format Options, change it, and burn again.
Playback freezes partway through: Burn a new copy at a slower speed on good-quality blank media.
The picture looks soft: That's expected when HD or 4K footage is converted to standard-definition DVD. If it also looks blocky, the project was probably squeezed too hard with Fit to disc. Use a dual-layer disc or split the content.
The disc opens as a folder in File Explorer: That's normal on a PC. Open it in a DVD player app with its "Open Disc" command instead of double-clicking the files.
Frequently Asked Questions
Can I just copy an MP4 to a DVD and play it on my DVD player?
Usually not. Most standalone DVD players need the DVD-Video format, which stores converted video in a VIDEO_TS folder with the menu and navigation data. To create that structure from an MP4, you need DVD authoring software such as Nero Video.
Can I make a DVD with a menu on Windows 11 without extra software?
No. Windows 11's built-in burning tools only make data discs. To make a DVD-Video with a menu that works in a DVD player, you need a DVD authoring tool.
How much video fits on a DVD?
A single-layer DVD holds about 4.7 GB and a dual-layer DVD holds about 8.5 GB. The actual running time depends on the encoding quality you choose. Nero Video's Full-O-Meter shows whether your project fits before you burn.
Will my 4K video stay 4K on a DVD?
No. DVD-Video is a standard-definition format, so HD and 4K footage is converted down to DVD resolution. To keep HD quality on a disc, you'd need to make a Blu-ray.
Should I choose PAL or NTSC?
Choose the standard used where the disc will be watched. NTSC is used in North America and Japan. PAL is used in most of Europe, Australia, and much of Asia.
Can I skip the menu and have the video start automatically?
Yes. On the Edit Menu screen, choose Do not create a menu, and the disc will start playing as soon as it's inserted.
Make a Disc That Anyone Can Play
Making a DVD-Video in Nero Video follows four screens in order: Content for your finished video and disc capacity, Edit Menu for the menu theme, Preview for testing navigation with a virtual remote, and Burn Options for writing the disc. Once you understand how DVD-Video differs from a data disc, and you choose the right TV standard and disc size, the process takes a few clicks. The step that makes the most difference is the last one: testing the disc on a real player before you give it to anyone.