You catch the car at the right moment. The framing works, the lighting looks good, and the shot has a real sense of speed.
Then you open the photo at full size.
The wheels look soft. Parts of the body have blended into the track, and the front wing is difficult to make out. It is still a decent racing photo, but it may not be clear enough for a wallpaper, thumbnail, article header, or print.

This happens often in F1 and sports photography. Cars move quickly, and photographers usually work from a distance. A slight camera shake or missed focus can affect the whole image.
Cropping and compression make things worse. Once a small photo has been saved, shared, and downloaded several times, much of its original detail may already be gone.
AI cannot recover information that no longer exists. It can still reduce visible blur, clean up partially visible edges, and increase the output resolution.
This guide uses Nero AI Image Upscaler Desktop to fix blurry F1 photos. The desktop app lets you choose an upscale model, apply Fix Blur or Enhance Sharpness, recover faces, and export images at up to 8x or 32K.
Can AI really unblur photos?
AI can make a blurry photo easier to see by analyzing motion trails, camera shake, soft focus, and compression damage. It uses the remaining shapes and textures to rebuild unclear edges. Nero AI Image Upscaler pairs four upscale models with separate Fix Blur, Enhance Sharpness, Recover, and Skin retouch controls.
This is different from applying a standard sharpening filter.
Basic sharpening increases contrast around edges that already exist. It can help with a slightly soft photo, but stronger settings often create bright outlines and extra noise. An AI model looks at more of the image. It considers the direction of the blur, the shape of the subject, nearby textures, and the boundary between the foreground and background.
In an F1 photo, that may help define the car body, tires, helmet, or track markings. A blurred edge can become cleaner, and a cropped image may hold up better at a larger size. The result is still a reconstruction. Small logos, car numbers, faces, and mechanical parts may look believable without being completely accurate.
That matters when the image is being used as a historical reference or technical record. For a thumbnail or wallpaper, a small reconstruction error may be less important. For documentation, it needs to be checked.
Why photos become blurry
Blur does not always come from the same problem. Its shape often tells you whether Fix Blur, sharpening, or upscaling is more suitable.
Motion blur
Motion blur usually follows a clear direction because the subject changes position while the shutter is open.
In an F1 photo, the car body, wheels, and lettering may stretch along the direction of travel. A panning shot can still have a sharp car while the background remains blurred.
The amount of blur depends on shutter speed, subject speed, and shooting angle. AI tends to work better when the motion trail is short and the original edges are still partly visible.
Camera shake
Camera shake affects more than the moving subject. The car, barriers, track markings, and background may all show similar softness or doubled edges.
This problem is more noticeable with long lenses because small camera movements become magnified. Unlike normal motion blur, the blur may run in several directions rather than following the car.
AI can reduce mild shake, but heavy movement often removes too much structure for an accurate recovery.
Out-of-focus blur
Focus blur produces soft edges rather than directional trails.
The car may look uniformly unclear, while an area in front of or behind it appears sharper. Helmets, tires, and body panels lose definition without looking stretched.
Slight focus errors can often be improved. When the subject is far outside the focus plane, the image contains fewer real edges for the model to rebuild.
Low resolution and heavy cropping
Cropping does not create blur by itself, but it exposes the limits of the original file.
Once a small car is enlarged, sensor pixels, jagged lines, and compression damage become much easier to see. Fine details such as suspension parts and small lettering may no longer contain enough information.
Upscaling can improve edge continuity and make the image more usable. It cannot reliably restore details that were never captured at a readable size.
JPEG and video compression
JPEG and video codecs remove fine image data to reduce file size. Moving edges, small text, smoke, rain, and detailed backgrounds are often affected first.
Compression can produce block patterns, ringing around the car, and smeared color transitions. These artifacts may look like ordinary blur, but they require both cleanup and detail reconstruction.
AI can make the image look cleaner. Small logos and car numbers still need checking because the model may generate plausible but incorrect characters.
Heat haze and atmospheric distortion
Track heat can bend light between the camera and the car. This creates wavering edges that change from one frame to the next.
The effect is common with long lenses and distant subjects, especially above hot asphalt. It may make the rear of the car or background look as though it is melting.
Heat haze is harder to correct than simple motion blur because the distortion is uneven. AI may improve the overall image, but it cannot always rebuild the exact original shape.
Which AI model should you use?
The table below offers a practical starting point.
Photo type | Recommended setting | Reason |
Motion blurred F1 car | Standard with Fix Blur | Reduces visible trails and cleans up the car outline |
Slightly soft racing photo | Standard with Enhance Sharpness | Adds definition to existing edges |
Driver portrait | Photograph with Recover | Handles faces and natural photographic detail |
Low resolution screenshot | Iris with Fix Blur | Works with small or compressed sources |
Heavily cropped racing photo | Standard or Iris at 4x | Adds room for editing and display |
Racing illustration | Anime | Keeps illustrated lines and textures |
Standard is the sensible first choice for most F1 action photos. Use Photograph when the person matters more than the vehicle. Iris may work better when the source is tiny or badly compressed.
Add Enhance Sharpness only if the result remains soft. Turning on every control at once makes it harder to tell which setting caused a problem.
Some images contain several issues at the same time. A video frame might be small, compressed, and motion blurred. In that situation, test Standard and Iris separately. The more aggressive model does not always produce the better image.
Unblurring is only one part of image enhancement. If you are also comparing enlargement quality, AI models, face recovery, batch processing, pricing, and hardware requirements, see our guide to the best AI image upscalers in 2026.
Online vs desktop: Which is better for photo unblur?
Nero AI handles blur correction differently online and on desktop.
Online, Image Unblur and Image Upscaler are two separate tools. In Nero AI Image Upscaler Desktop, Unblur is one of the available AI models. Blur repair and enlargement therefore stay in the same desktop workflow.
Quick comparison
Feature | Online Image Unblur | Online Image Upscaler | Desktop Unblur model |
Access | Runs in a browser | Runs in a browser | Requires Nero AI Image Upscaler Desktop |
Main purpose | Correct blur | Enlarge low resolution images | Correct blur while preparing a larger output |
Best suited to | Motion blur, camera shake, and missed focus | Small, cropped, or low resolution images | Images affected by both blur and limited resolution |
Model selection | Dedicated unblur process | Photo, Anime, Standard, and Iris | Unblur is selected as an AI model |
Enlargement | Not the main purpose | 2x, 4x, or 8x | Up to 8x, 32K, or 1024MP |
Workflow | Quick single-purpose correction | Online upscaling and detail improvement | Model testing, large output, and batch work |
Nero AI online: Image Unblur and Upscaler
Nero AI Image Unblur is built for photos affected by motion blur, camera shake, or missed focus. It runs directly in the browser and focuses on correcting the blur rather than increasing the image size.
This makes it a practical choice when the photo is already large enough. For example, an F1 image may have enough resolution for social media but still show light camera shake or a soft car outline.
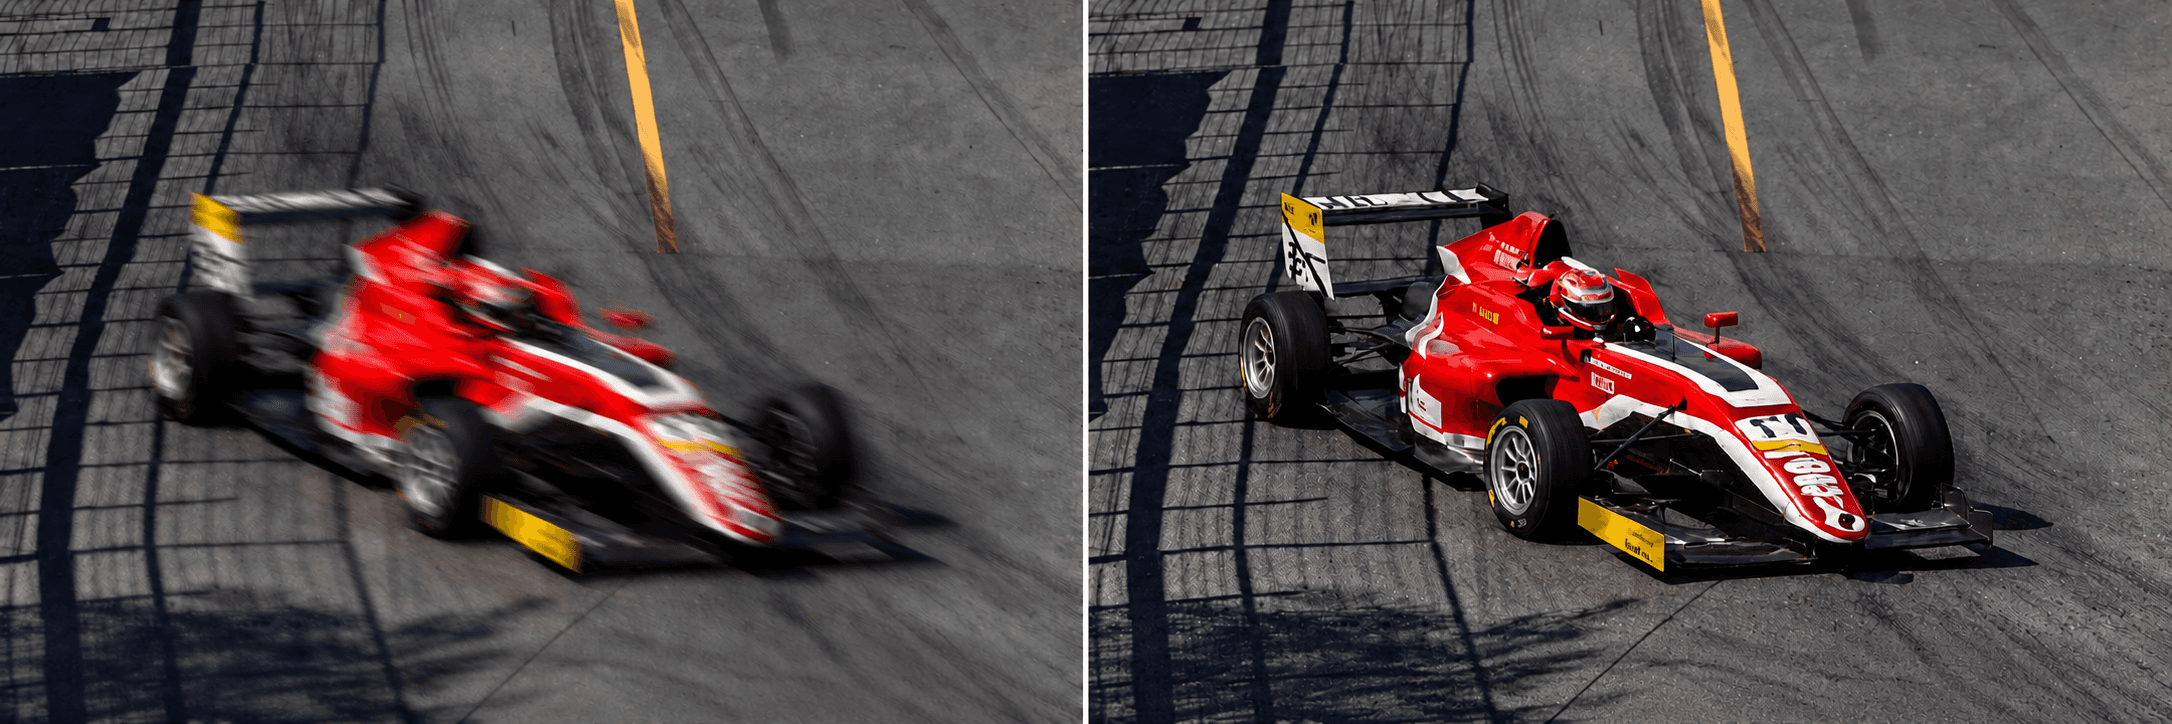
This short demonstration shows Nero AI Image Unblur reducing visible blur in an F1 image and making the car’s outline and details easier to see.
Nero AI Image Upscaler serves a different purpose. It enlarges low resolution images and offers Photo, Anime, Standard, and Iris models, along with 2x, 4x, and 8x output options.
Use the online Upscaler when the car is too small in the frame or the image has lost detail after cropping. When a photo is both blurry and low resolution, you may need to process it with both online tools.
Nero AI Image Upscaler Desktop
In Nero AI Image Upscaler Desktop, Unblur is part of the model list rather than a separate tool. It is designed for motion blur, camera shake, focus problems, and compression artifacts.
This setup works better when blur correction is only one part of the job. A small F1 screenshot, for instance, may need the Unblur model and a 4x enlargement before it is suitable for a thumbnail or wallpaper.
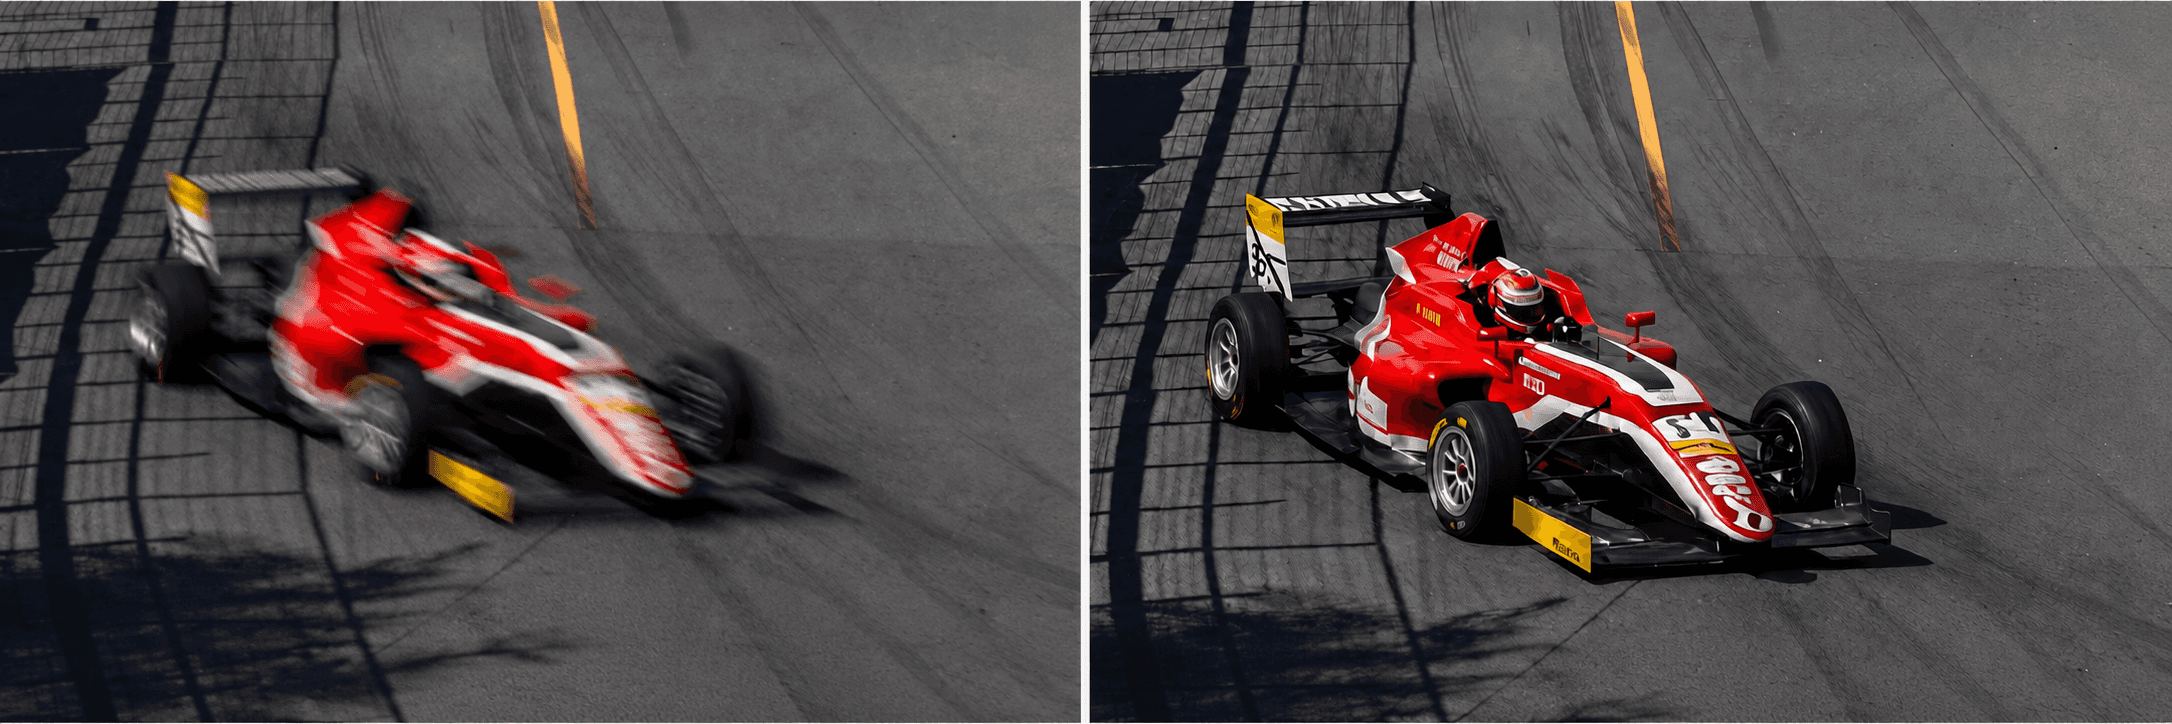
The desktop app also supports output up to 8x, 32K, or 1024MP. Batch processing can handle up to 100 images in one run.
Choose the online Image Unblur tool for a quick blur fix. Use the online Image Upscaler when resolution is the main issue. The desktop Unblur model is the better fit when the photo needs blur repair, enlargement, and closer control in one workflow.
How to unblur photos with Nero AI Image Upscaler Desktop
The steps below use Nero AI Image Upscaler Desktop. The desktop app lets you choose an upscale model, apply blur correction, recover faces, and export larger images.
Step 1. Import your blurry photo
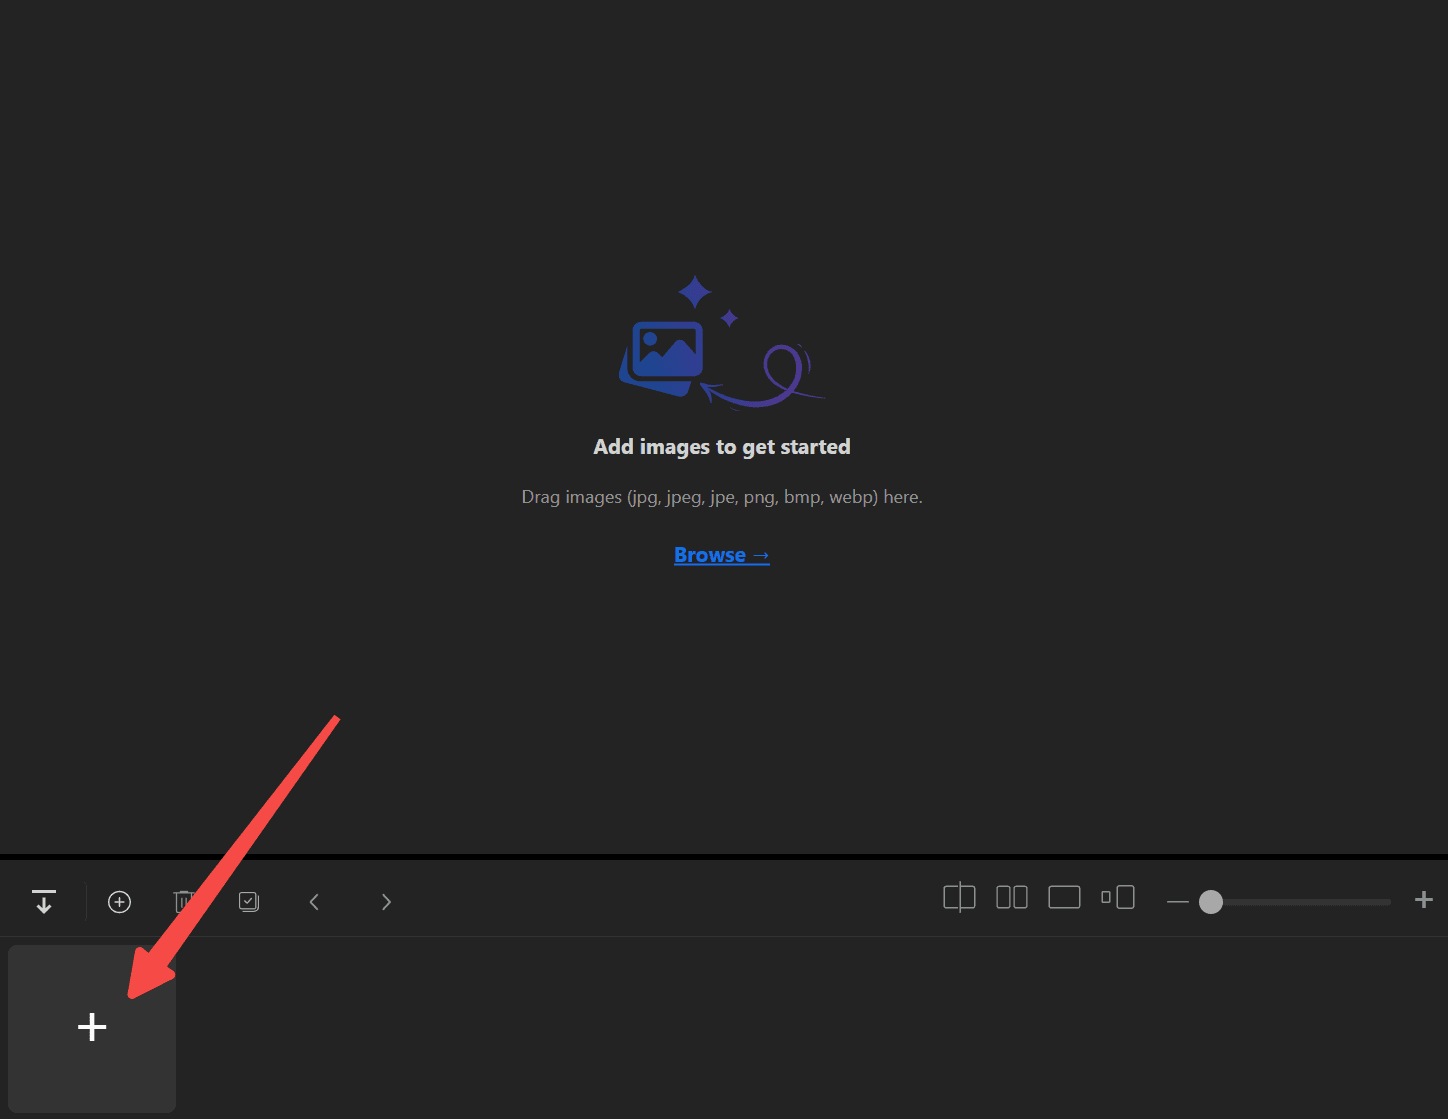
Open Nero AI Image Upscaler Desktop and add the image you want to fix.
Use the original camera file or highest resolution copy available. Avoid screenshots and compressed social media downloads when possible.
Step 2. Choose the upscale size
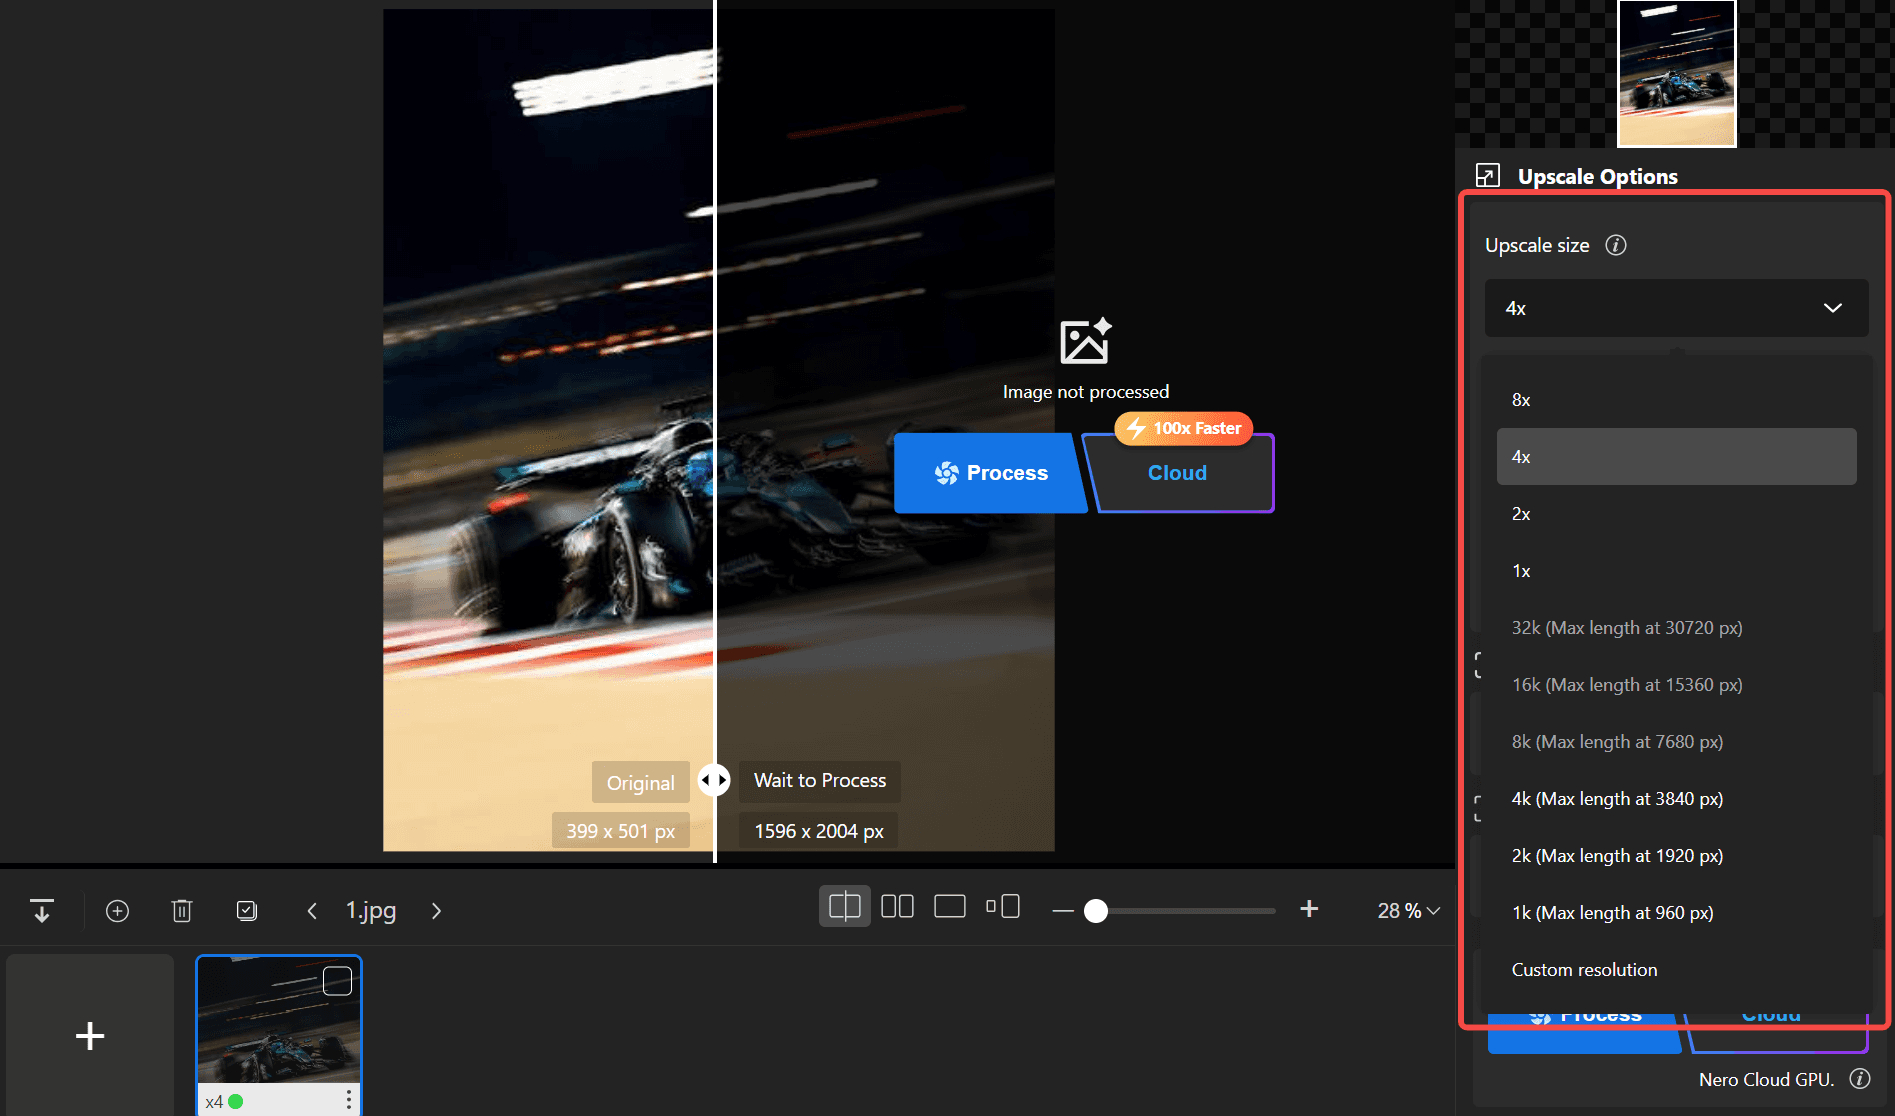
Select 1x, 2x, 4x, or 8x based on the source image and final use.
A 2x or 4x upscale is enough for most F1 photos. Use 8x only when you need heavy cropping, large prints, or very high resolution output.
The maximum output can reach 32K or 1024MP.
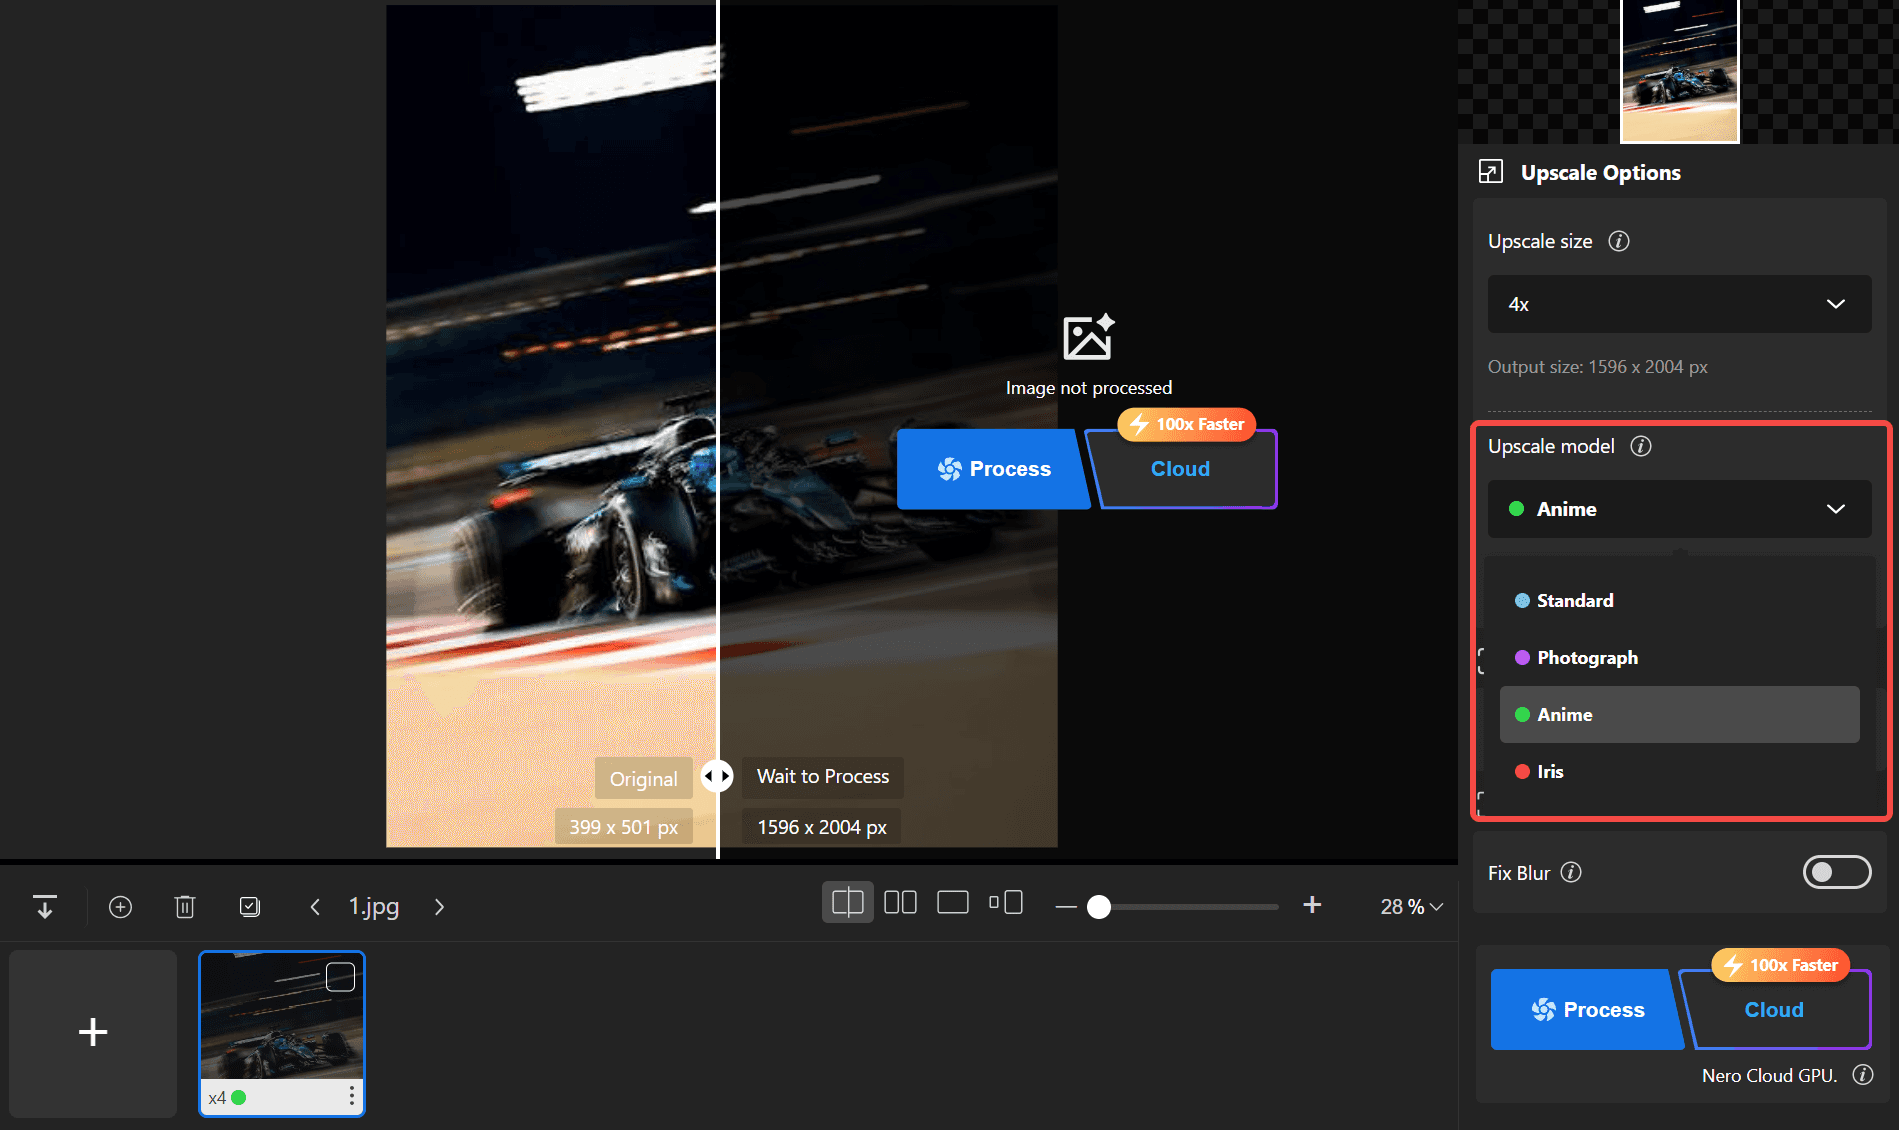
Step 3. Choose the right upscale model
Nero AI Image Upscaler Desktop includes four upscale models.
Standard
Standard suits most F1 photos, cars, and track scenes. Start here when the vehicle is the main subject.
Photograph
Photograph works better for portraits and natural skin tones. Choose it for drivers, team members, and paddock photos.
Anime
Anime is made for illustrations, manga, and stylized racing artwork. It is not intended for normal track photography.
Iris
Iris is useful for very small, cropped, or compressed images. Check logos, car numbers, and fine vehicle parts after processing.
Step 4. Turn on Fix Blur
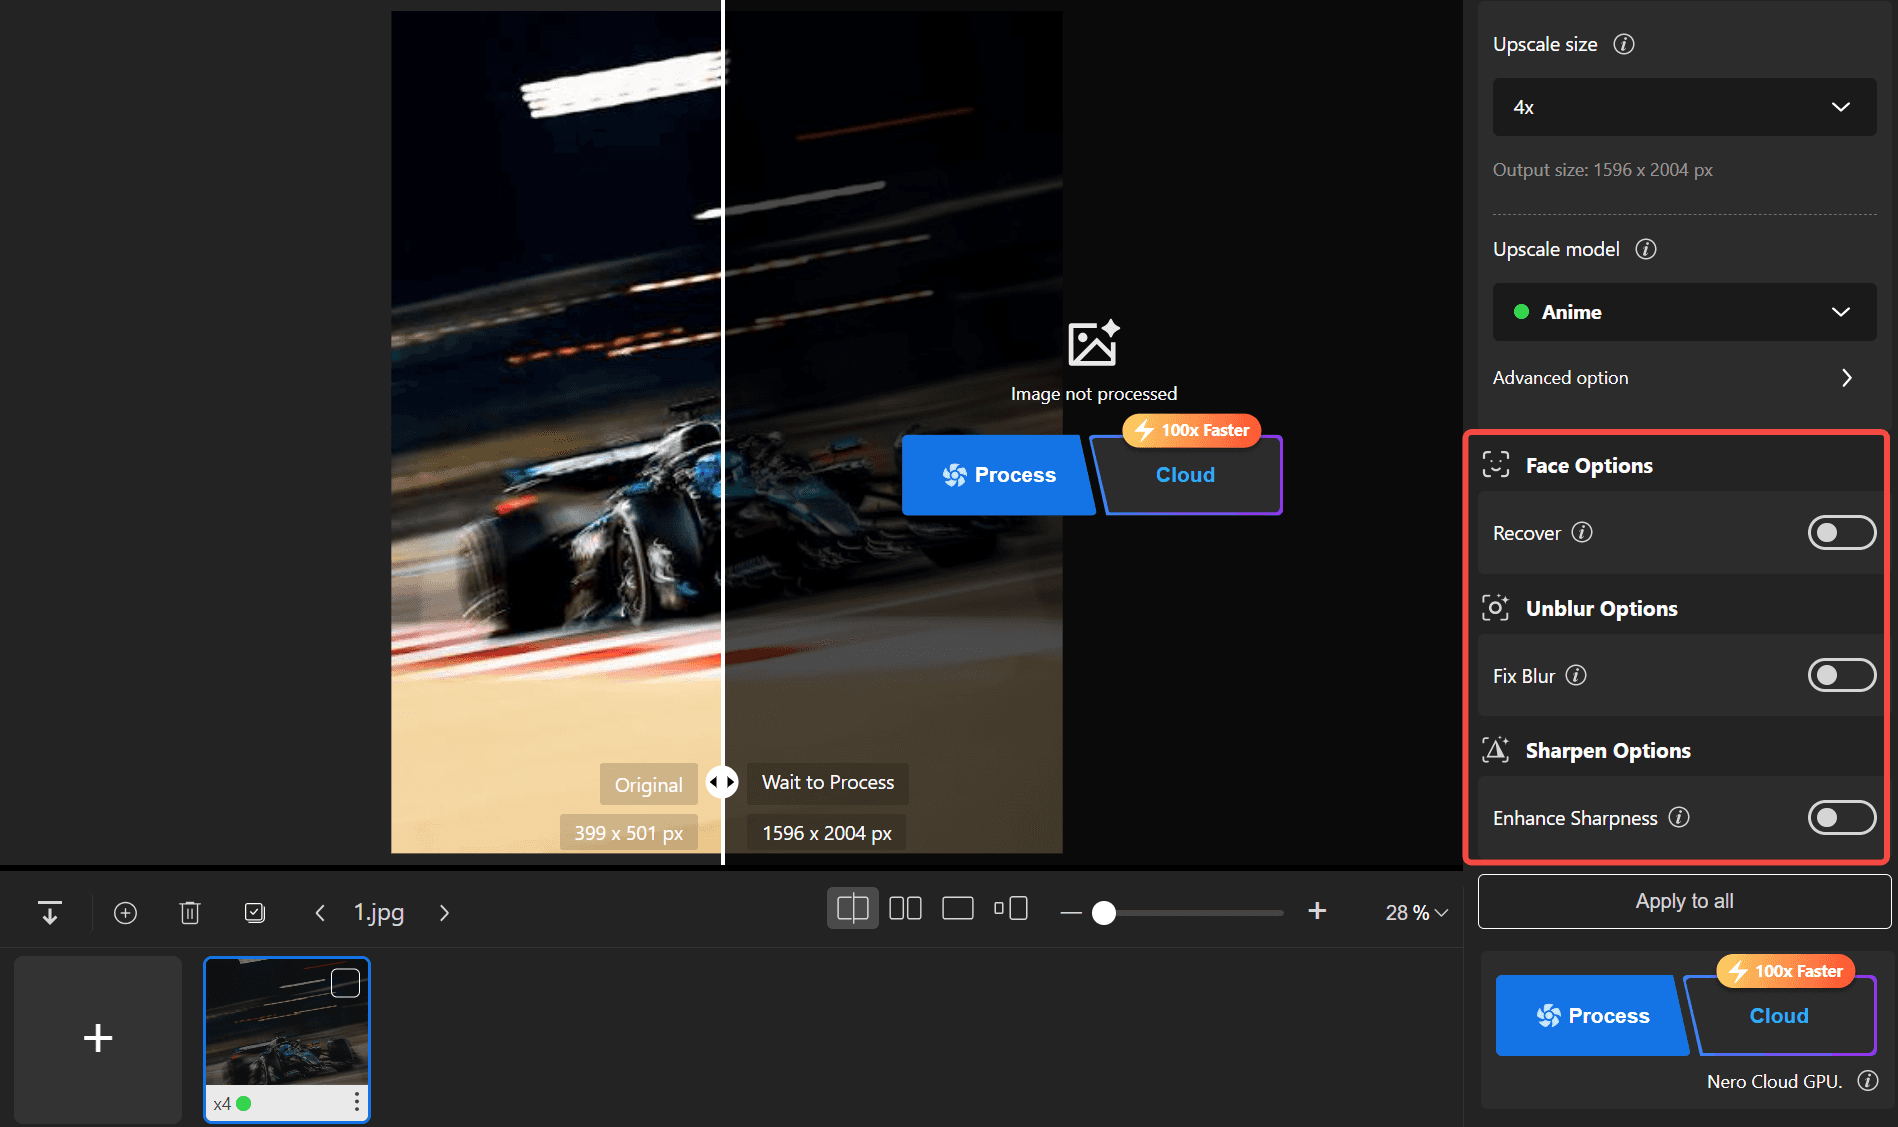
Enable Fix Blur for motion blur, camera shake, missed focus, or soft compressed edges.
For most blurry F1 shots, start with Standard, Fix Blur, and a 2x or 4x upscale. Leave Enhance Sharpness off for the first test.
Step 5. Add Enhance Sharpness if needed
Turn on Enhance Sharpness when the car is recognizable but still looks soft.
Use it lightly. Strong sharpening can create halos around the vehicle, wheels, fencing, and track lines.
Step 6. Use face options for driver photos
Enable Recover when a driver or another person is clearly visible.
Skin retouch can smooth facial skin, but it does not remove noise from the whole image. Leave both options off when the face is too small to identify.
Step 7. Compare the result
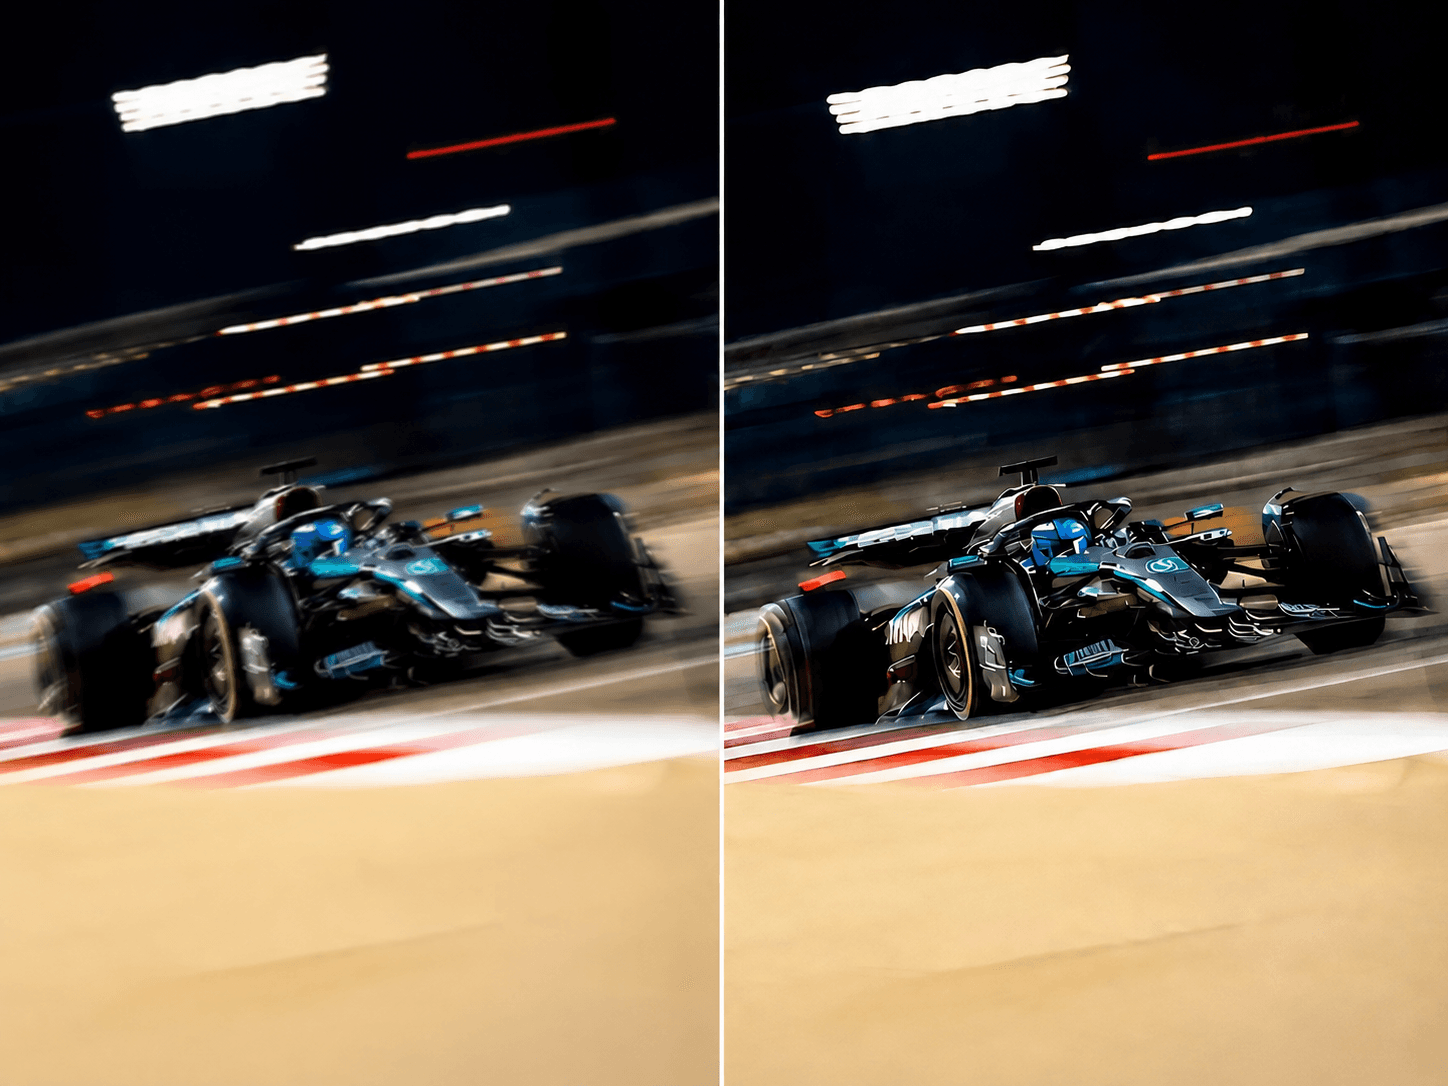
Use Single, Slider, or Split View to compare the processed image with the original.
Zoom in to 100 percent. Check the wheels, wings, helmet, car number, logos, barriers, and track markings for distortion.
Step 8. Export the image
Choose an output size that matches the final use.
A 2x or 4x file is usually enough for websites, thumbnails, and social media. Larger settings make more sense for posters, wallpapers, and further editing.
Nero AI Image Upscaler Desktop also supports batch processing for up to 100 images.

Choose the workflow that fits the photo
There is no single best way to unblur every F1 image. A quick online fix may be enough for one photo, while a larger or more complex file may benefit from a desktop workflow.
Nero AI Image Unblur online is suited to fast browser-based correction. Nero AI Image Upscaler Desktop is useful when you also need model selection, face options, batch processing, or output up to 8x and 32K.
Whichever route you choose, start with the original file when possible. Check the result at full size, especially around wheels, wing edges, logos, and car numbers. The goal is not to remove every trace of motion. A good result keeps the speed of the shot while making the important details easier to see.
Use the online Image Unblur tool for a quick browser workflow, or open Nero AI Image Upscaler Desktop for larger outputs and more processing options:
Frequently asked questions
What is the best way to unblur an image?
Start by identifying the problem.
Motion trails, camera shake, and focus errors are suited to Fix Blur. Enhance Sharpness works better when the image is clear enough to recognize but lacks crisp edges.
Choose an upscale model based on the subject. Process the image once, then inspect it at full size before adding more settings.
Which upscale model is best for F1 photos?
Standard is the best starting point for most cars and track scenes.
Photograph works better when the driver or another person is the main subject. Iris is intended for very small, cropped, or compressed images.
Anime should be used for illustrations and stylized racing artwork.
What is the difference between Fix Blur and Enhance Sharpness?
Fix Blur deals with motion trails, camera shake, focus problems, and blurry edges.
Enhance Sharpness strengthens details that are already present. It can make body panels, tires, clothing, and track textures look clearer.
Too much sharpening may add halos or noise.
Can Fix Blur and Enhance Sharpness be used together?
Yes, but test them one at a time first.
Begin with Fix Blur when the image has obvious motion or focus problems. Add Enhance Sharpness only when the processed result still looks soft.
When both are active, inspect wheels, wing parts, fences, numbers, and logos for unwanted changes.
Can AI make blurry car numbers or sponsor logos readable?
It may improve characters that are already partly visible.
Completely unreadable text cannot be recovered reliably. The software may generate letters or numbers that look correct but are not.
Check important details against another photo or source.
Can Nero AI Image Upscaler output 32K images?
Yes. It supports enlargement up to 8x and output up to 32K or 1024MP, depending on the source and selected settings.
A 32K export is not the same as a native 32K photograph. The file has more pixels, but the original image still determines how much real detail is available.