Protecting privacy in your videos has never been more critical. Whether you're a content creator safeguarding bystander identities, a journalist protecting sources, or simply editing personal footage with sensitive information, knowing how to blur faces effectively is an essential skill. CapCut provides the precision tools and advanced controls you need to blur faces professionally—from simple static shots to complex tracking of moving objects.
The real power lies in CapCut's keyframe system. When you need to blur moving objects or track subjects across your frame, keyframes enable smooth, professional tracking that keeps your blur locked exactly where you need it. This transforms what could be a frustrating manual process into a manageable, precise operation that delivers consistent results.
In this comprehensive guide, you'll master three proven methods to blur faces in CapCut (PC). From rapid solutions for static subjects to advanced tracking techniques for complex motion, you'll discover the right approach for every scenario.
Method 1: Cover-up Stickers (Best for Static Subjects)
For relatively still subjects—think interview setups, podcast recordings, or scenes where faces don't move dramatically—CapCut's sticker feature offers the quickest and most fun solution. This approach works beautifully when you want to blur faces without complex setup, and it even handles gentle movement with a simple tracking upgrade.
Basic sticker workflow:
Navigate to the Sticker tab in CapCut's top menu, then select the Cover-ups category. Here you'll find mosaic patterns perfect for privacy protection, along with playful options like emoji or decorative elements if you want a more creative touch.
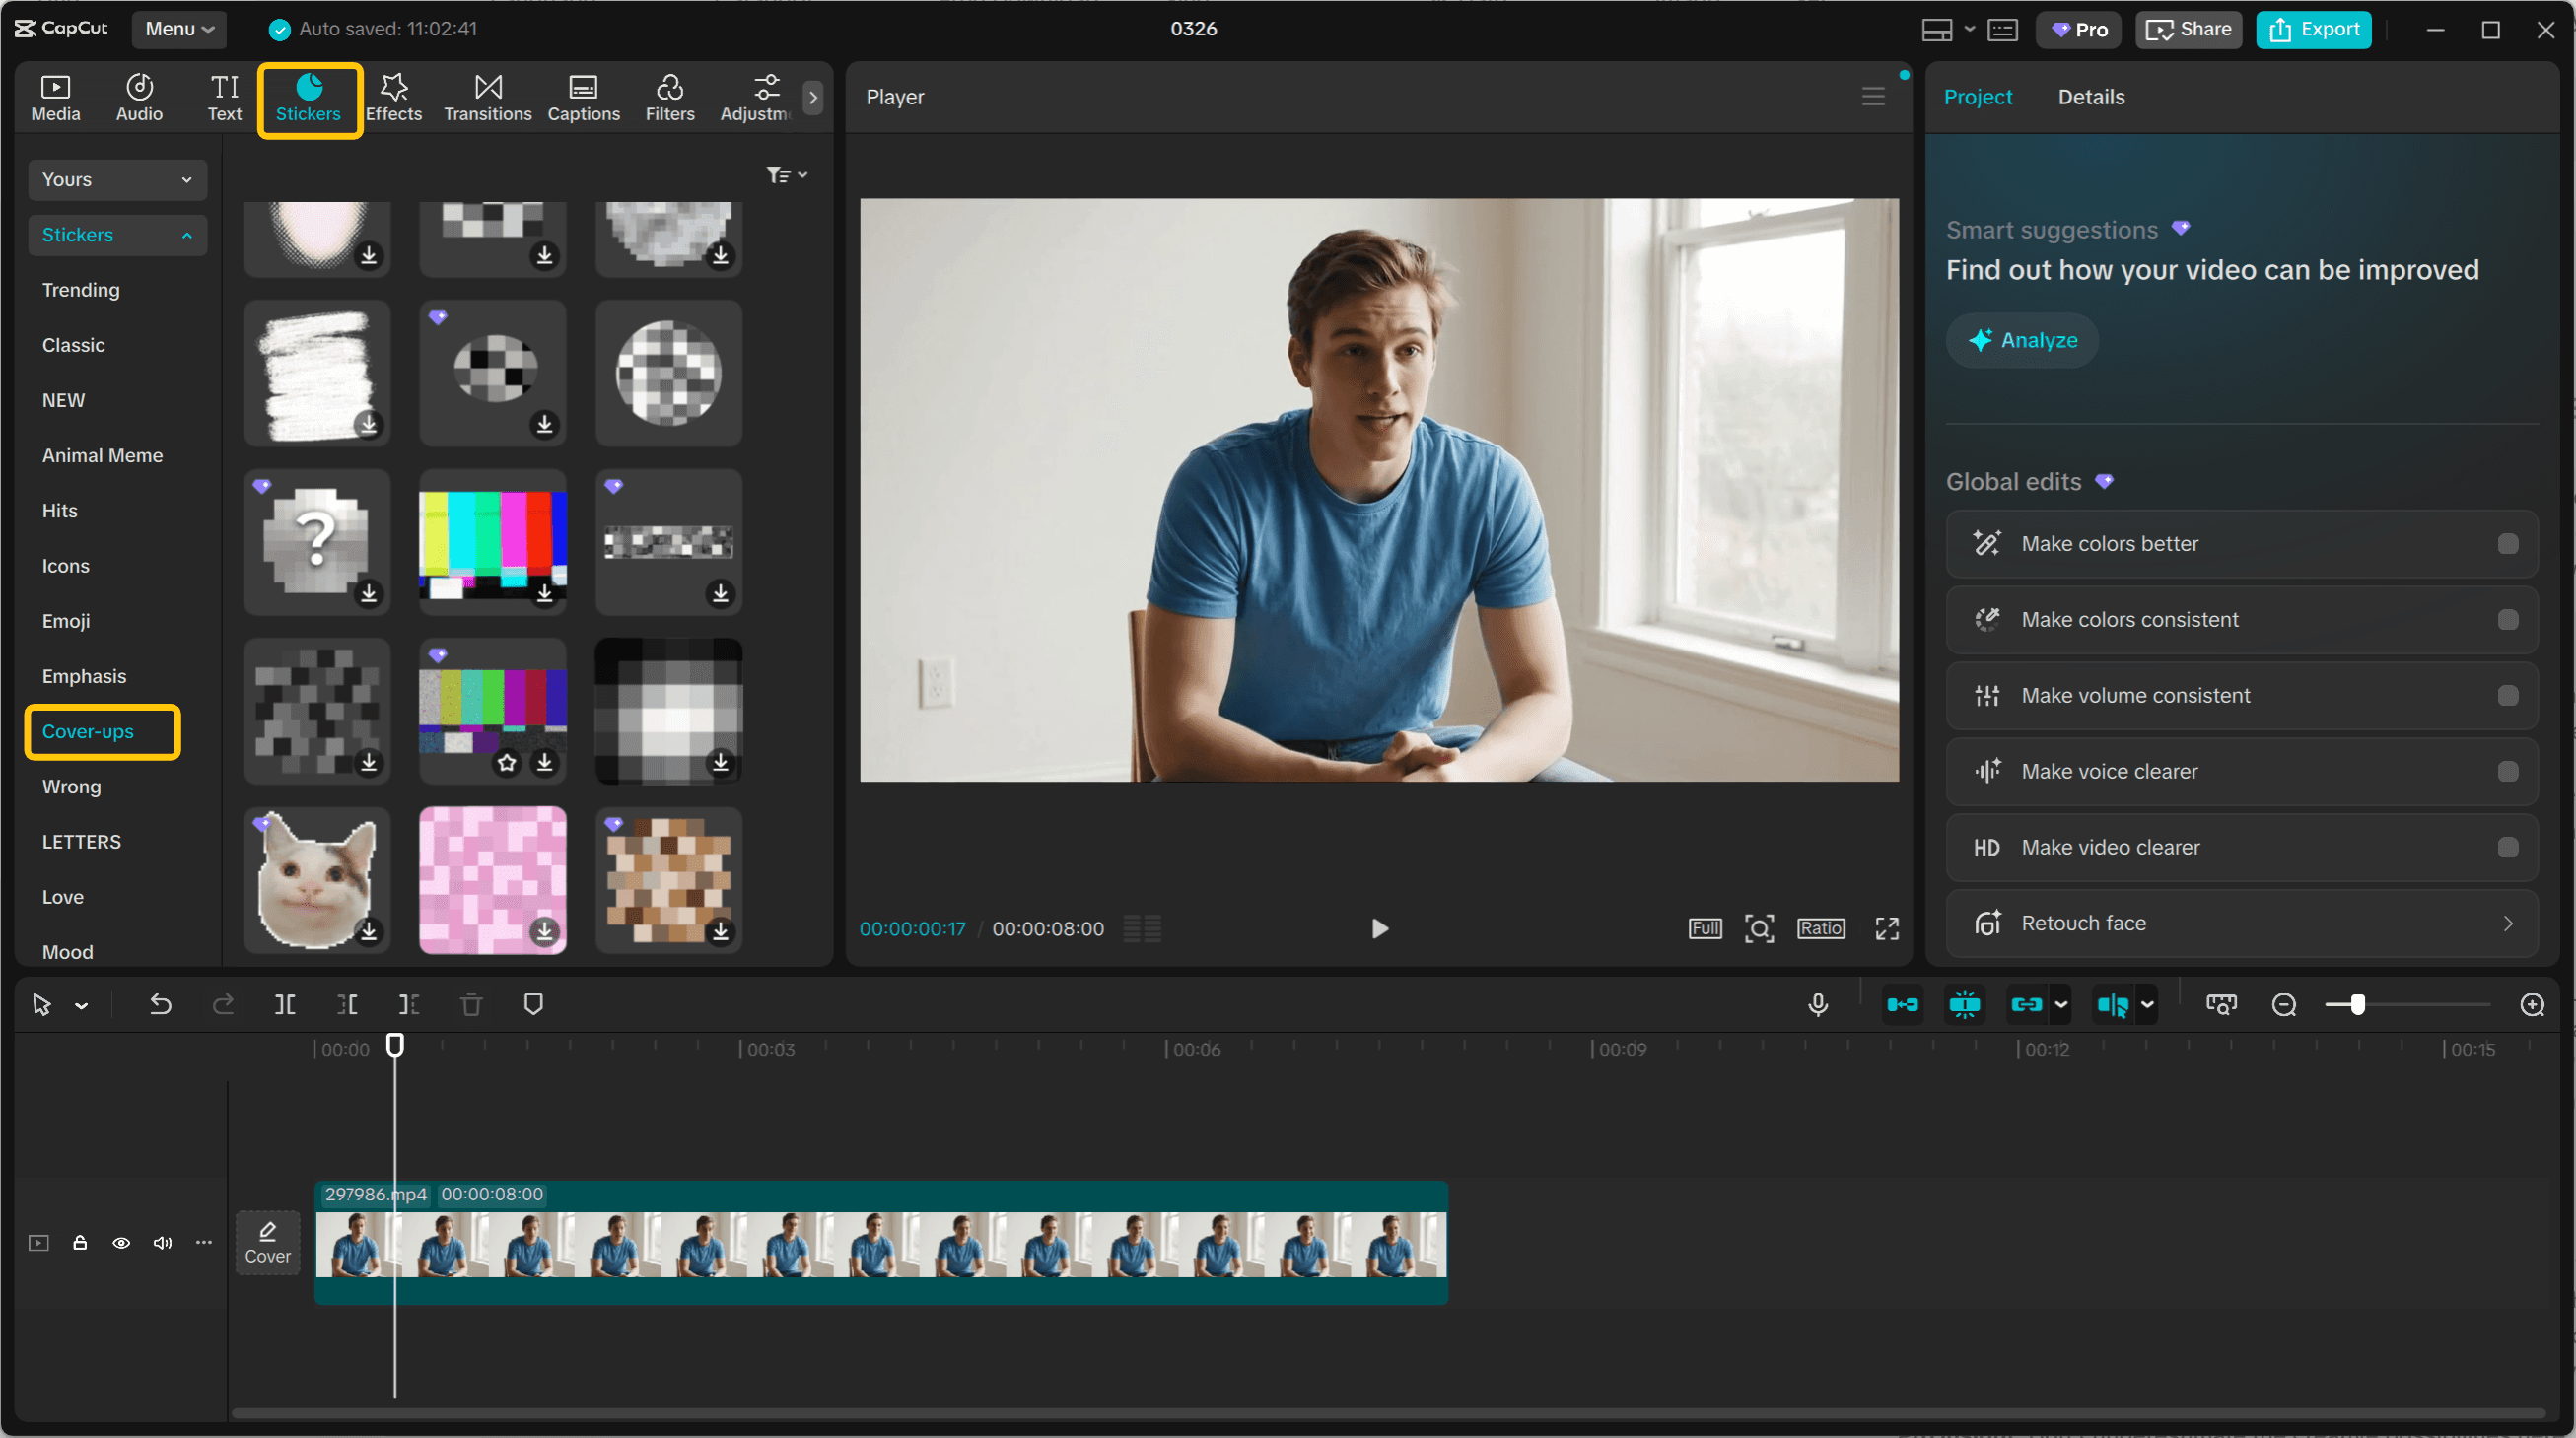
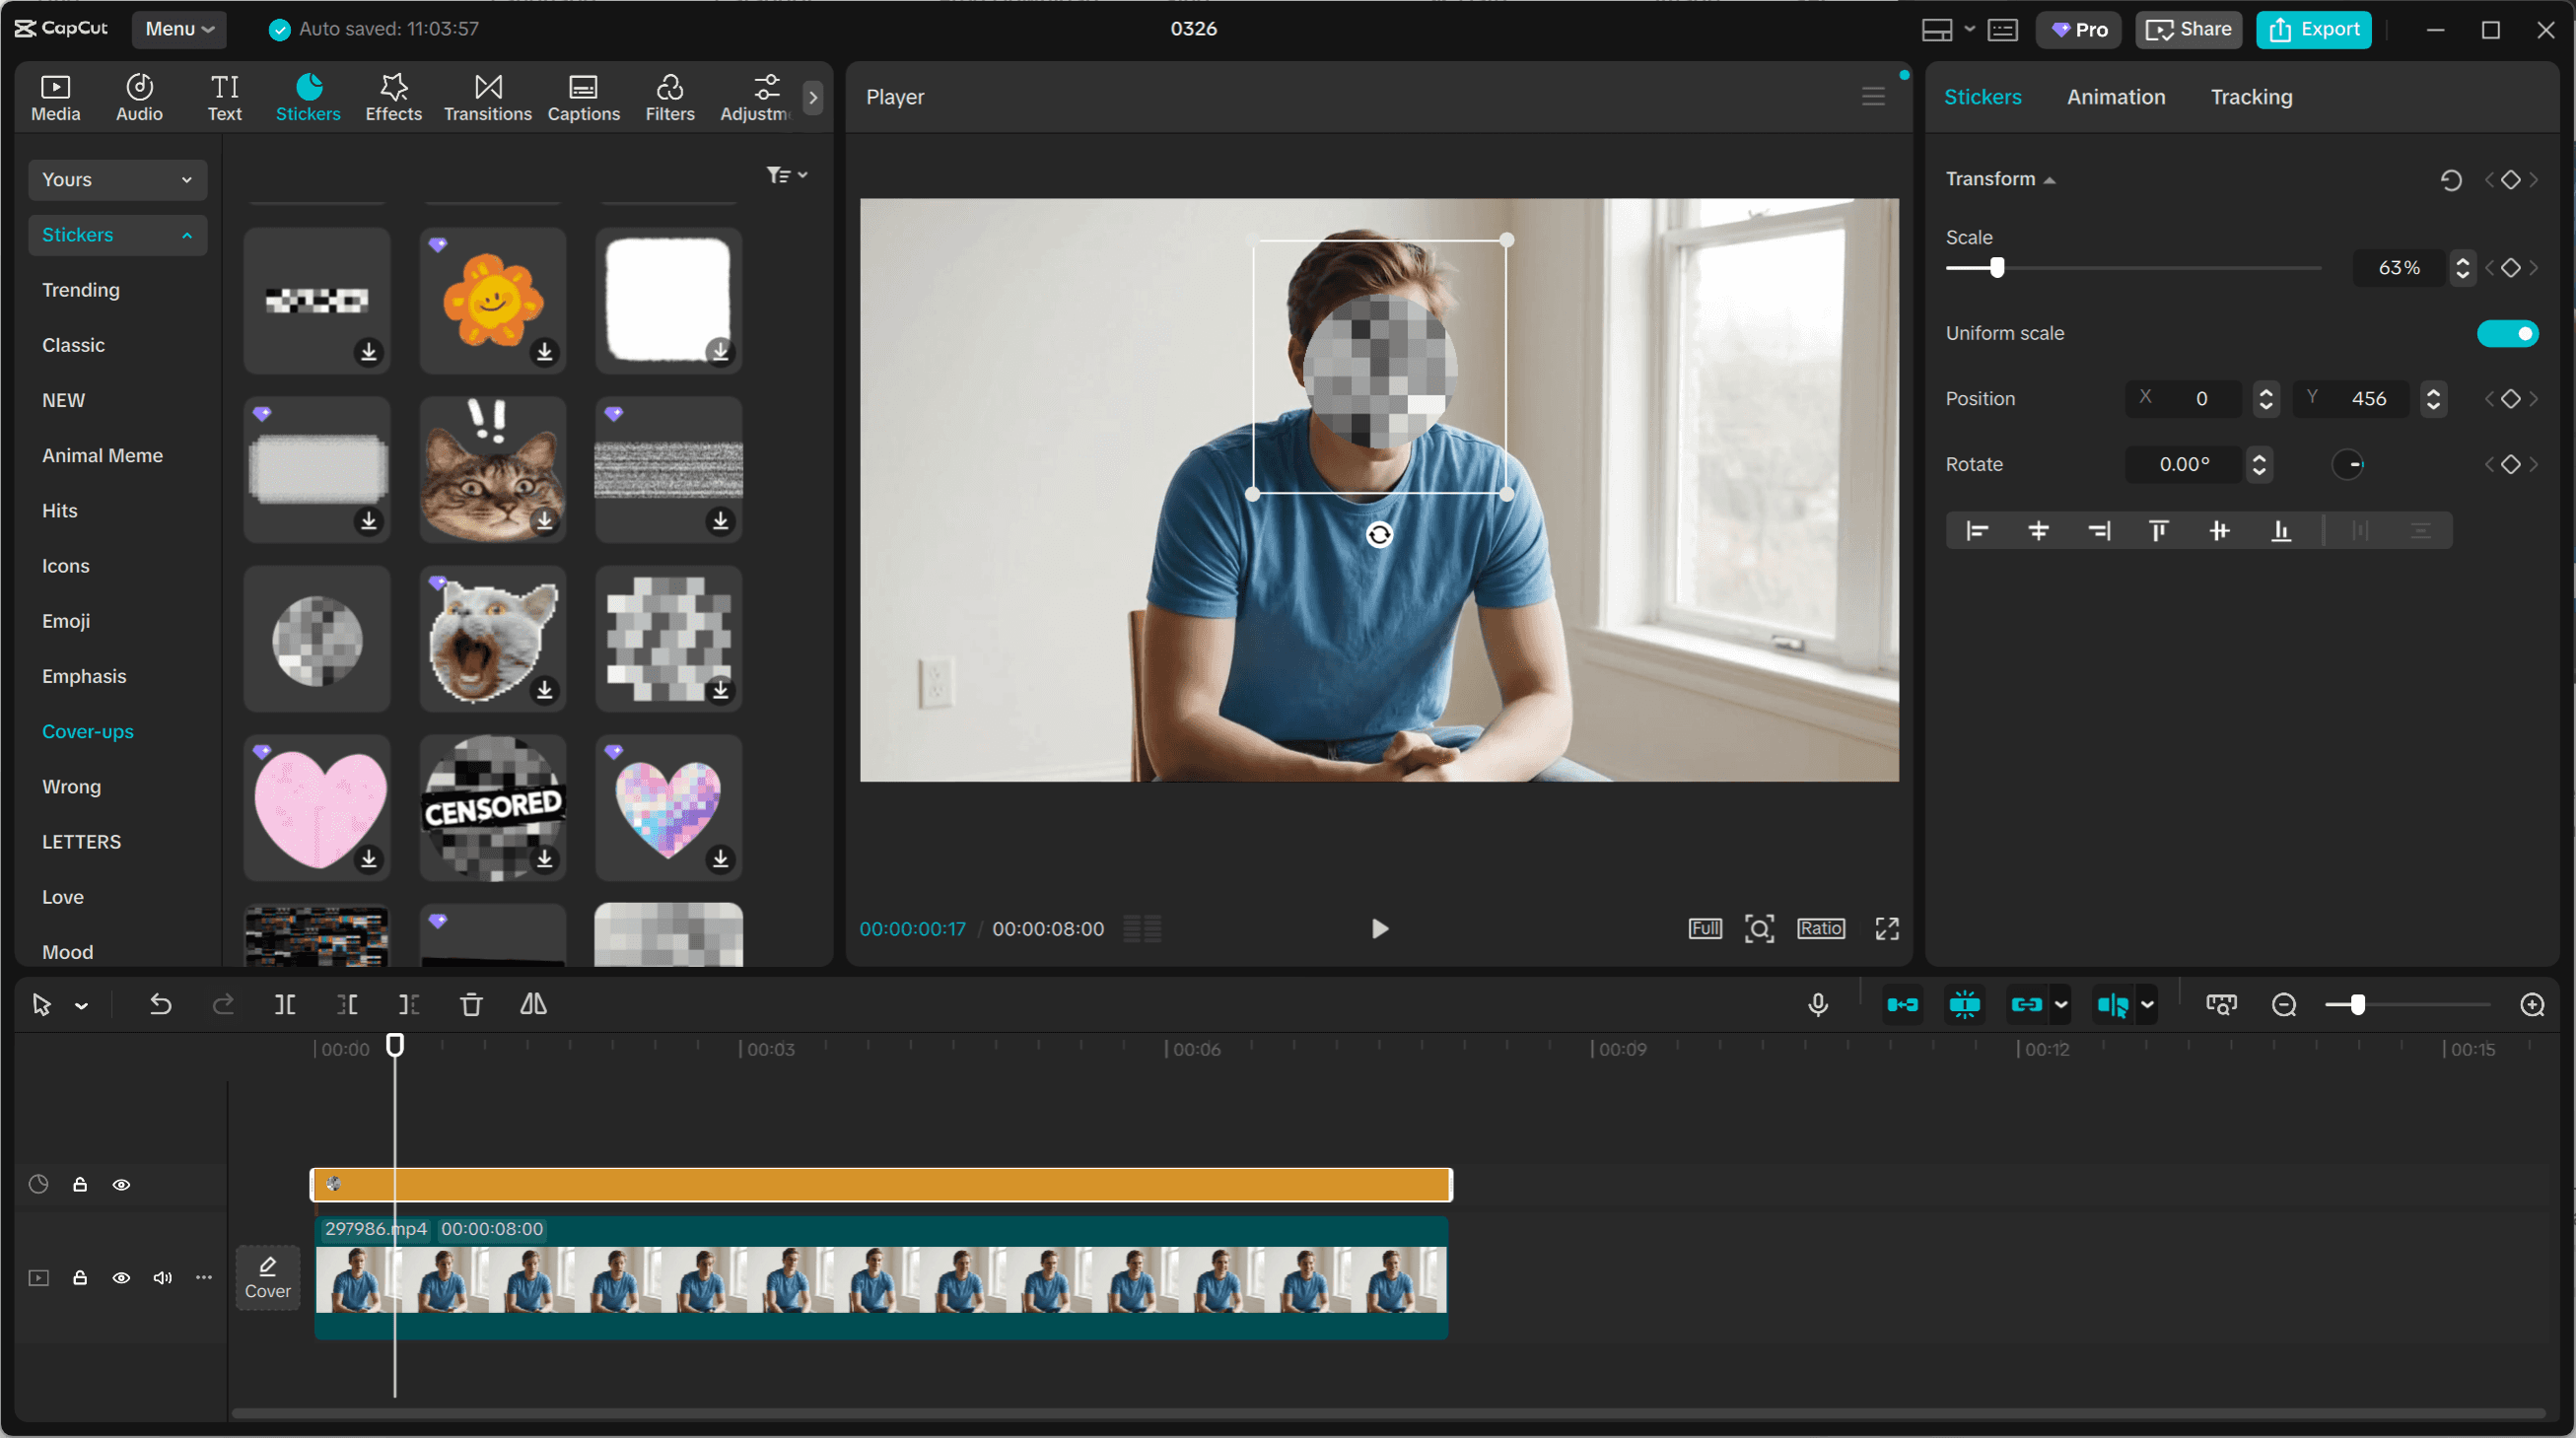
Once you've chosen your sticker, drag it directly onto your timeline above the video clip, then adjust its position and size to cover the face you want to blur. The entire process takes seconds, making it ideal for quick edits where you need immediate results.
Level up with motion tracking:
Here's where this simple method becomes surprisingly powerful. If your subject moves slightly—perhaps shifting in their seat, nodding, or making small gestures—CapCut's built-in motion tracking can follow them automatically.
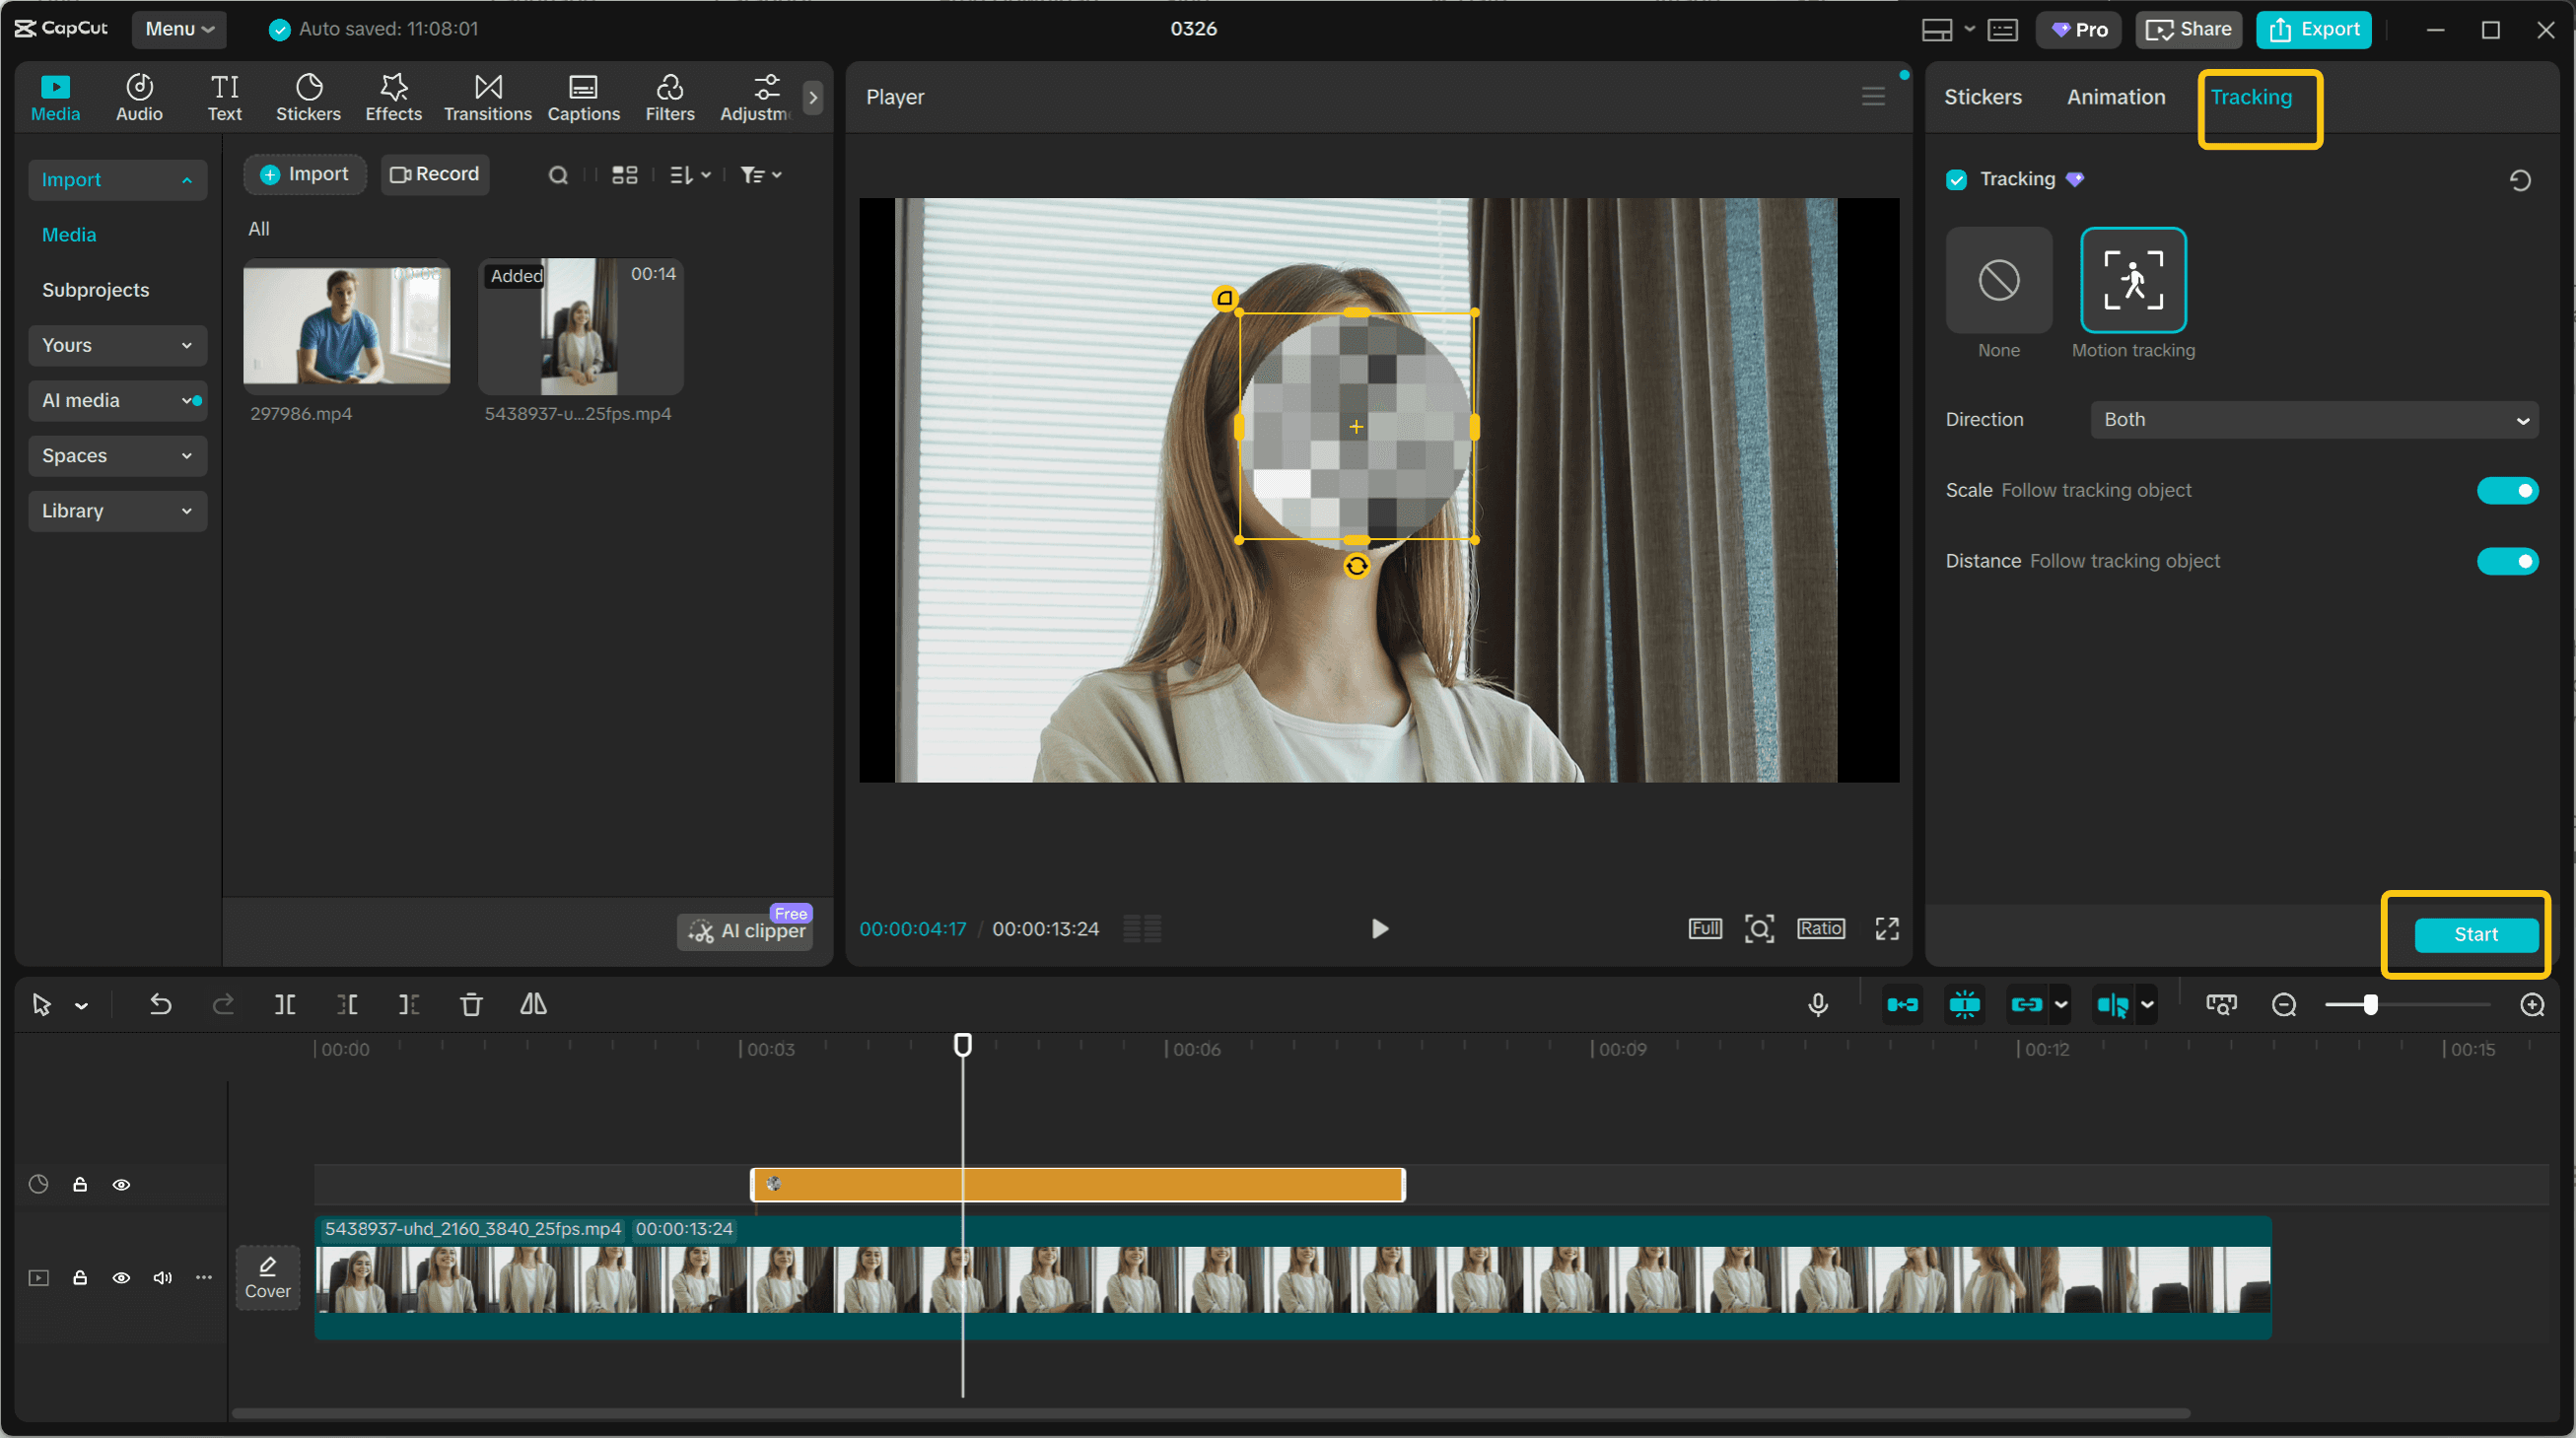
Select the sticker you've placed, then look to the right editing panel and click "Tracking."
Choose "Motion Tracking" from the options.
You'll see a yellow frame appear on the player — position this frame over the face you want to track, then click "Start." CapCut will analyze the movement and keep your sticker locked to that face throughout the clip.
When this method works best:
This sticker approach excels with relatively stationary subjects where movement stays within a predictable range. The motion tracking handles gentle motion beautifully—someone talking while seated, a subject standing in place, or slow walking shots all work well.
For fast-moving subjects or rapid head turns, the tracking may struggle to maintain perfect accuracy, but for the majority of everyday blur needs, this method delivers impressive results with minimal effort.
Pro insight:
Don't underestimate the creative possibilities here. While mosaic stickers provide traditional blur coverage, experimenting with emoji, shapes, or themed stickers can add personality to your content while still protecting privacy. The key is matching your sticker choice to your video's tone—professional content calls for subtle mosaics, while casual vlogs can embrace more playful options.
Method 2: Blur Effect with Mask (Best for Professional Results)
When you need a more polished, professional appearance for blurring faces in CapCut, the blur effect combined with an effect mask delivers superior results. This method offers significantly better tracking accuracy than stickers while maintaining complete control over your blur area. It's the go-to technique when quality matters and you're working with moving subjects that require precise blur placement.
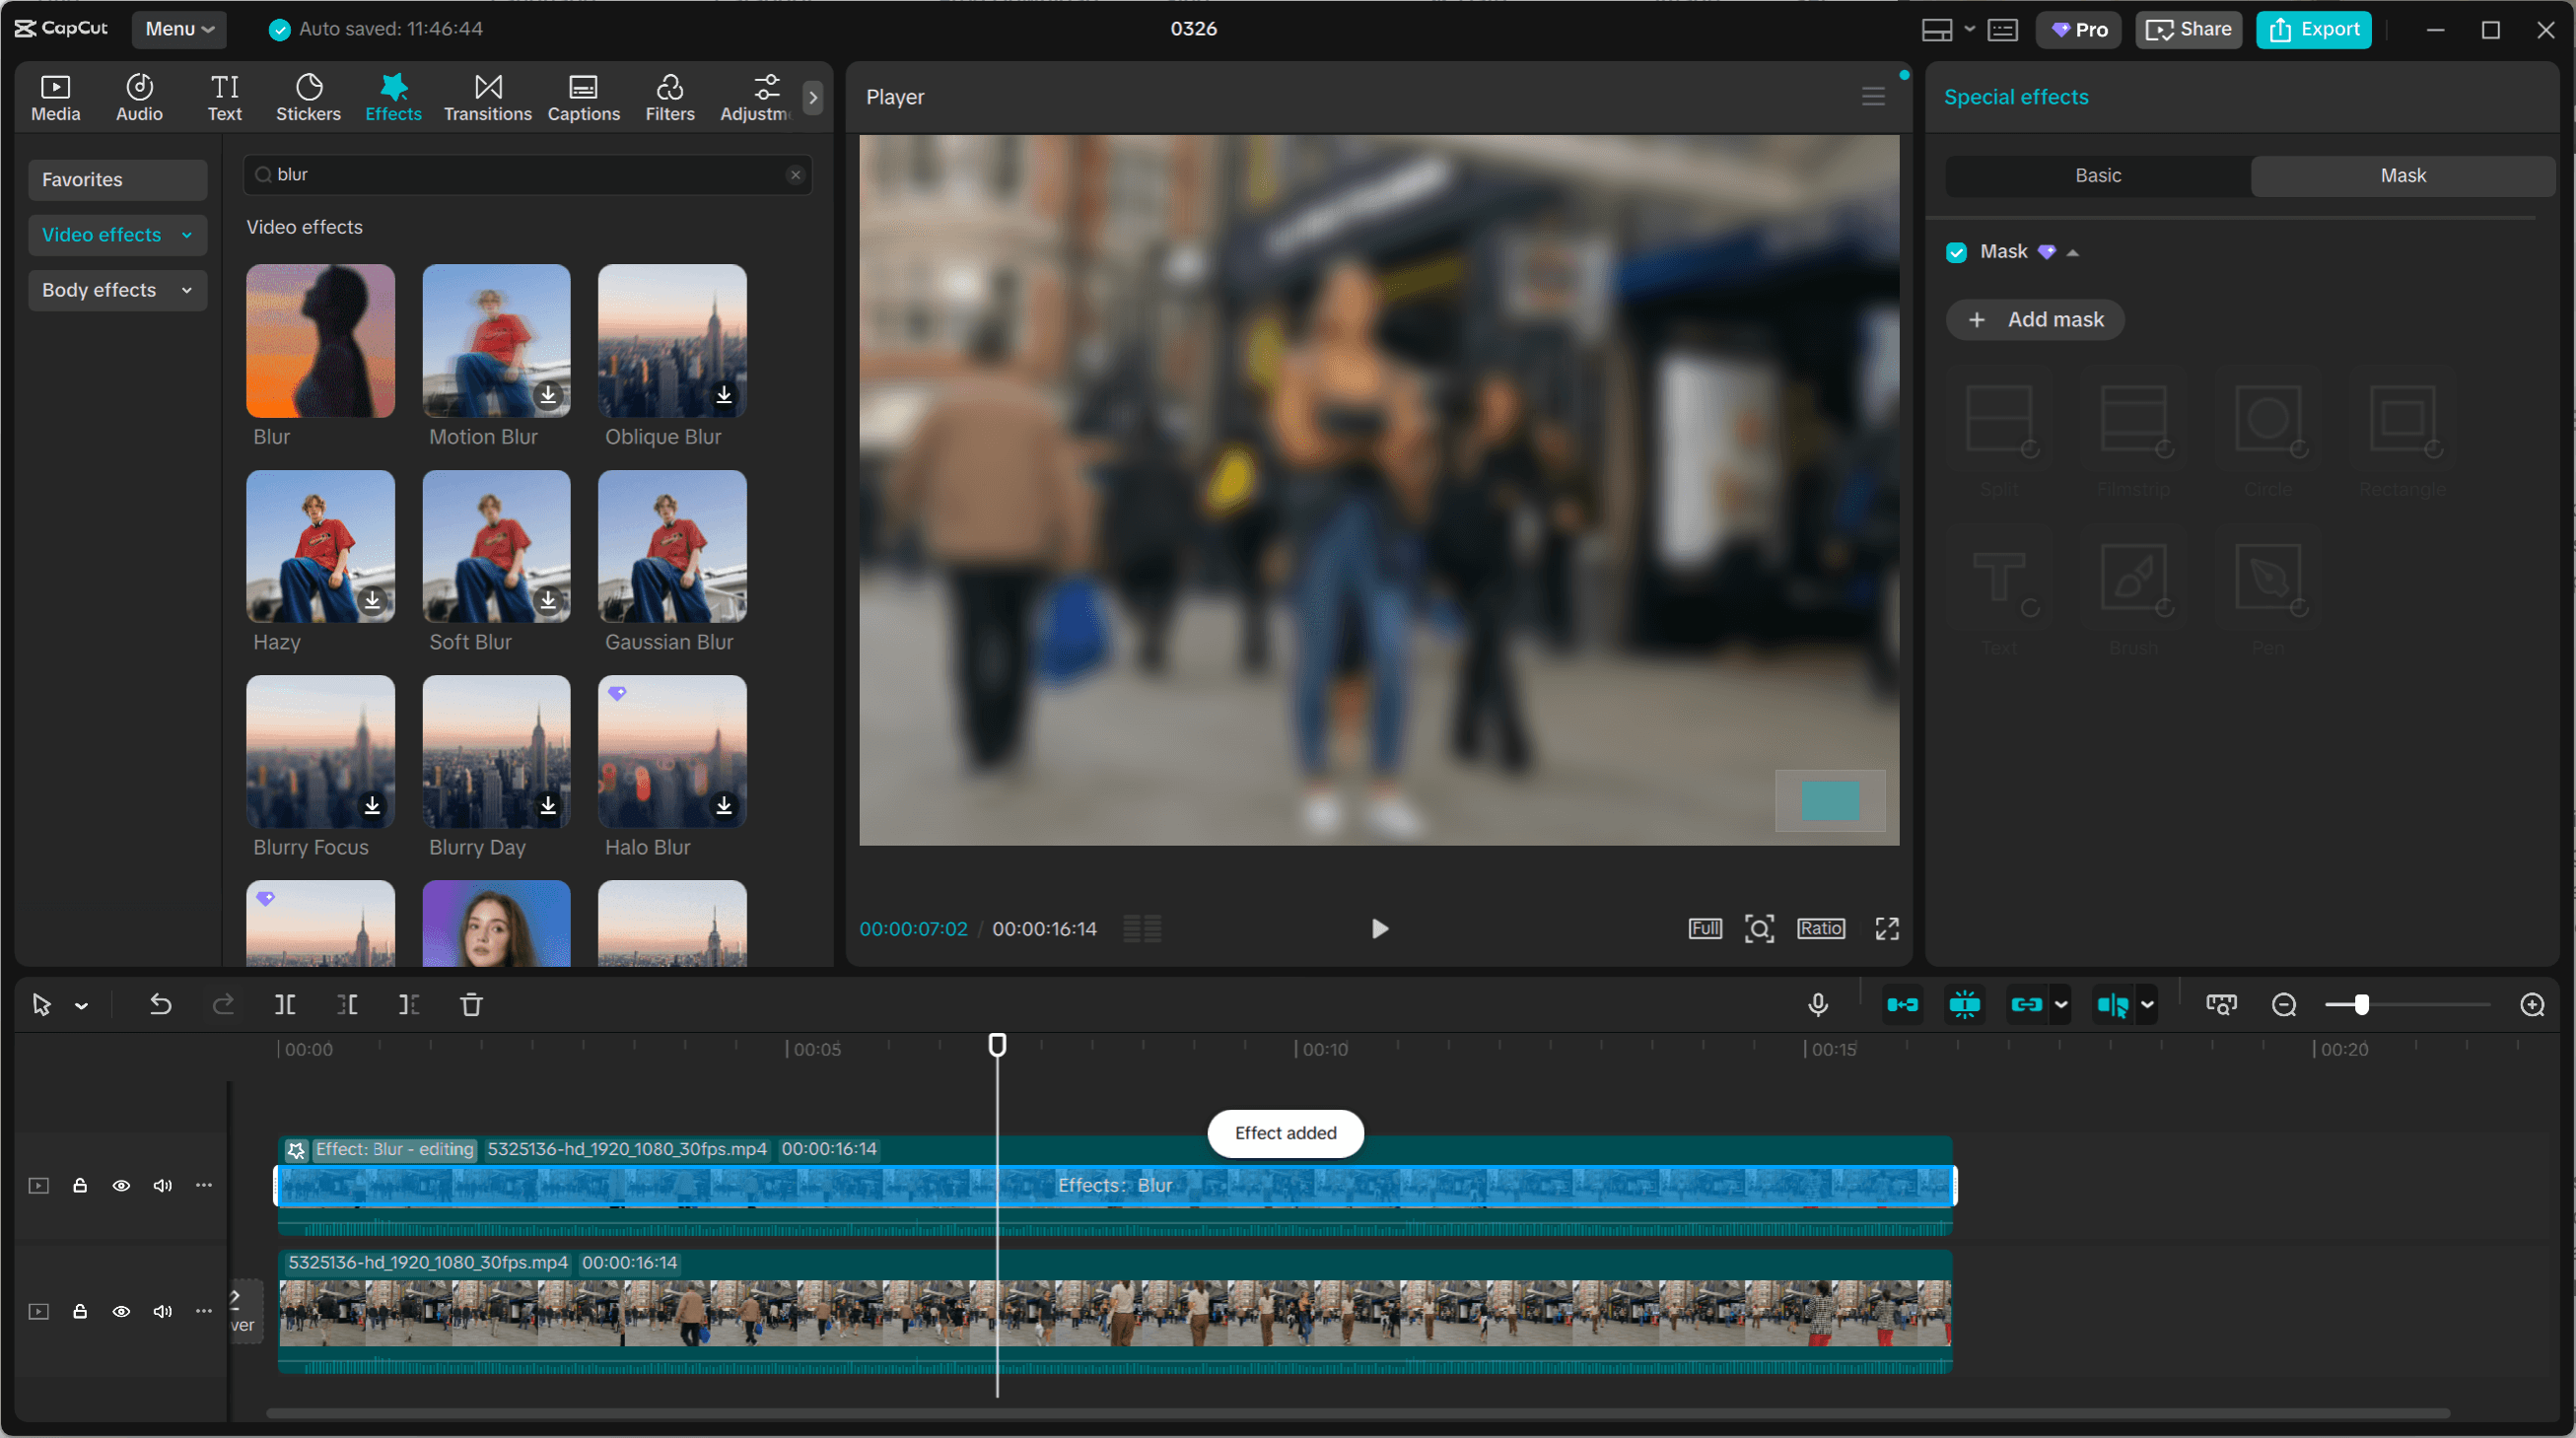
Setting up the blur effect:
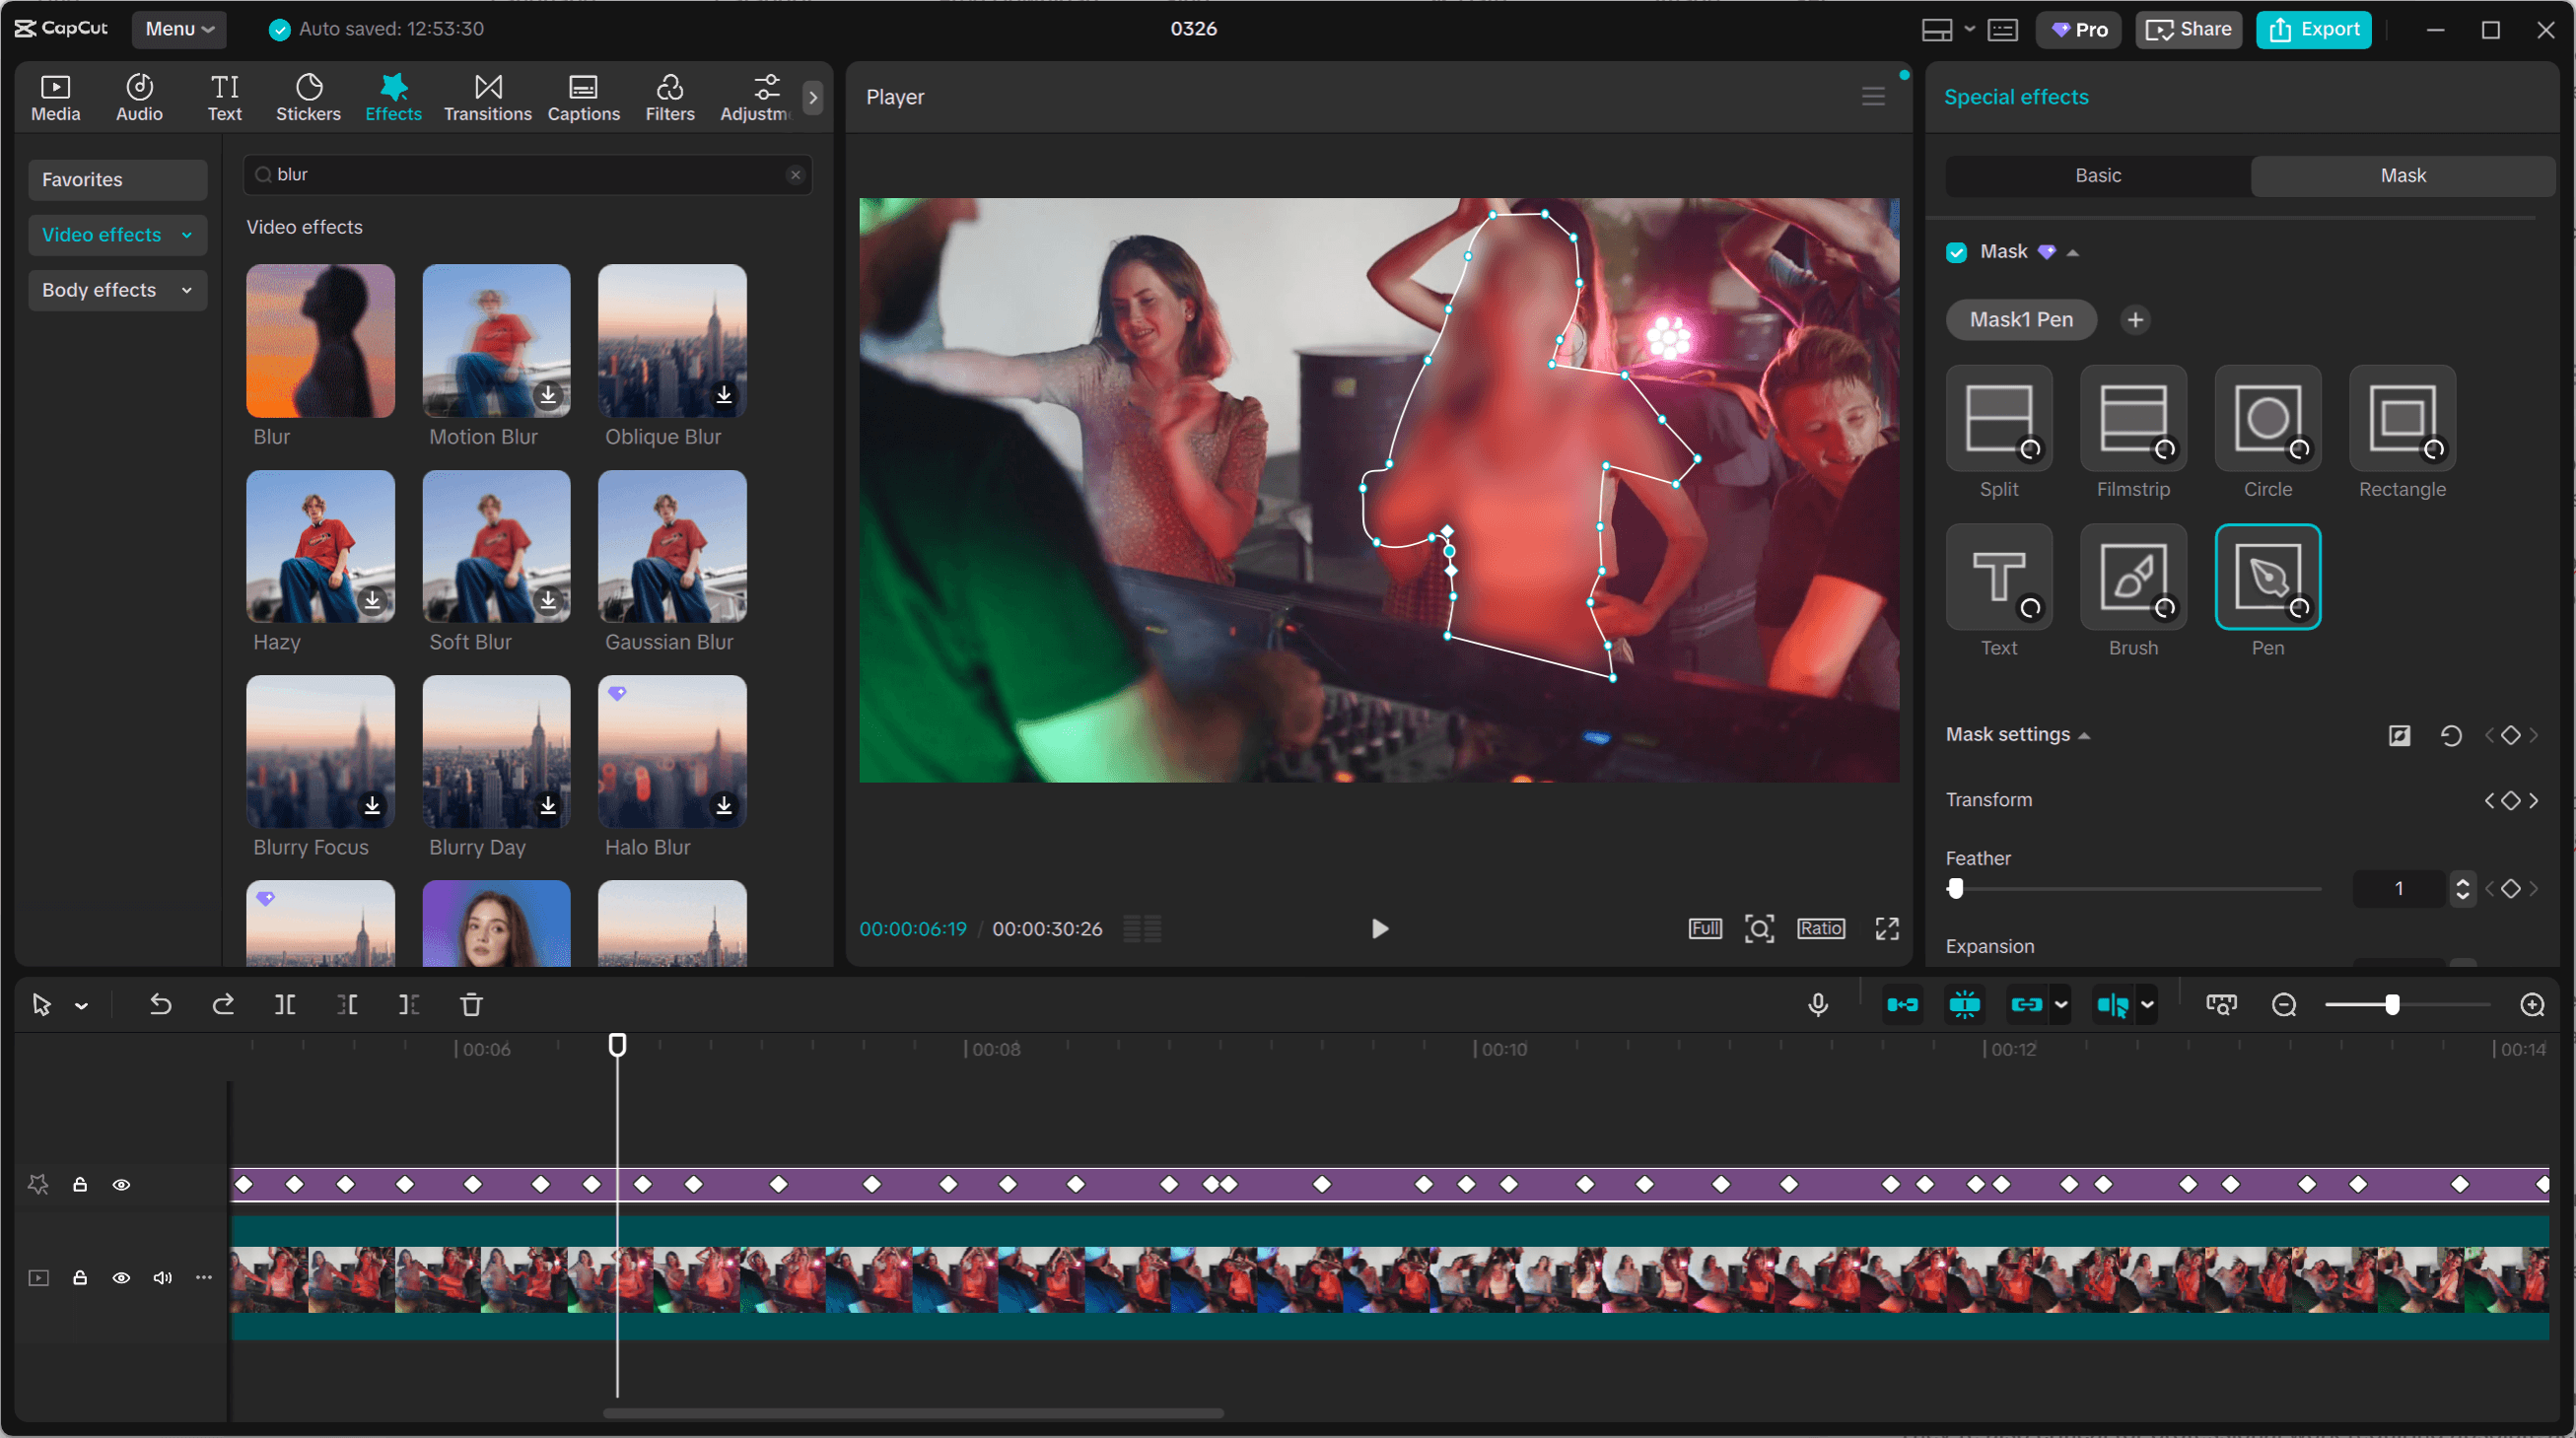
Start by navigating to the Effects panel in CapCut's interface. In the search field, type "Blur" to browse the available blur effects—you'll find options ranging from subtle Gaussian blurs to more aggressive pixelation effects.
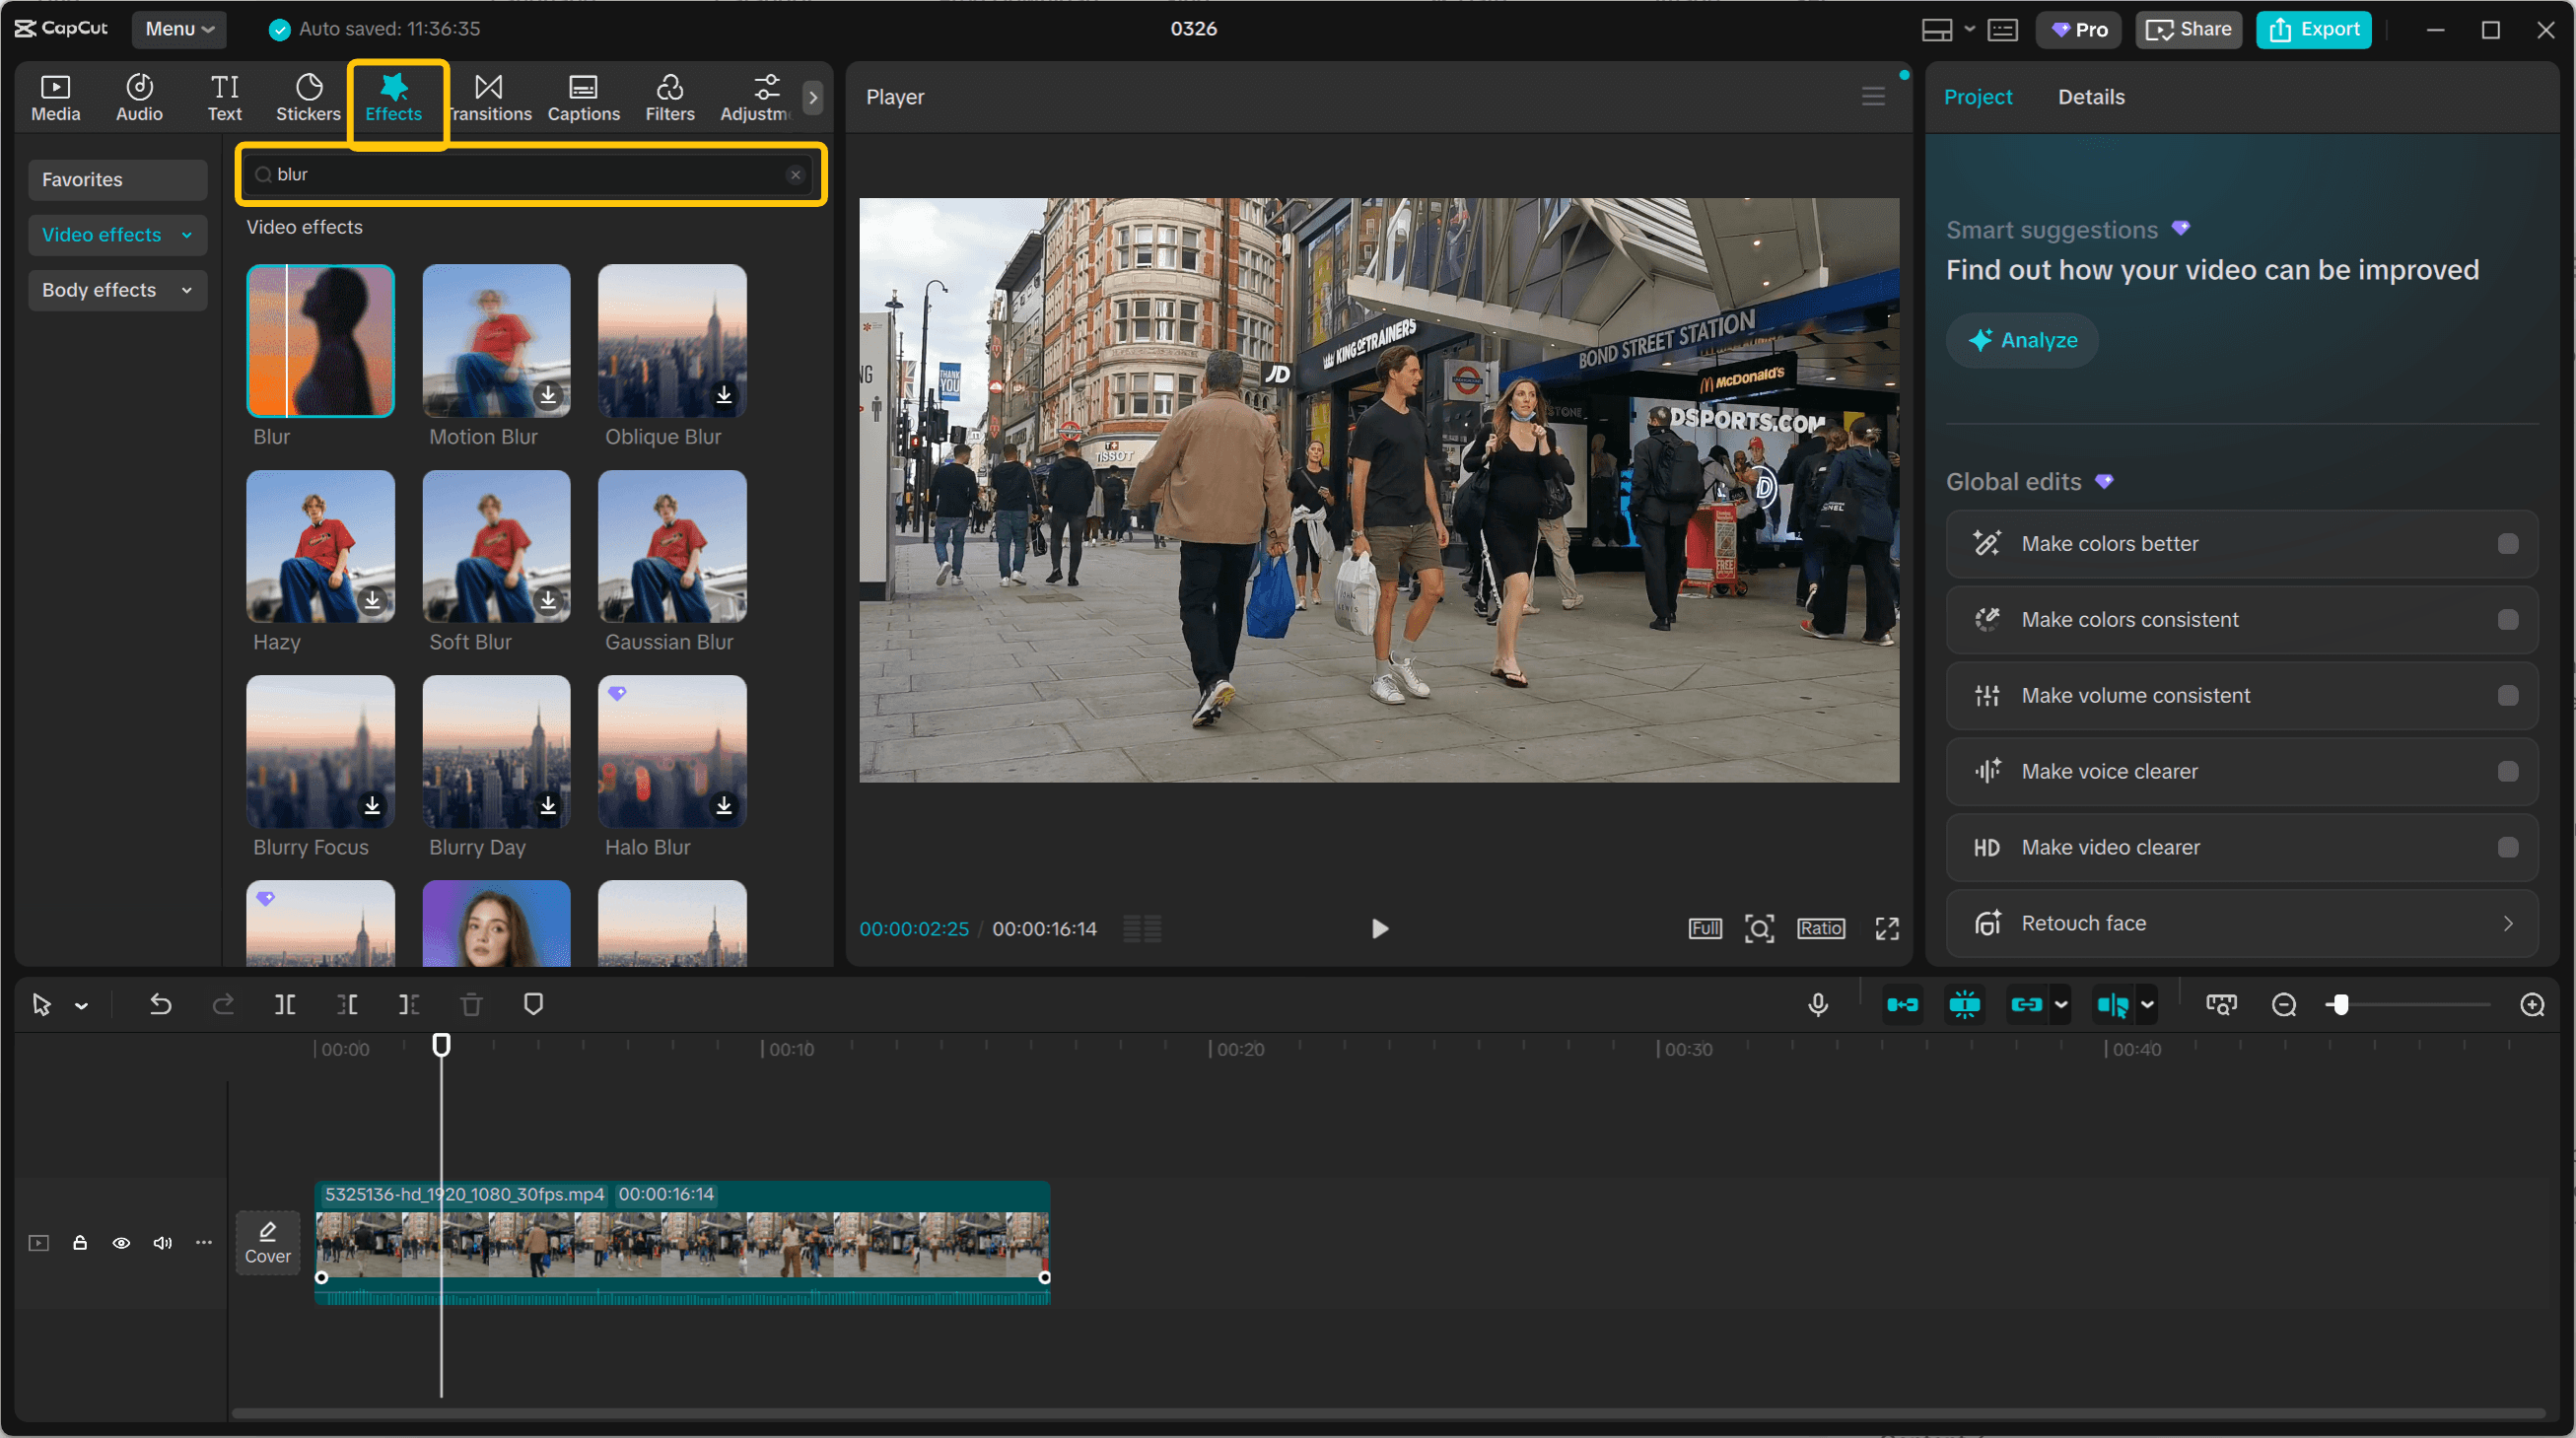
Once you've selected the blur style that matches your needs, drag the effect directly onto your video clip in the timeline. At this point, the blur applies to your entire frame, which isn't what we want—that's where masking comes in.

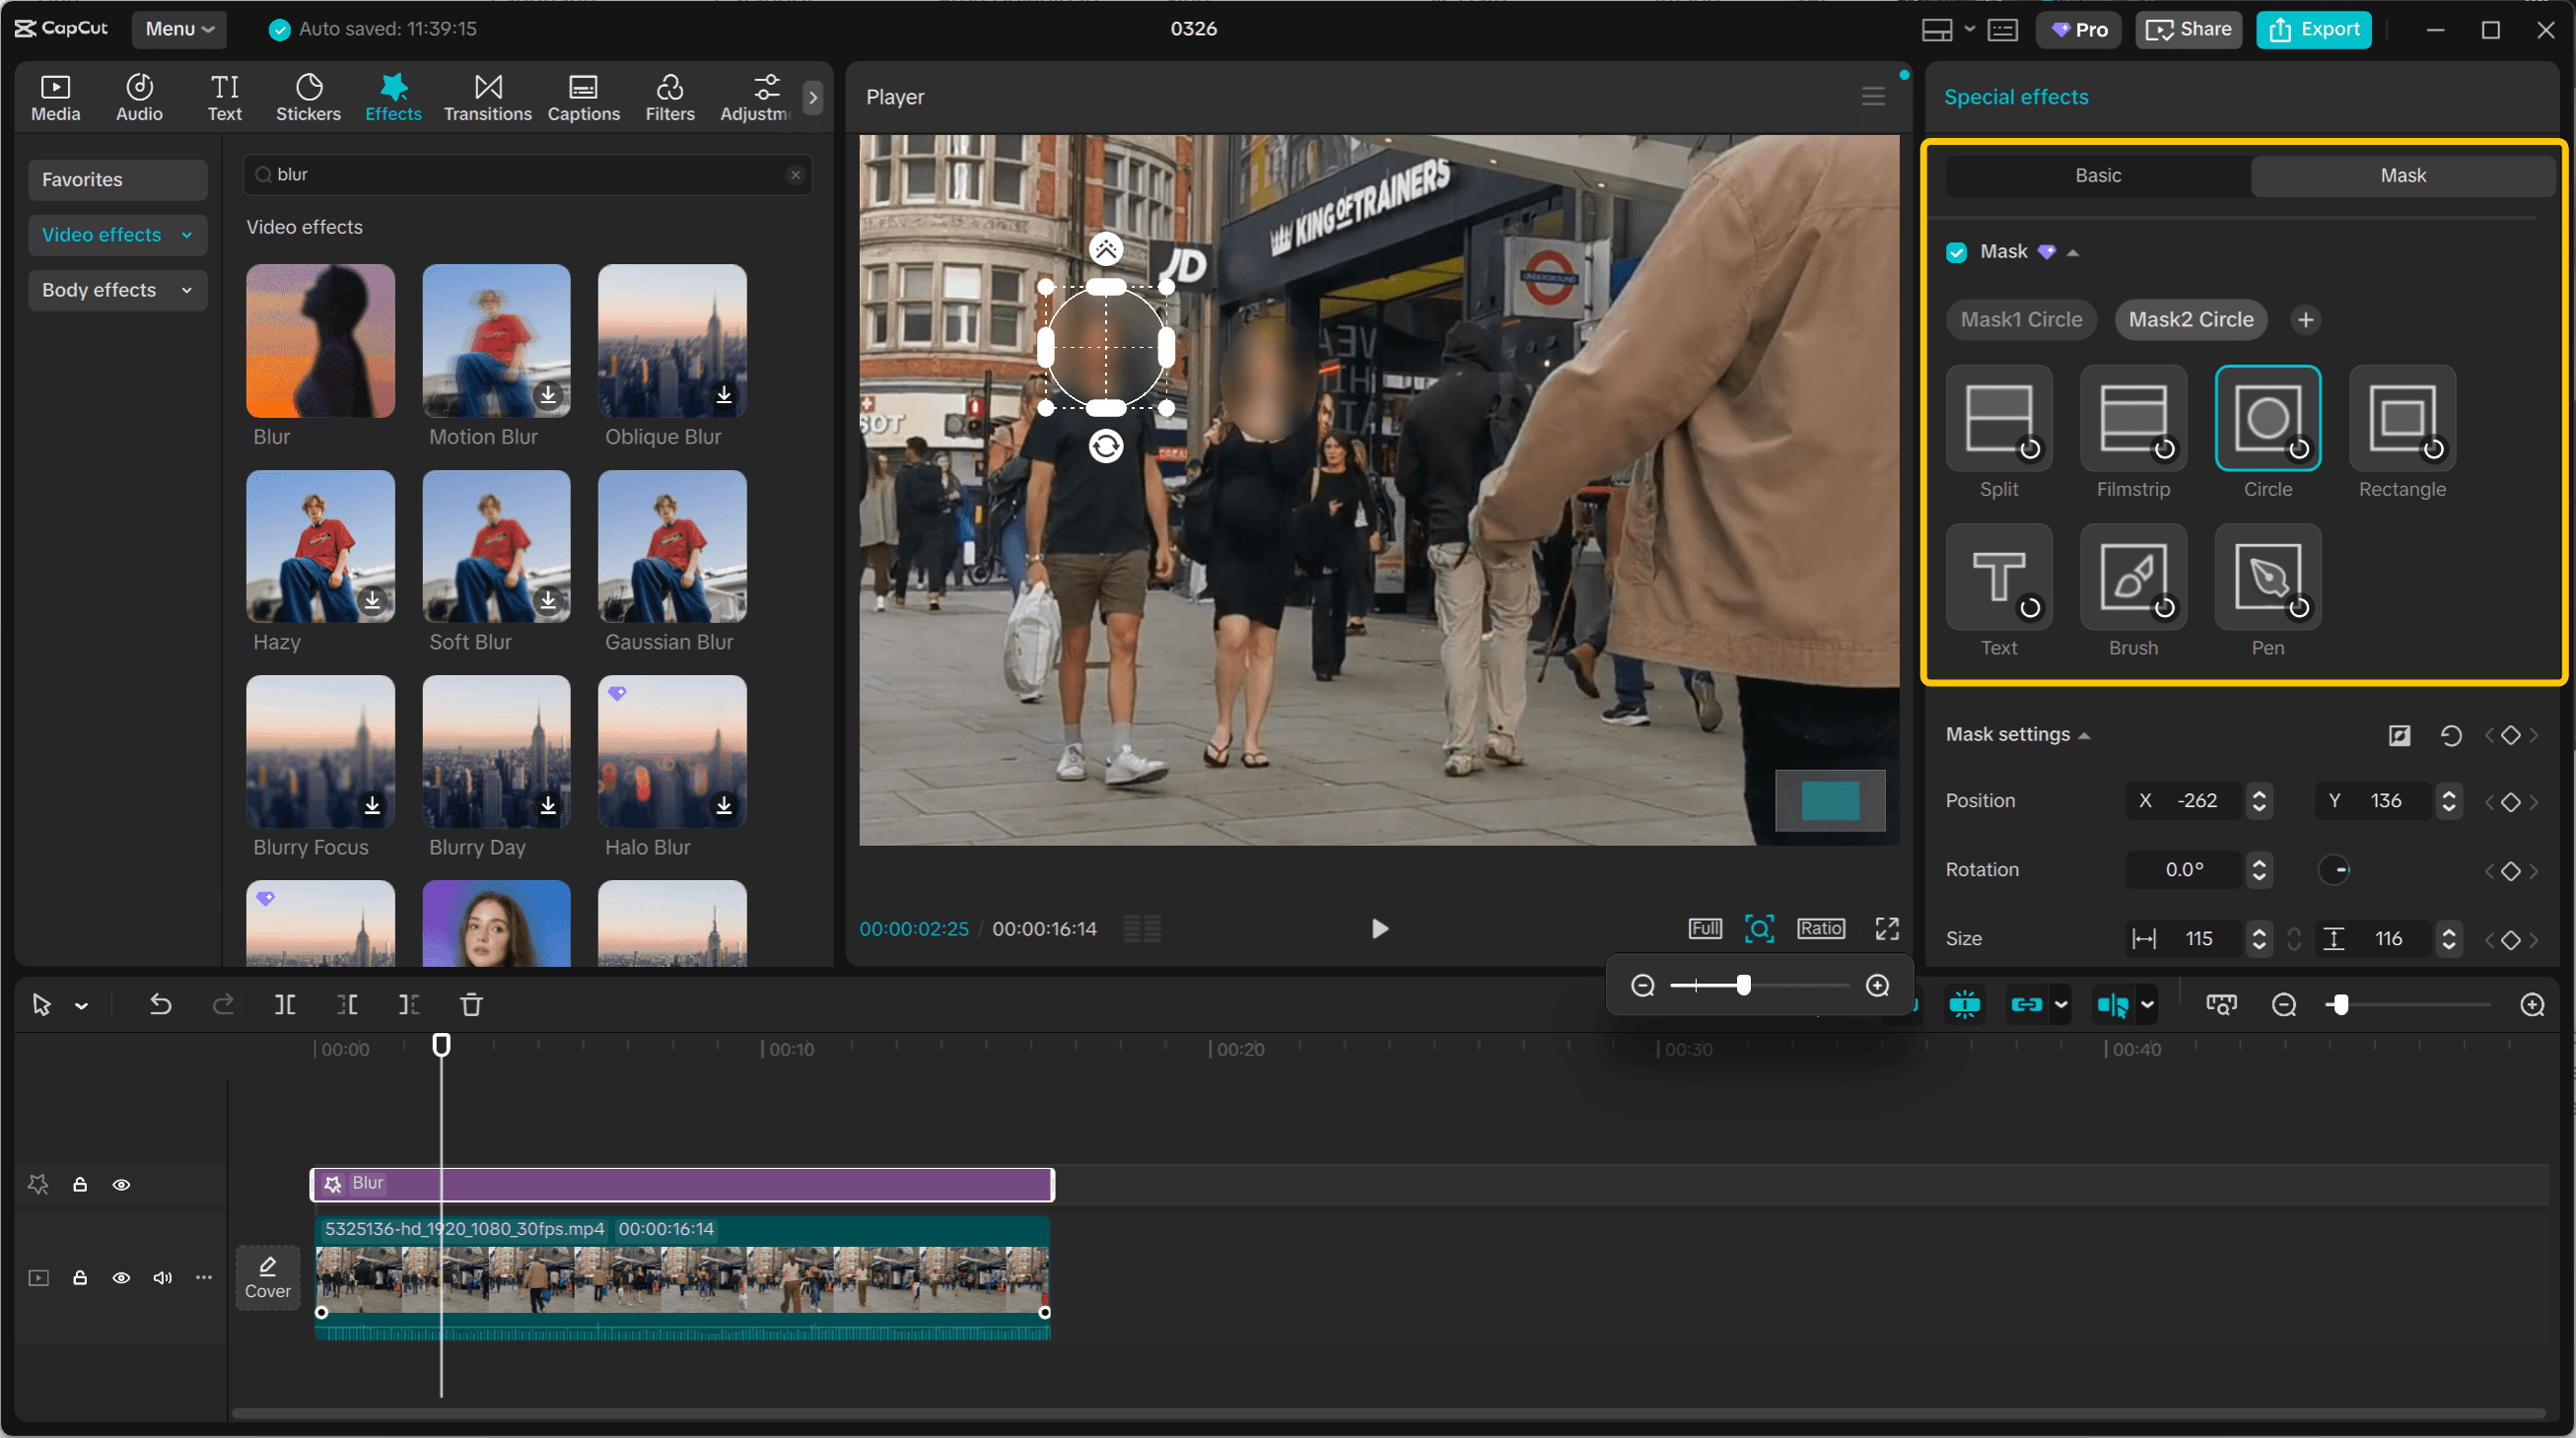
Creating and positioning the mask:
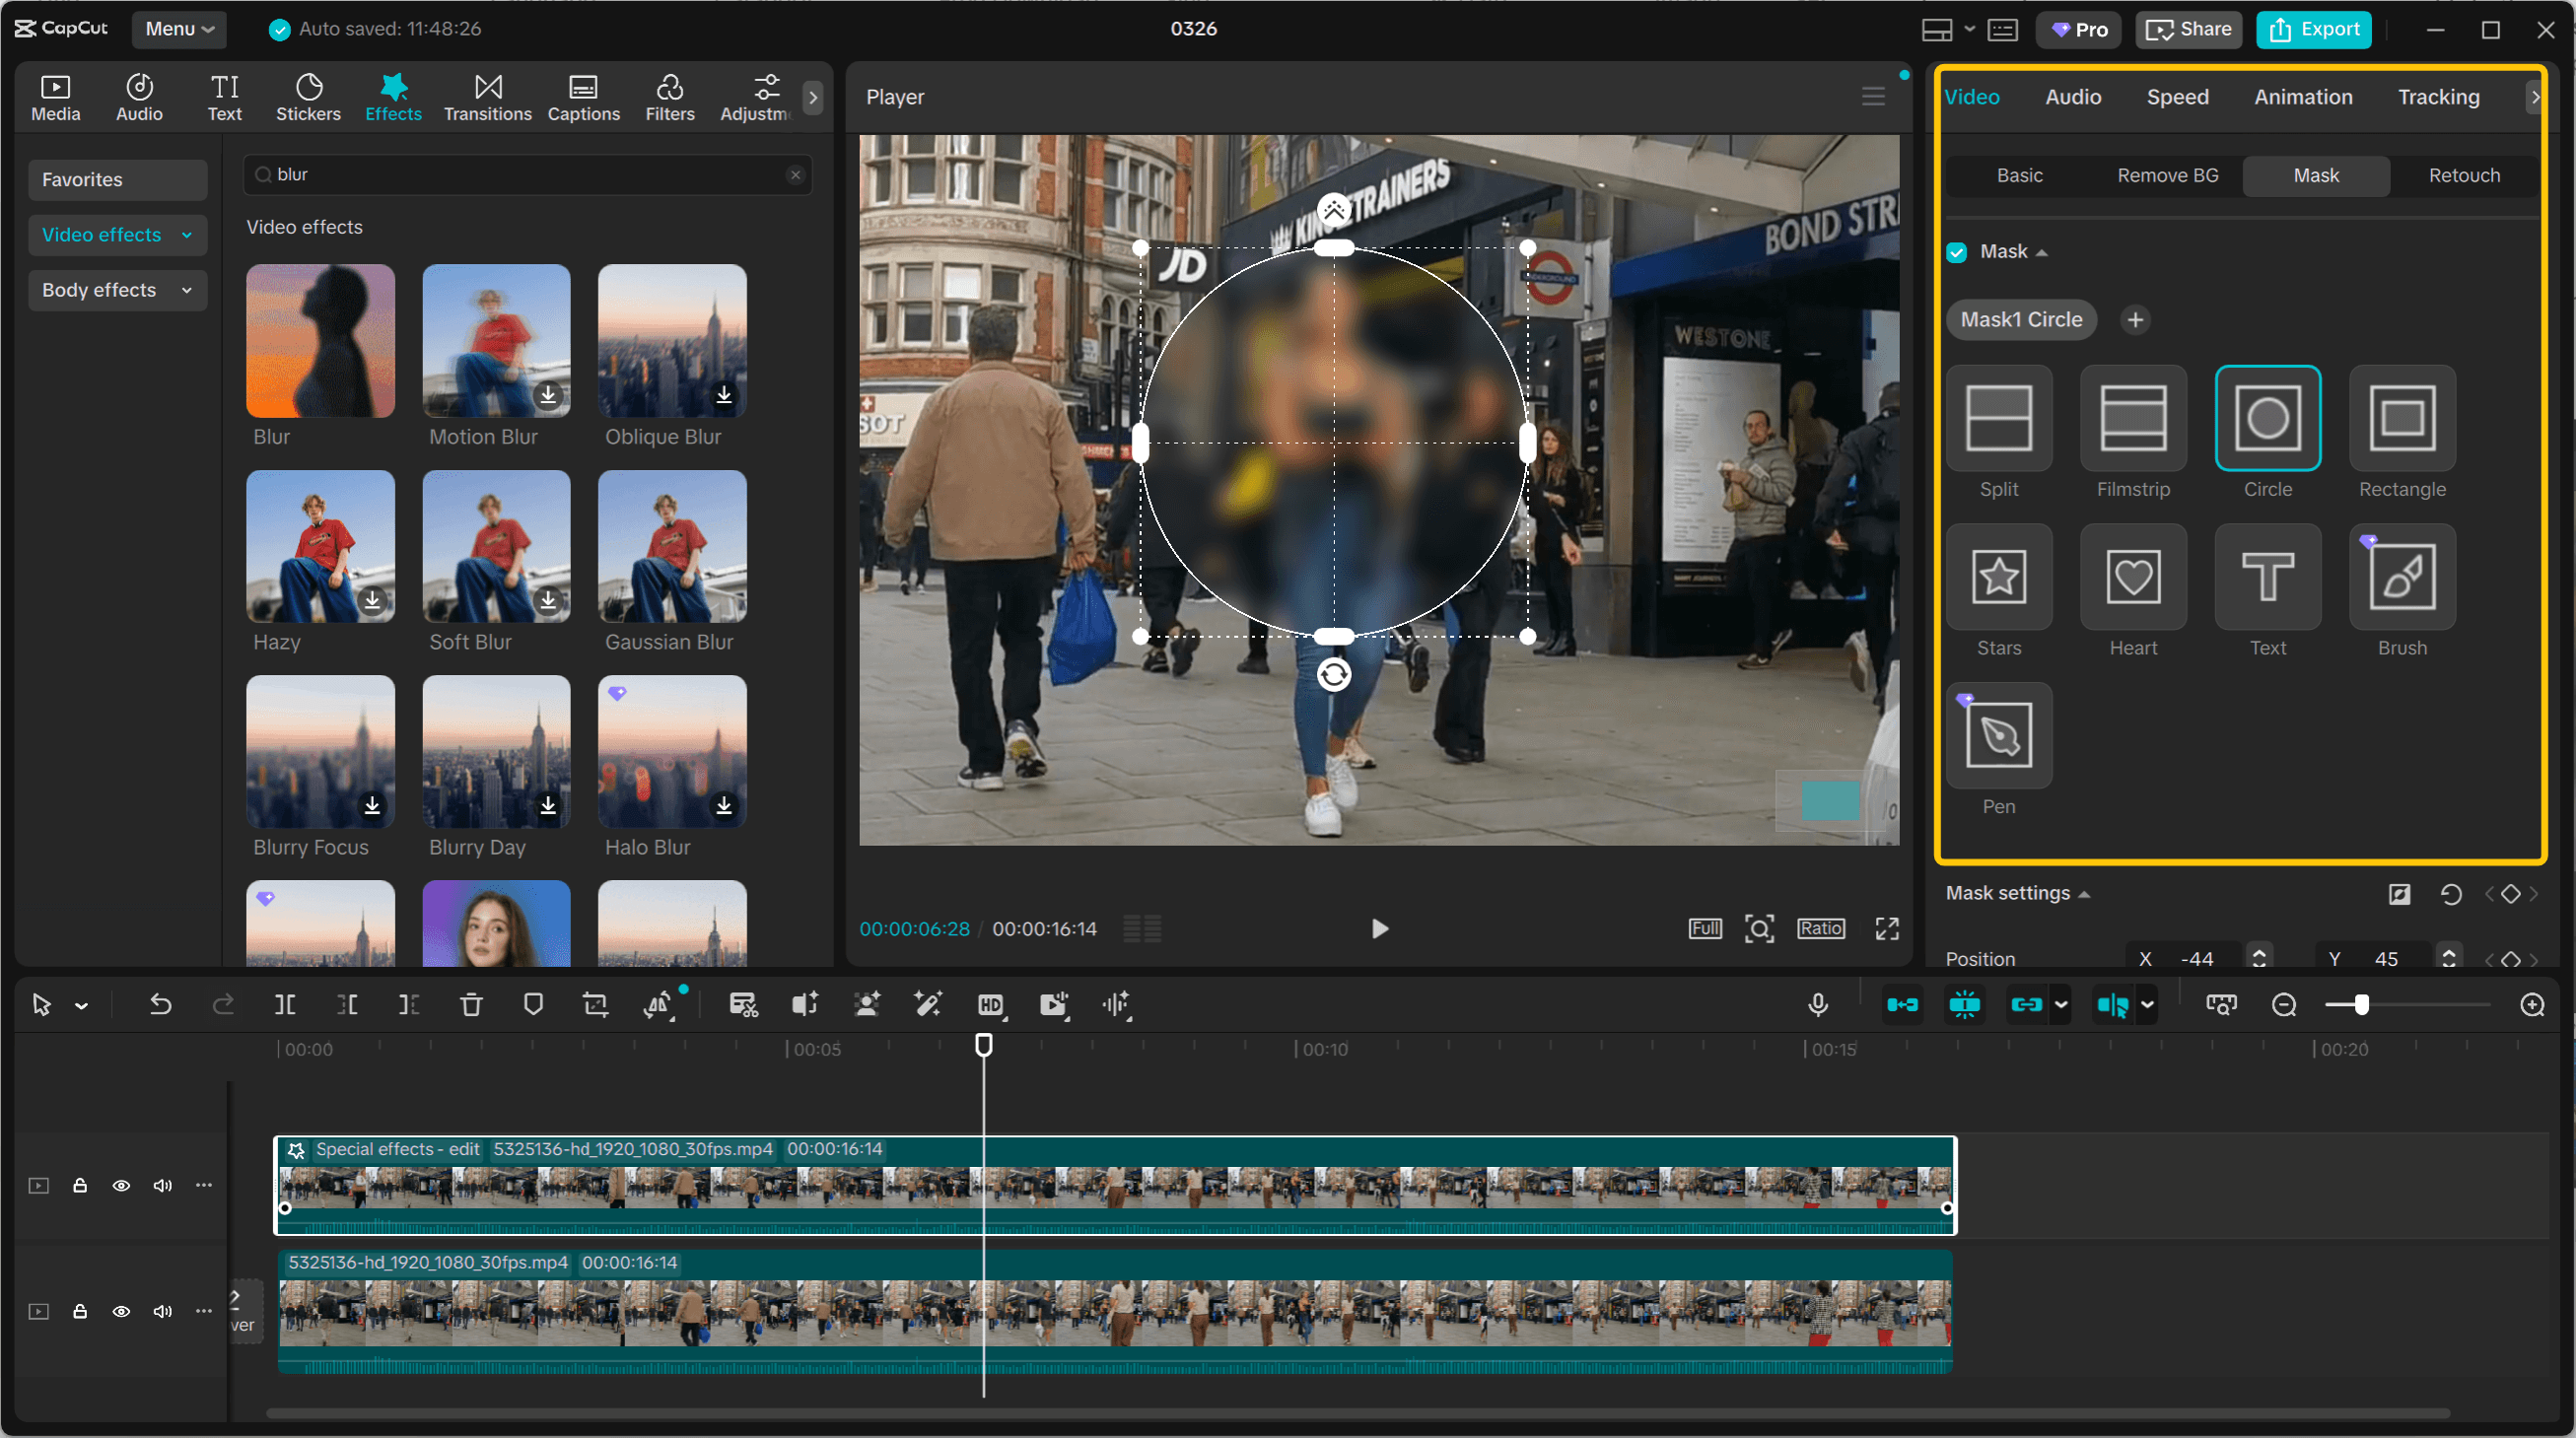
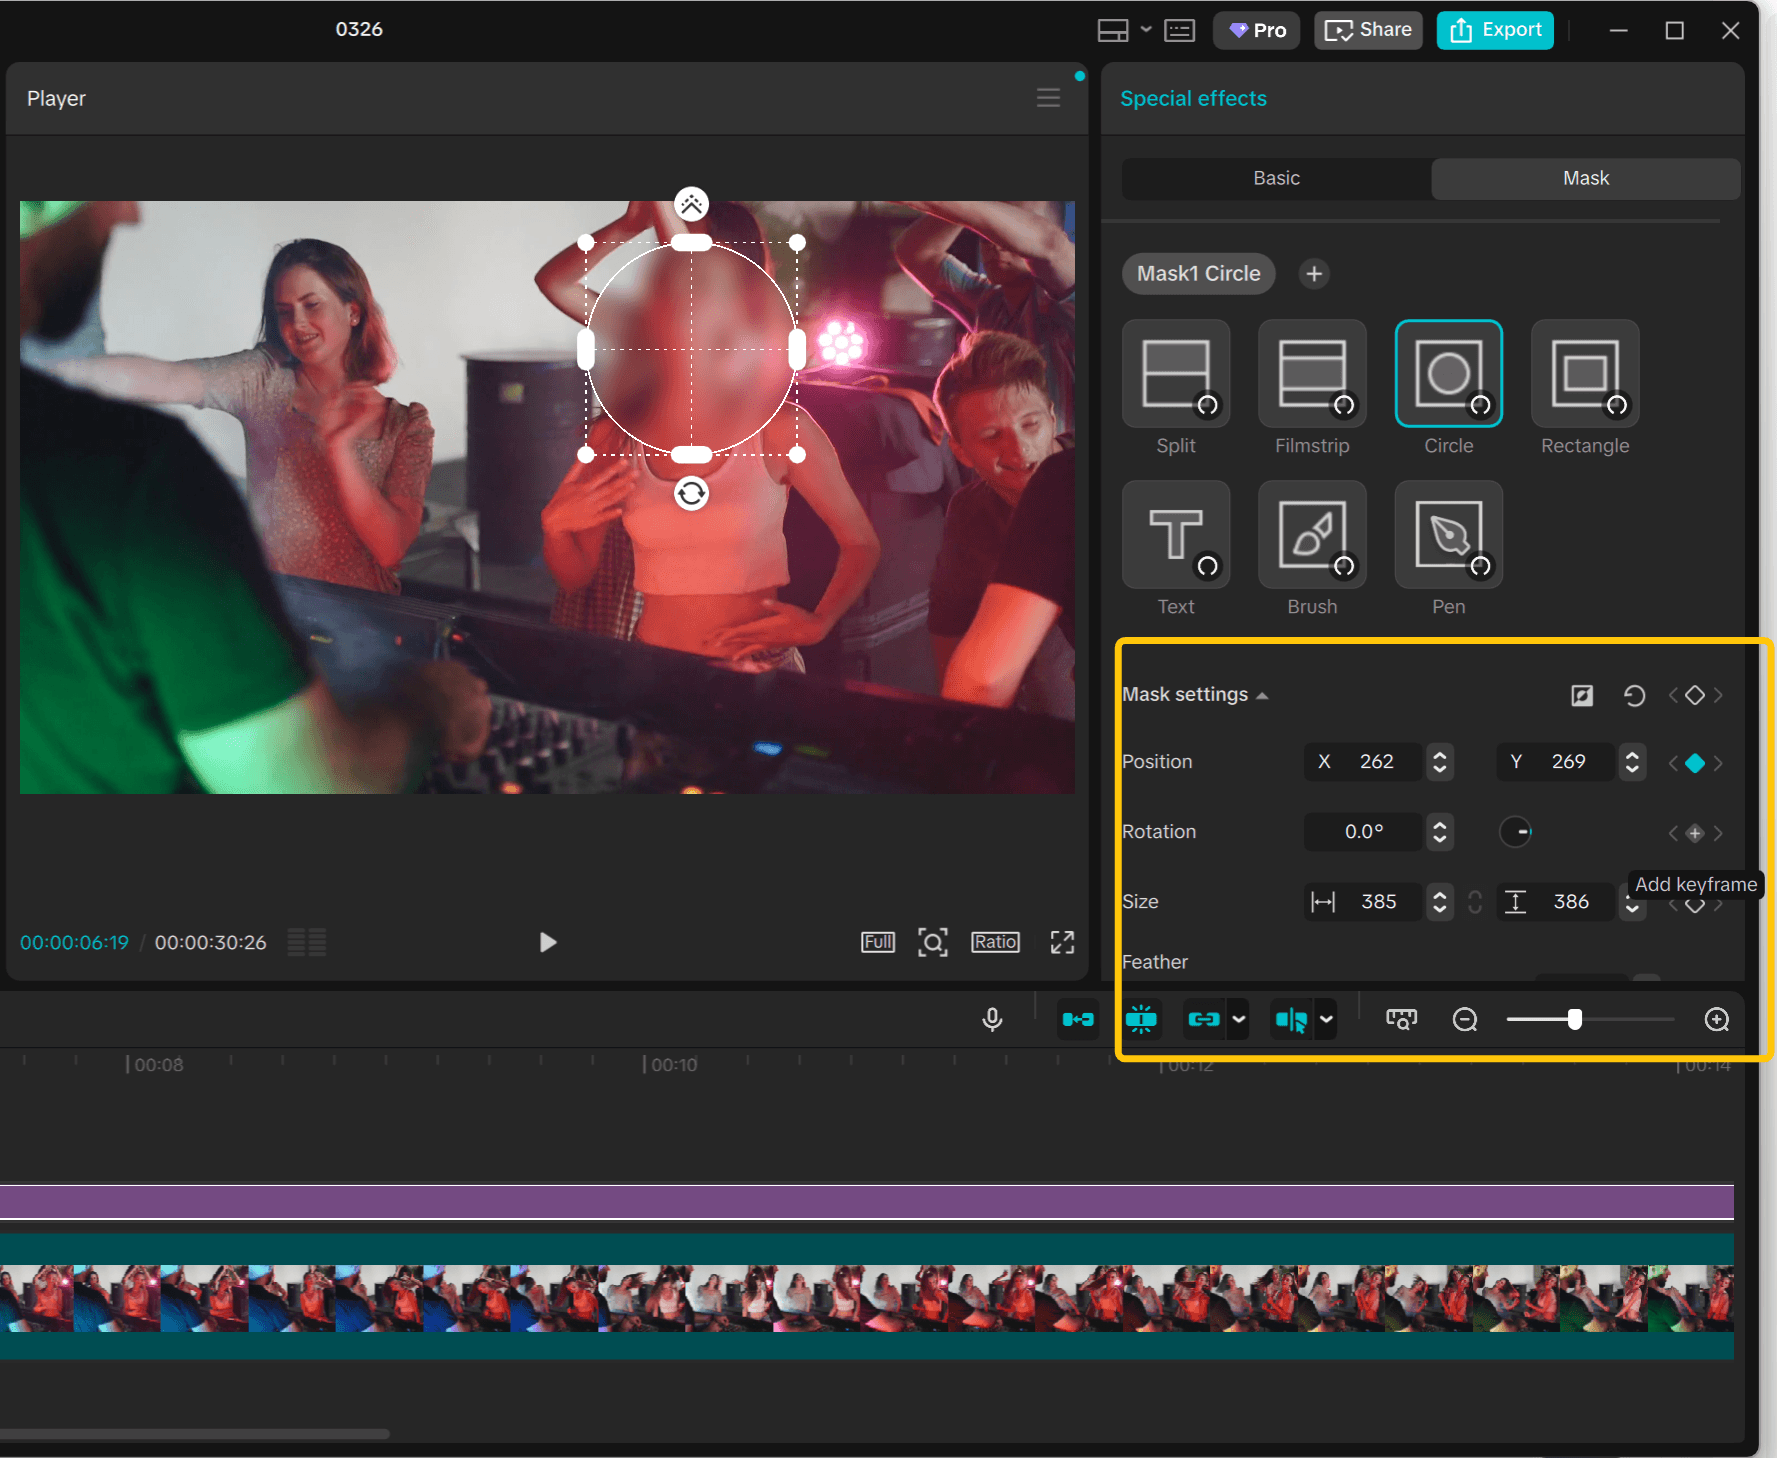
With your blur effect applied, look to the right editing panel and locate the Mask section. Click "Add Mask" to create a mask for your blur effect.
CapCut offers several mask shapes—circle, rectangle, and custom options—choose the one that best fits the face or object you're blurring. Adjust the mask's size and position to cover exactly the area you want blurred. This gives you surgical precision: only the masked area receives the blur effect, while everything else in your frame remains crystal clear.
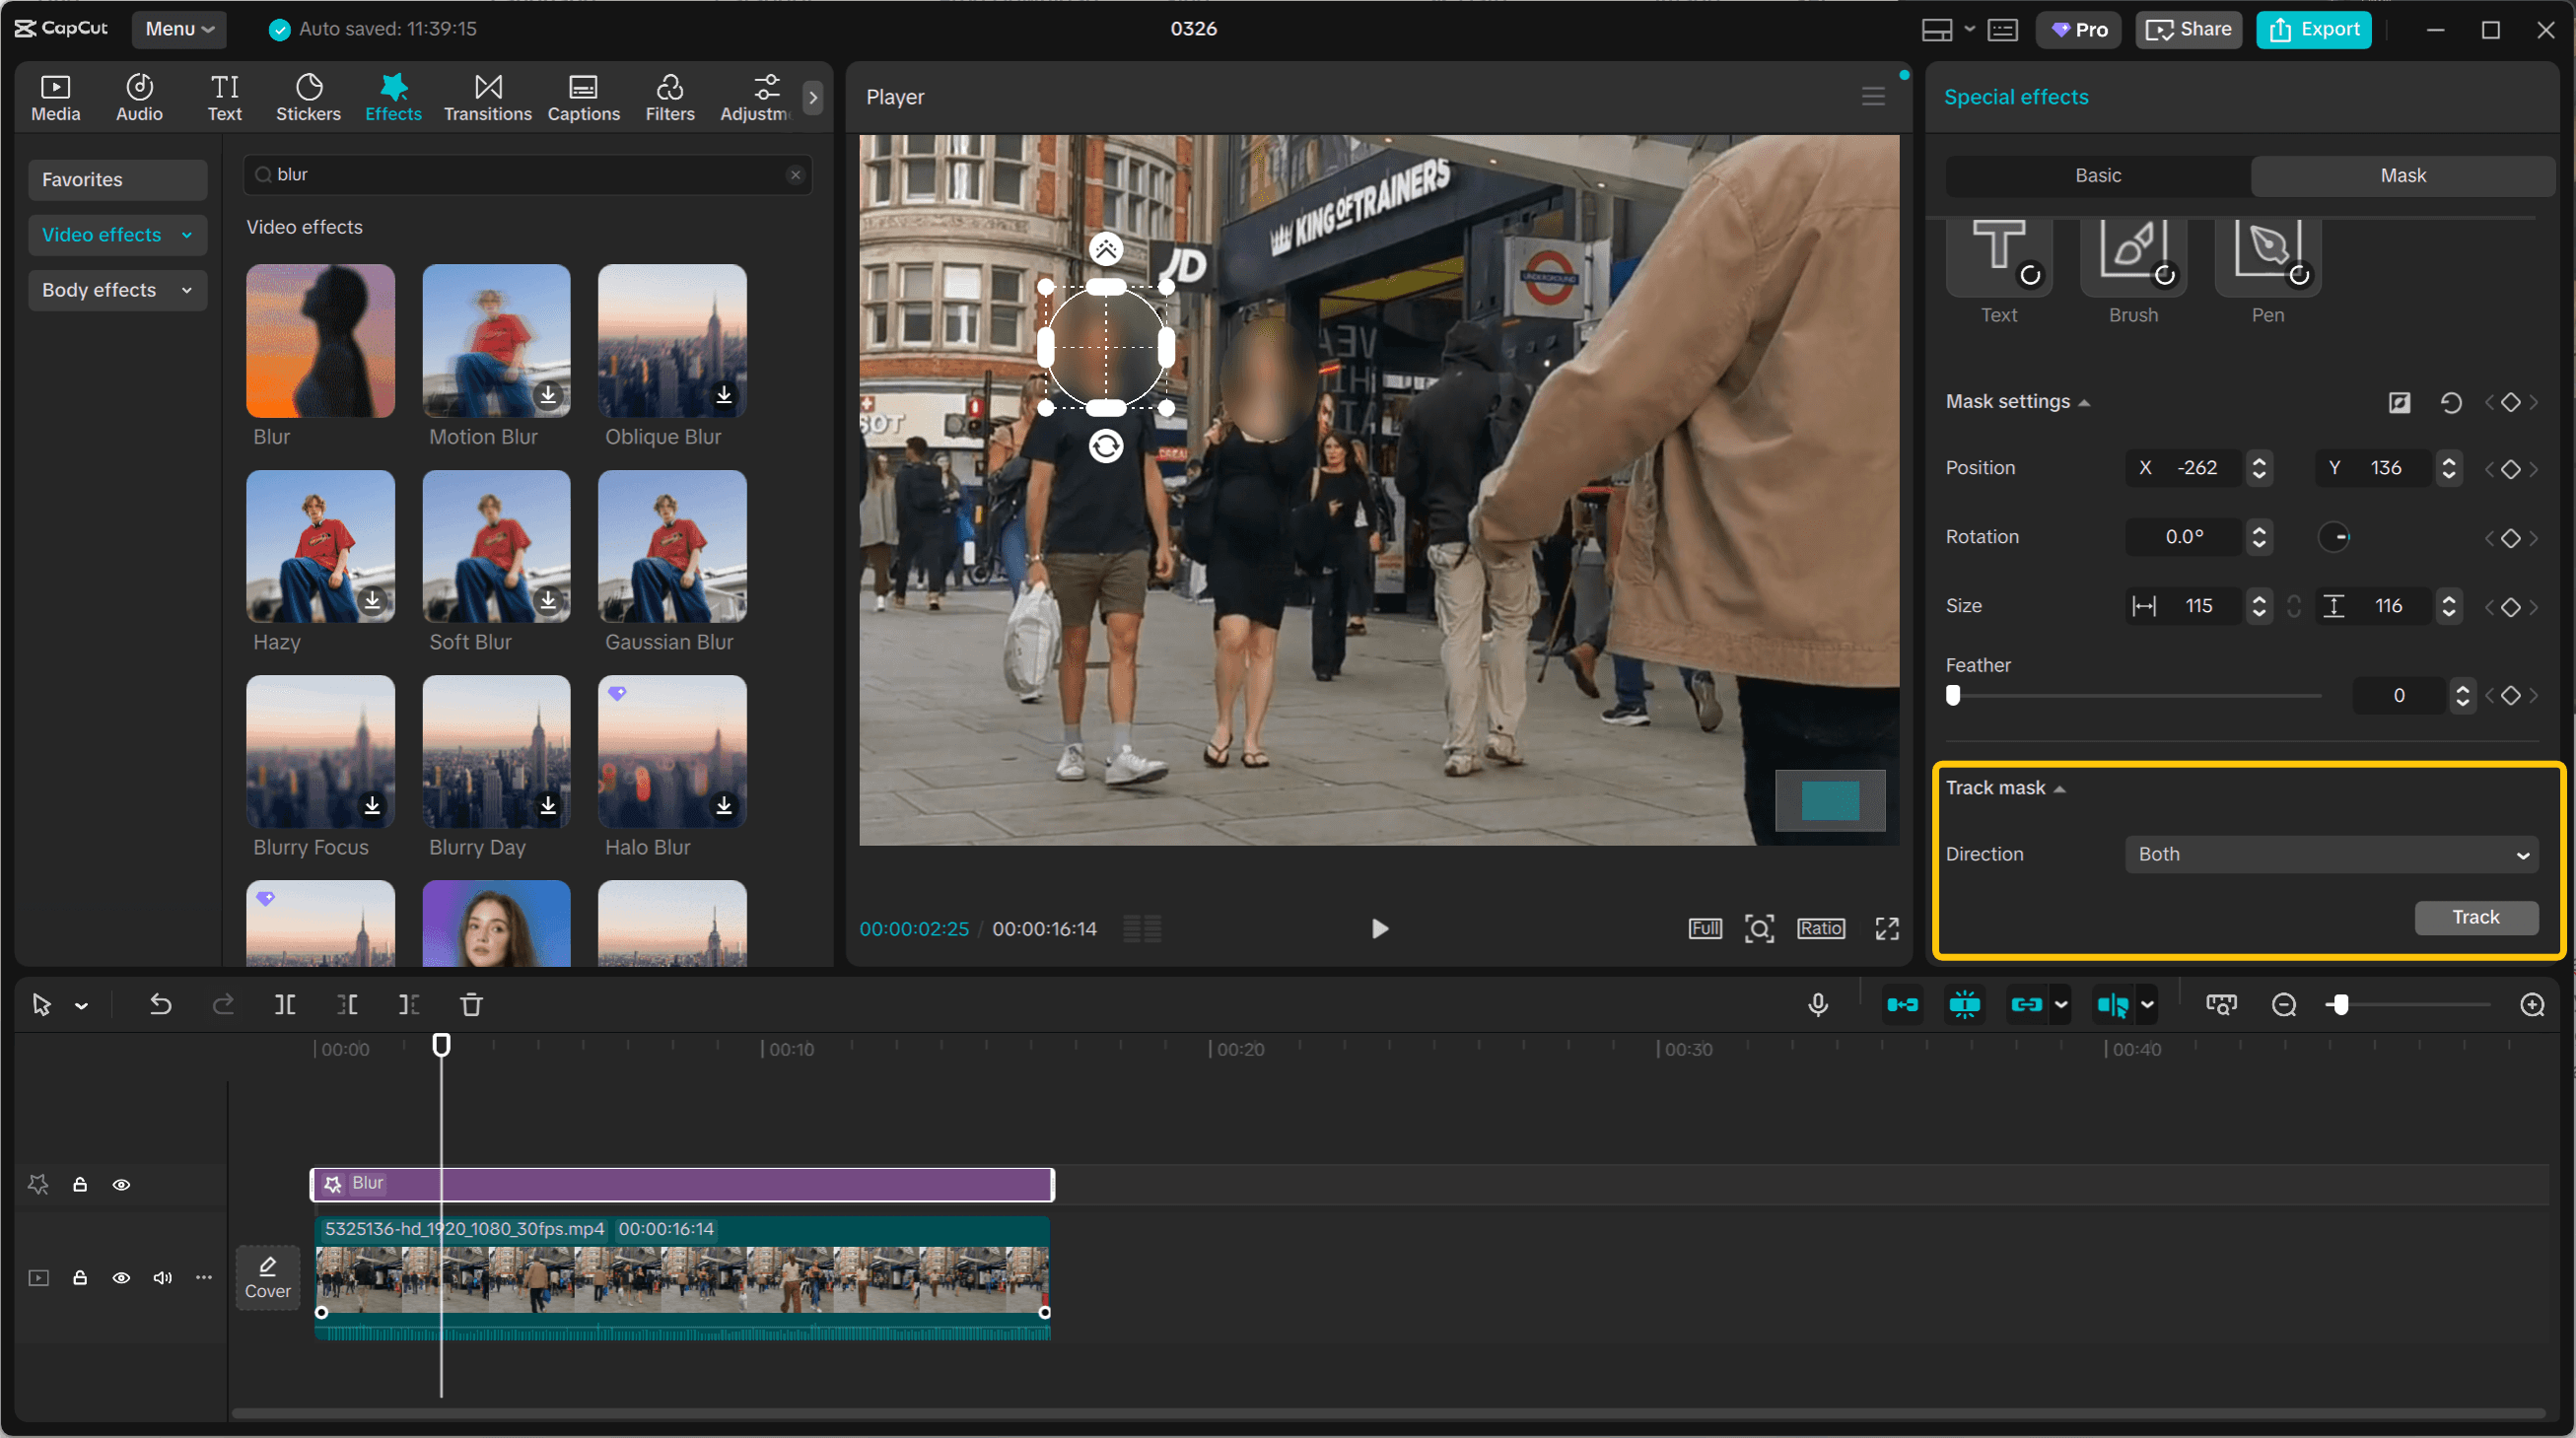
Automated motion tracking:
Here's where this method truly shines for blur moving objects.
Instead of manually repositioning your mask frame by frame, CapCut provides automatic motion tracking. Find the "Track Mask" option in your mask settings and click "Track." CapCut will analyze your footage and automatically create keyframes that follow your subject's movement throughout the clip. The mask tracking algorithm is considerably more accurate than the sticker tracking from Method 1, making it ideal for subjects with moderate to complex movement patterns.
When this method excels:
This blur effect and mask approach is perfect for walking subjects, street footage with people in motion, interview subjects who gesture or move naturally, and any scenario where you need to blur moving objects while maintaining professional video quality. The combination of automatic tracking with manual refinement capability gives you the best balance between efficiency and precision. For content destined for professional distribution or when privacy protection is critical, this method delivers the reliability you need.
Pro tips for advanced masking:
Beyond the basic mask shapes, CapCut offers powerful tools for creating custom mask shapes that can elevate your blur work to truly professional levels. The "Brush" tool enables automatic shape tracing—simply paint over the area you want to mask, and CapCut intelligently detects edges and boundaries to create a fitted mask.
This works exceptionally well for irregular shapes like faces at angles or objects with complex outlines. Alternatively, the "Pen" tool gives you complete manual control, allowing you to outline your shape point by point with precision. This is invaluable when you need to blur faces in profile, partially obscured subjects, or any scenario where standard geometric shapes fall short. These advanced masking techniques transform a simple blur into a seamless, professional result that looks intentional rather than applied as an afterthought.

Method 2.5: Free Alternative to Effect Masking
If you've explored Method 2 and discovered that applying masks to blur effects requires a CapCut subscription, don't worry—there's a completely free workaround that achieves identical results. Many users encounter this limitation and assume professional blur masking is locked behind a paywall, but a simple layer-based technique gives you the same capabilities without spending a cent.
The free workflow:
Start by duplicating your video clip. Select your clip in the timeline, copy paste it to create an identical copy.
Position this duplicate directly above your original footage.
Now apply your chosen blur effect directly to this duplicated layer—not to an effect track, but to the video clip itself.
This is where the magic happens: instead of masking the blur effect (which requires payment), you'll mask the video clip, which remains a free feature in CapCut.
This free alternative democratizes professional blur techniques for creators working on tight budgets, students learning video editing, or anyone who needs occasional blur functionality without committing to a subscription. You maintain complete control over blur placement, benefit from automatic tracking, and deliver professional results—all within CapCut's free tier.
Method 3: Precision Tracking with Keyframes (Best for Accuracy)
Method 2's automatic tracking works well for most scenarios, but fast movements, complex motion patterns, or subjects moving out of frame can cause drift. Manual keyframe adjustment gives you pixel-perfect control to fix these issues.
Limitation: If you've used the brush tool for custom masks, CapCut doesn't allow keyframe adjustments—this is a software limitation. Use geometric masks (circle, rectangle) or the pen tool instead when you need manual refinement capability.
Locating keyframes:
After running auto tracking, navigate to your effect track (Method 2) or duplicated video track (Method 2.5). You'll see small diamond shapes along the timeline—these are the keyframes CapCut created automatically, marking where it recorded your mask's position and size.
Activating keyframe editing:
Select your blur effect or masked clip, then find the mask properties in the right panel (Position, Dimension, Rotation). Click the diamond icon next to the properties you want to control—typically Position and Dimension for tracking faces. When the diamond highlights, keyframe mode is active.
Making adjustments:
Move your playhead to a frame where tracking has drifted. Adjust the mask's position or size, and CapCut automatically creates a new keyframe. Continue through your clip: find the next problem area, adjust, and a new keyframe appears.
CapCut interpolates smoothly between your keyframes, so you only need to fix key problem moments—not every frame.
When to use this method:
Manual keyframes are essential for subjects with sudden movements, quick head turns, or when moving in and out of frame. They're also critical for professional work requiring absolute accuracy—documentary footage, news content, or any scenario where privacy protection cannot fail.
Pro tip:
After auto tracking completes, scrub through your entire timeline to identify all drift points first. Mark the timecodes, then fix them systematically to ensure complete coverage.
Beyond CapCut: When You Need More Powerful Tracking
You've now learned three methods to blur faces in CapCut PC: stickers with basic motion tracking for static subjects, blur effects with masks and auto tracking for professional results (plus the free workaround), and manual keyframe refinement for pixel-perfect accuracy. These techniques cover most blur scenarios you'll encounter.
However, CapCut's auto tracking can be sketchy at certain points—especially with fast movements or complex motion patterns. If you're working with challenging footage or need to blur multiple moving objects simultaneously, manual corrections can become time-consuming.
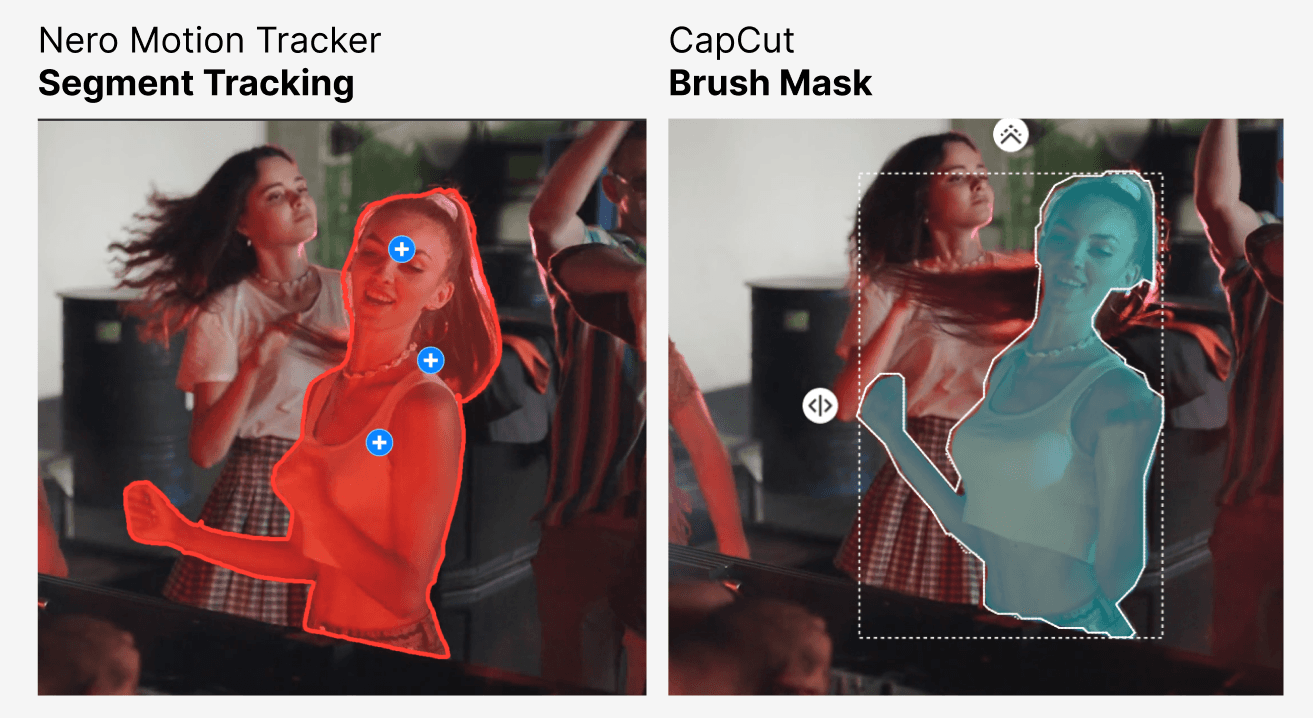
Nero Motion Tracker:
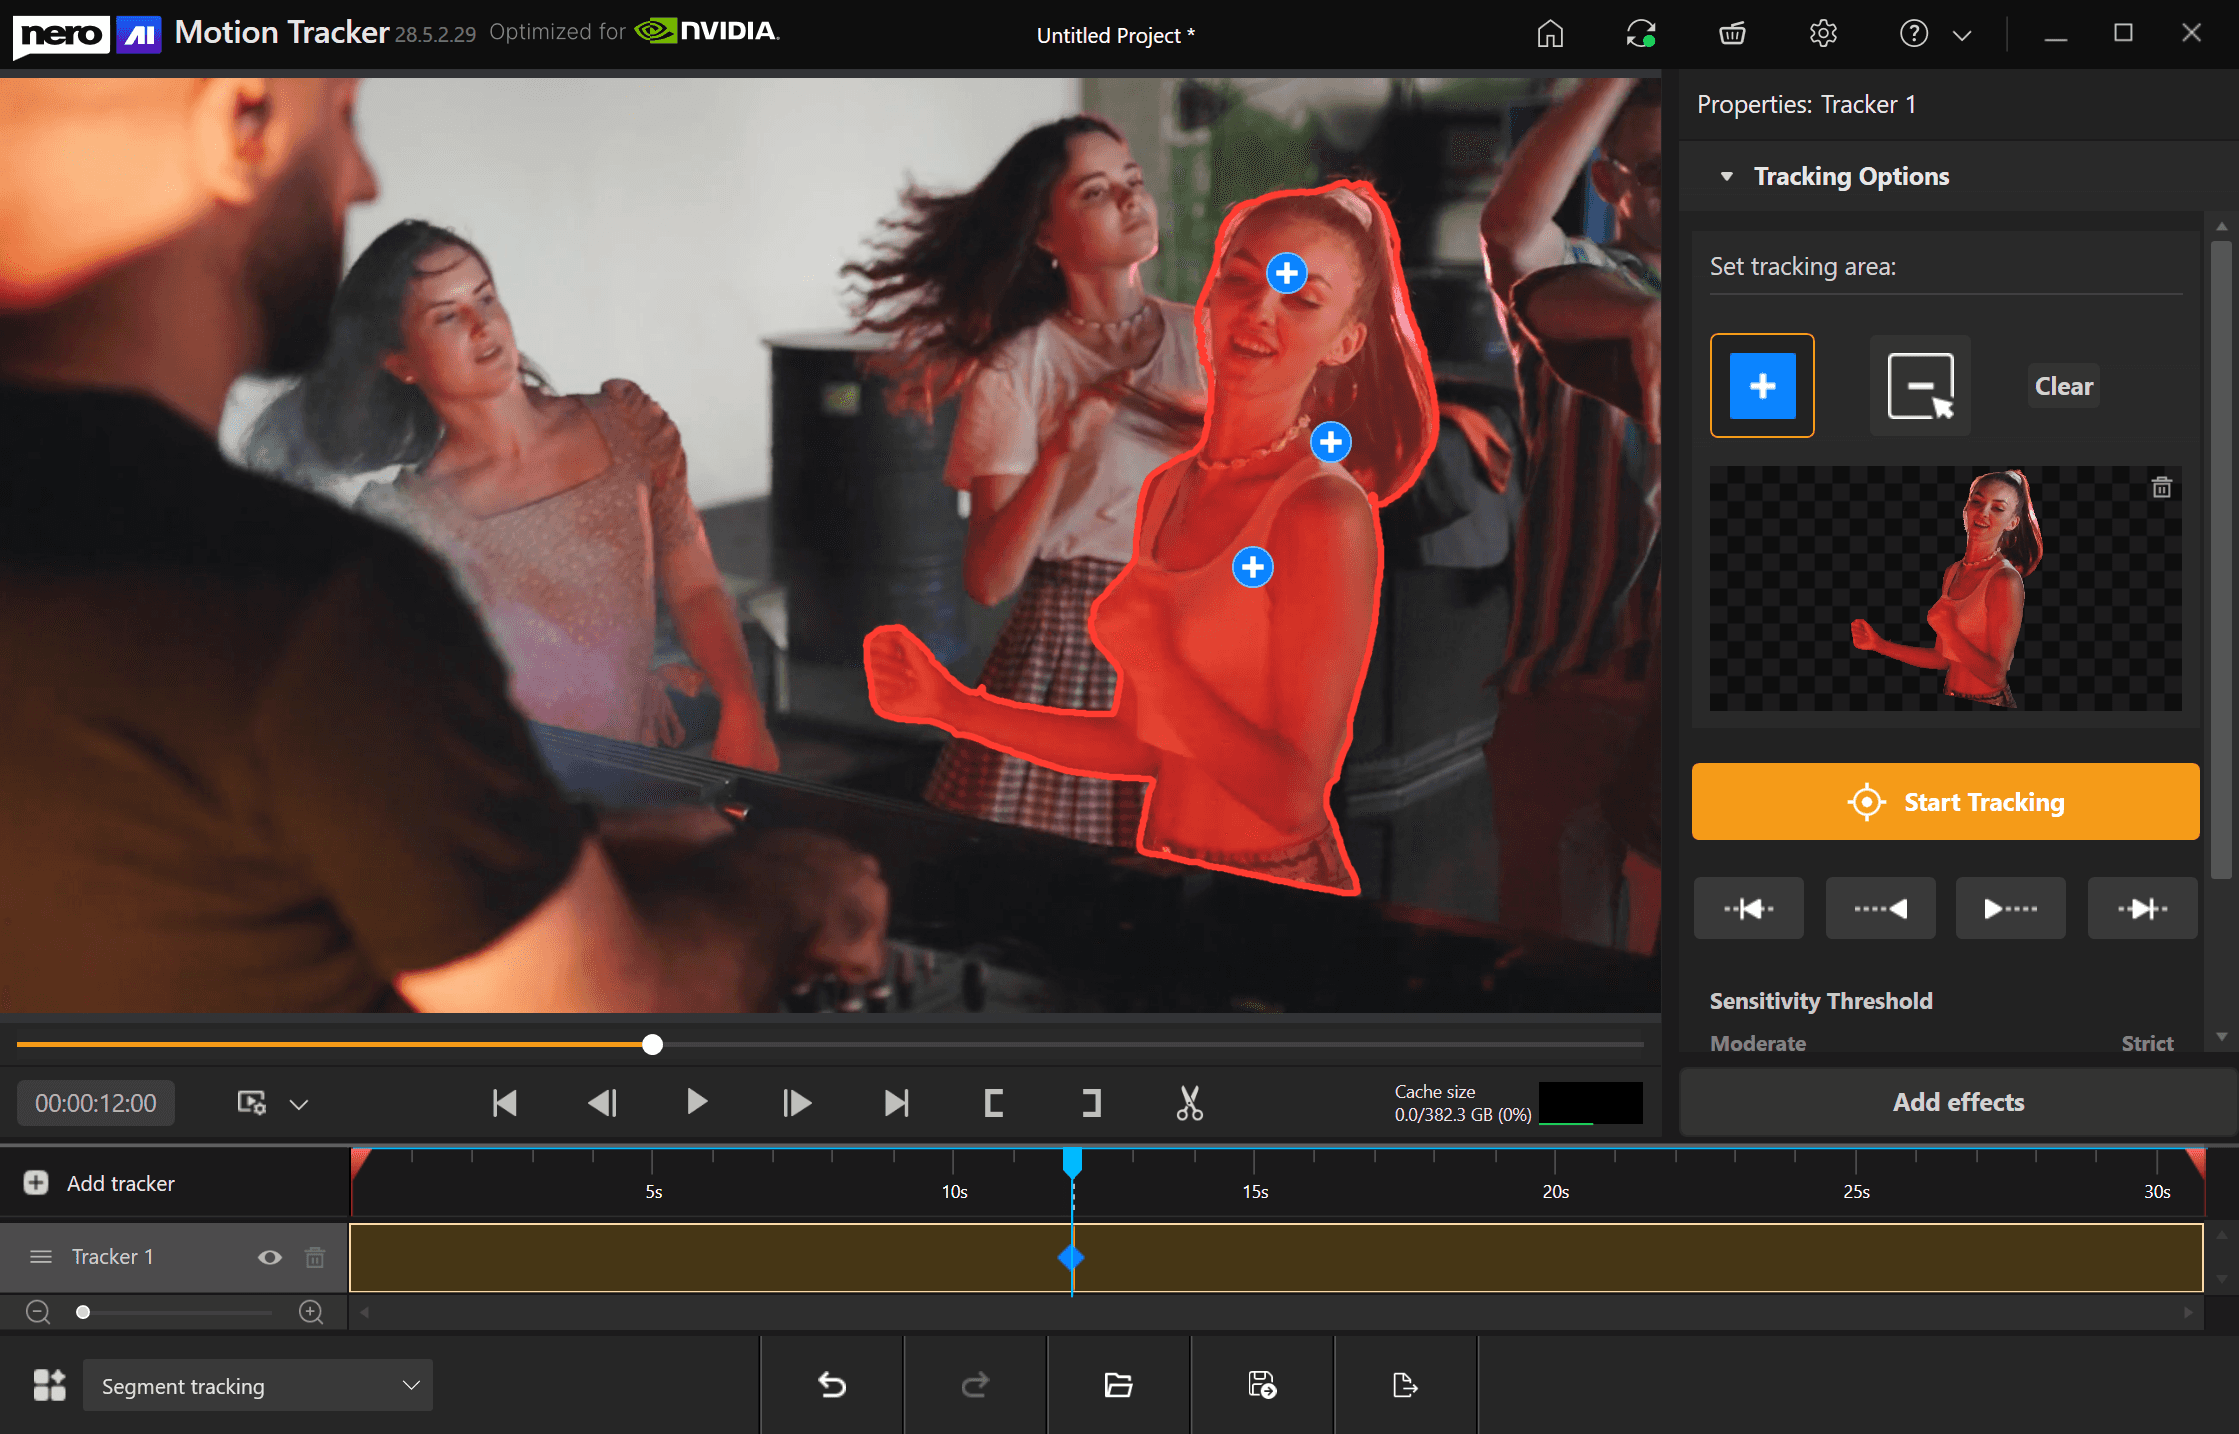
For those situations where CapCut's tracking falls short, Nero Motion Tracker offers a more powerful solution. Its new segment tracking mode works like CapCut's brush tool but delivers significantly higher accuracy around details and edges. The AI-powered tracking maintains precision even through complex movements that would cause CapCut's tracker to drift.
👉Download Nero Motion Tracker👈
What makes it particularly valuable for beginners: you don't need to understand keyframes, effect tracks, or manual adjustments to blur moving objects effectively. The tool handles the technical complexity automatically, making professional-quality tracking accessible even if you're completely new to video editing.
Conclusion
Mastering face blur in CapCut gives you essential privacy protection tools that scale with your needs. And when CapCut's limitations become bottlenecks, tools like Nero Motion Tracker provide the advanced tracking capabilities that professional workflows demand.
Whether you're protecting privacy in street footage, anonymizing interview subjects, or handling sensitive content for clients, you now have the complete toolkit to blur faces effectively—from beginner-friendly quick fixes to expert-level precision tracking.


