Windows 11 dropped native DVD playback support, and burning a disc isn’t as straightforward as it used to be. File Explorer and Windows Media Player can handle basic data DVDs, but video DVDs, ISO images, and disc copying require third-party software like Nero Burning ROM.
Whether you’re backing up family photos, archiving work documents, or creating a playable movie DVD, each scenario calls for a different approach. This guide covers all three methods available on Windows 11 in 2026. If you’re using Nero Express instead of Nero Burning ROM, see our step-by-step DVD burning tutorial.
Why Burn DVDs in 2026?
DVDs offer some advantages that cloud storage and USB drives can't fully replace:
Longevity. Archival-grade DVDs can last 30 to 100 years under proper storage conditions.
Offline access. No internet connection required.
Tamper resistance. Write-once DVDs (DVD-R/DVD+R) can't be modified after burning, making them suitable for legal and compliance archives.
Cost without subscriptions. At roughly $0.20 to $0.50 per disc, there are no ongoing fees.
Universal compatibility. Any computer with an optical drive can read them, regardless of operating system.
What You'll Need to Burn a DVD on Windows 11
Gather these items before you start:
A DVD burner drive. Most modern laptops don't include one. An external USB DVD burner works fine. Look for drives that support DVD-R, DVD+R, DVD-RW, DVD+RW, and dual-layer writing.
A blank, recordable DVD. Single-layer discs hold 4.7 GB. Dual-layer discs hold 8.5 GB. Not all burners and players support dual-layer, so check your drive specifications.
Files ready to burn. Videos, documents, photos, music, or an ISO image file. Make sure the total size fits within your disc capacity.
DVD burning software. Windows 11 includes File Explorer and Windows Media Player for basic burning. For video DVDs, ISO burning, and advanced features, third-party software like Nero Burning ROM is recommended.
DVD Disc Types Explained
Disc Type | Capacity | Rewritable? | Best For |
DVD-R | 4.7 GB | No | One-time data backup, video DVDs |
DVD+R | 4.7 GB | No | One-time data backup, better error management |
DVD-RW | 4.7 GB | Yes (up to ~1,000 times) | Reusable data transfer, testing |
DVD+RW | 4.7 GB | Yes (up to ~1,000 times) | Reusable data transfer, faster formatting |
DVD+R DL | 8.5 GB | No | Large video files, dual-layer movie DVDs |
DVD-R DL | 8.5 GB | No | Large data archives |
DVD-R and DVD+R use different tracking technologies, but most modern burners handle both equally well. If you want to erase and rewrite a disc multiple times, pick DVD-RW or DVD+RW.
Method 1: Burn a DVD on Windows 11 with Nero Burning ROM
Best for: Data DVDs, video DVDs (pre-authored), ISO images, disc copying, and professional archiving
Nero Burning ROM has been a popular optical disc burning tool for over two decades. It supports every DVD format, handles both data and video DVD burning, burns ISO images, and includes features like SecurDisc protection, disc spanning, and post-burn verification.
Step 1: Install Nero Burning ROM
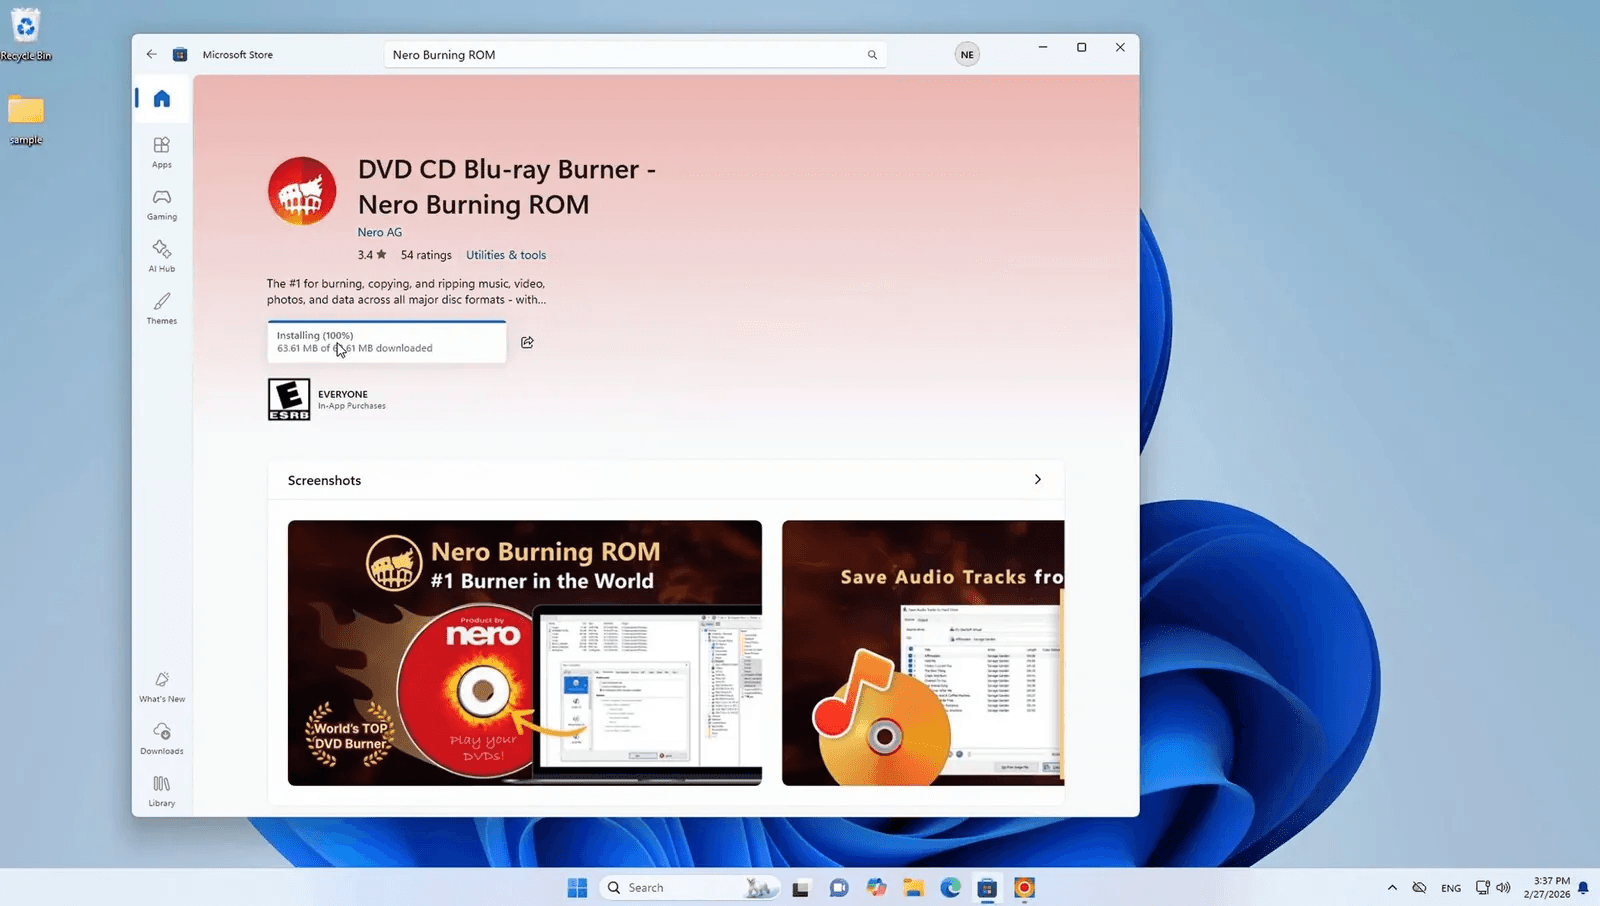
First, download and install Nero Burning ROM from the Microsoft Store.
Installation steps:
Click the download link above or open the Microsoft Store on your Windows 11 PC
Search for “Nero Burning ROM“ (if not using the direct link)
Click the Get or Install button
Wait for the download and installation to complete (approximately 63 MB)
Step 2: Launch Nero and Create a New DVD Project
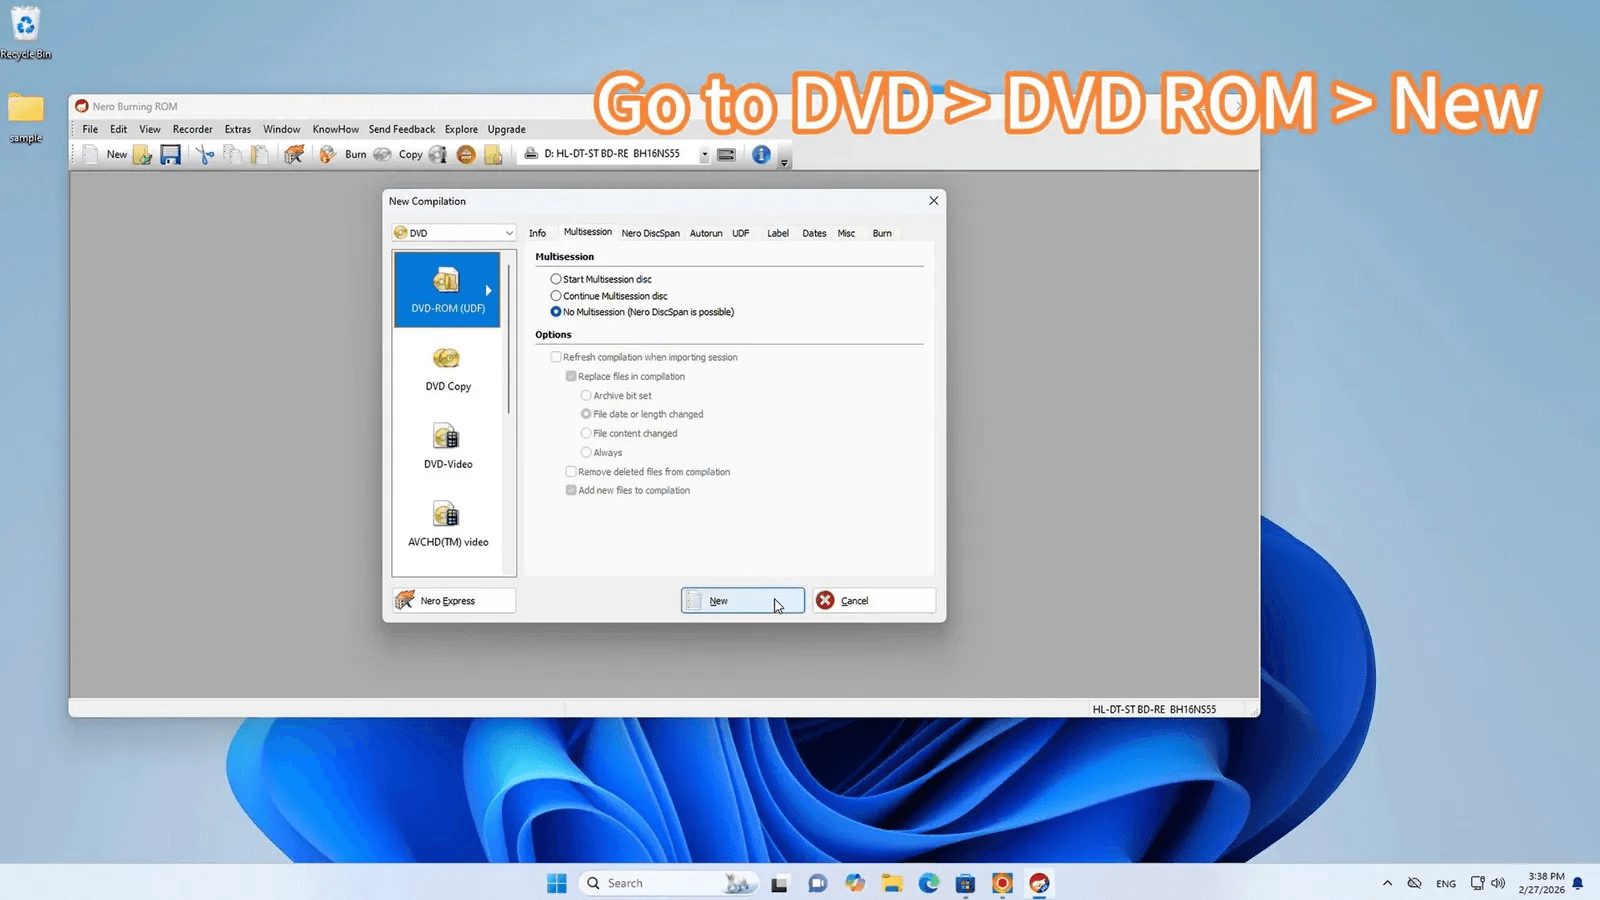
Once Nero Burning ROM is installed, launch the application and set up your DVD project:
Open Nero Burning ROM from your Start menu
In the New Compilation window, navigate to DVD > DVD-ROM (UDF) > New
The DVD-ROM (UDF) option works well for data DVDs that store any type of file
You’ll see other options including DVD-Video, DVD Copy, and DVD-ROM (ISO)
Click New to create your DVD project
For a video DVD that plays in standard DVD players, choose DVD > DVD-Video instead. To burn an ISO image, select DVD > DVD-ROM (ISO) or use the “Burn Image” option from the File menu.
Step 3: Add Files to Your DVD
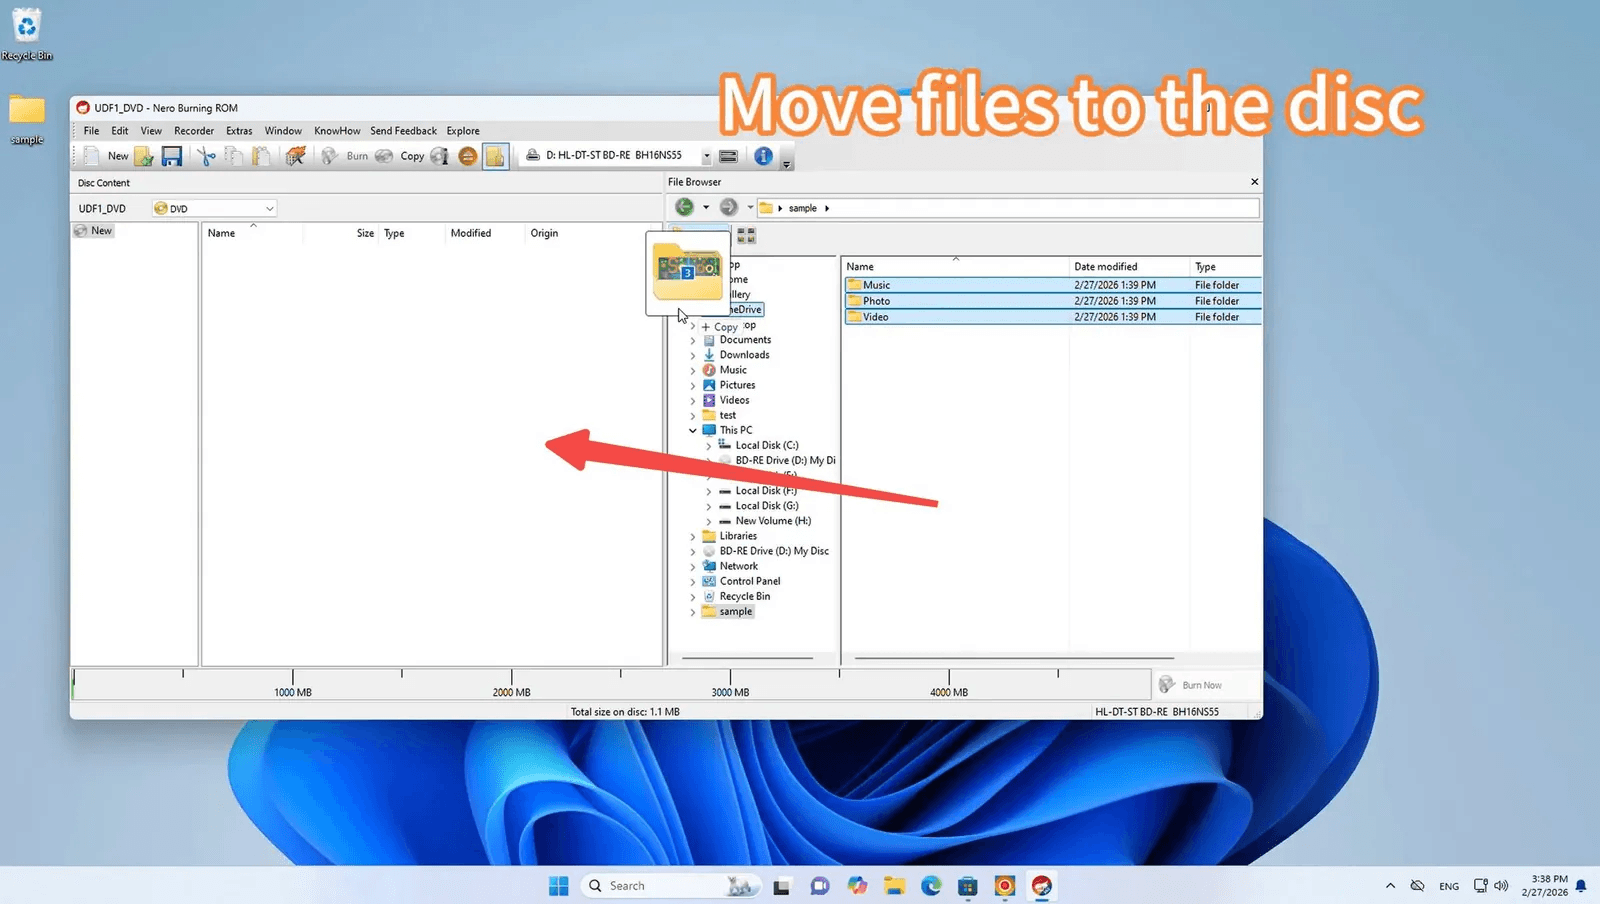
Now add the files you want to burn:
The Nero interface has two panels: the left shows your disc content, the right is a file browser.
Navigate to the folder containing your files in the right panel
Drag and drop files or entire folders from the right panel to the left panel
Watch the capacity indicator at the bottom to ensure you don’t exceed the DVD storage limit
Step 4: Review Your Files and Burn
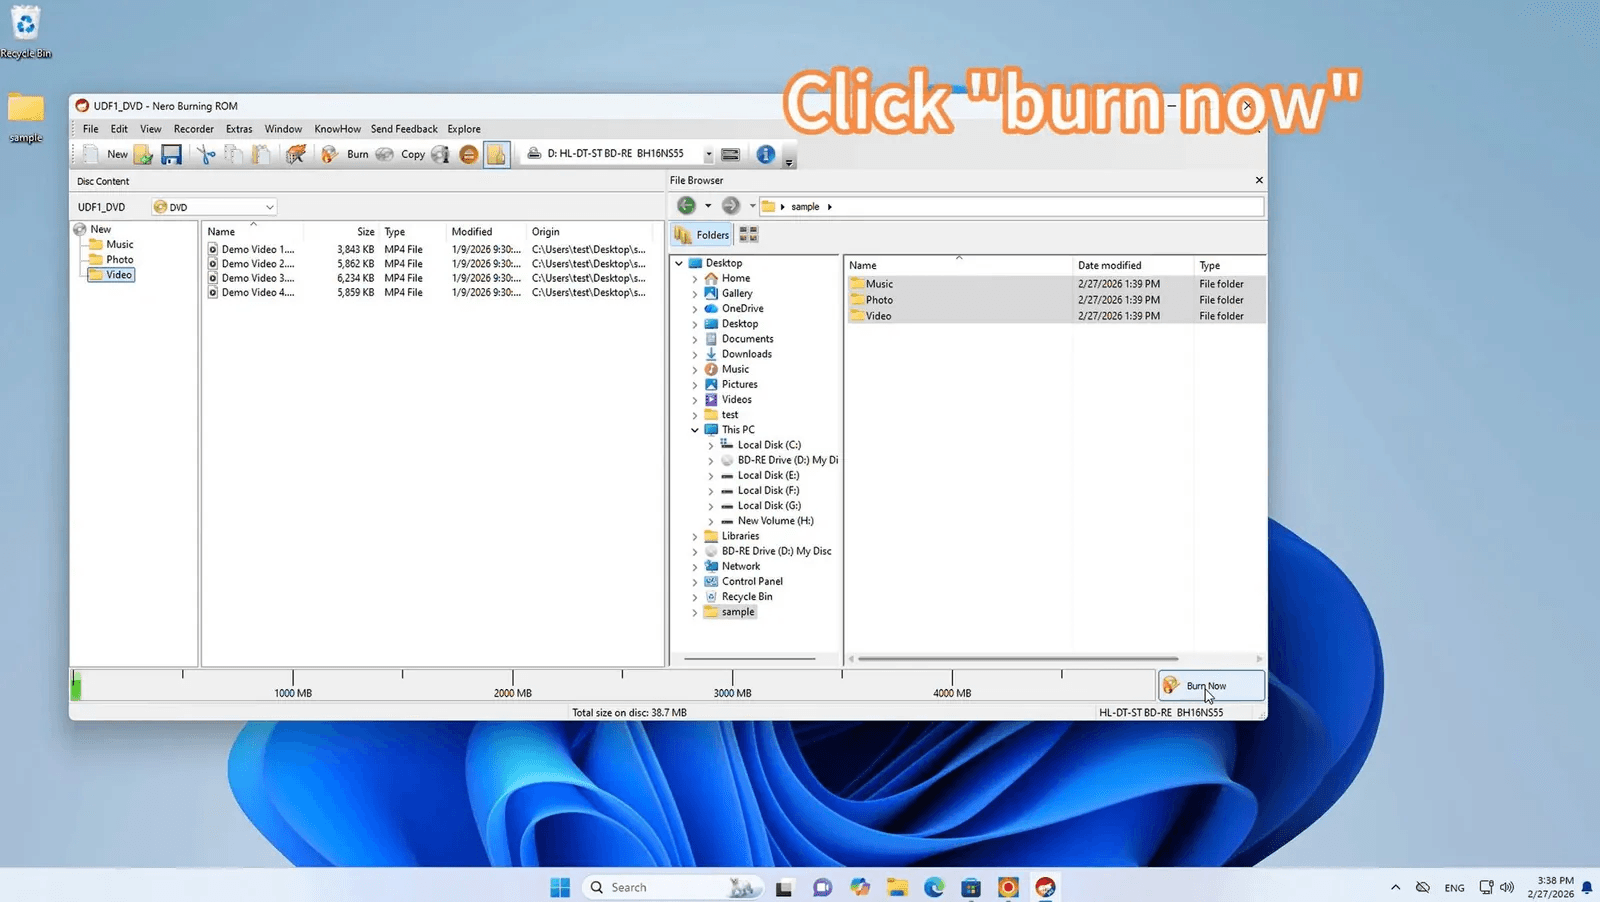
Before burning, review your file selection:
Check the file list in the disc content area
Insert a blank DVD into your DVD burner drive
Click the Burn Now button
Step 5: Monitor the Burning Process
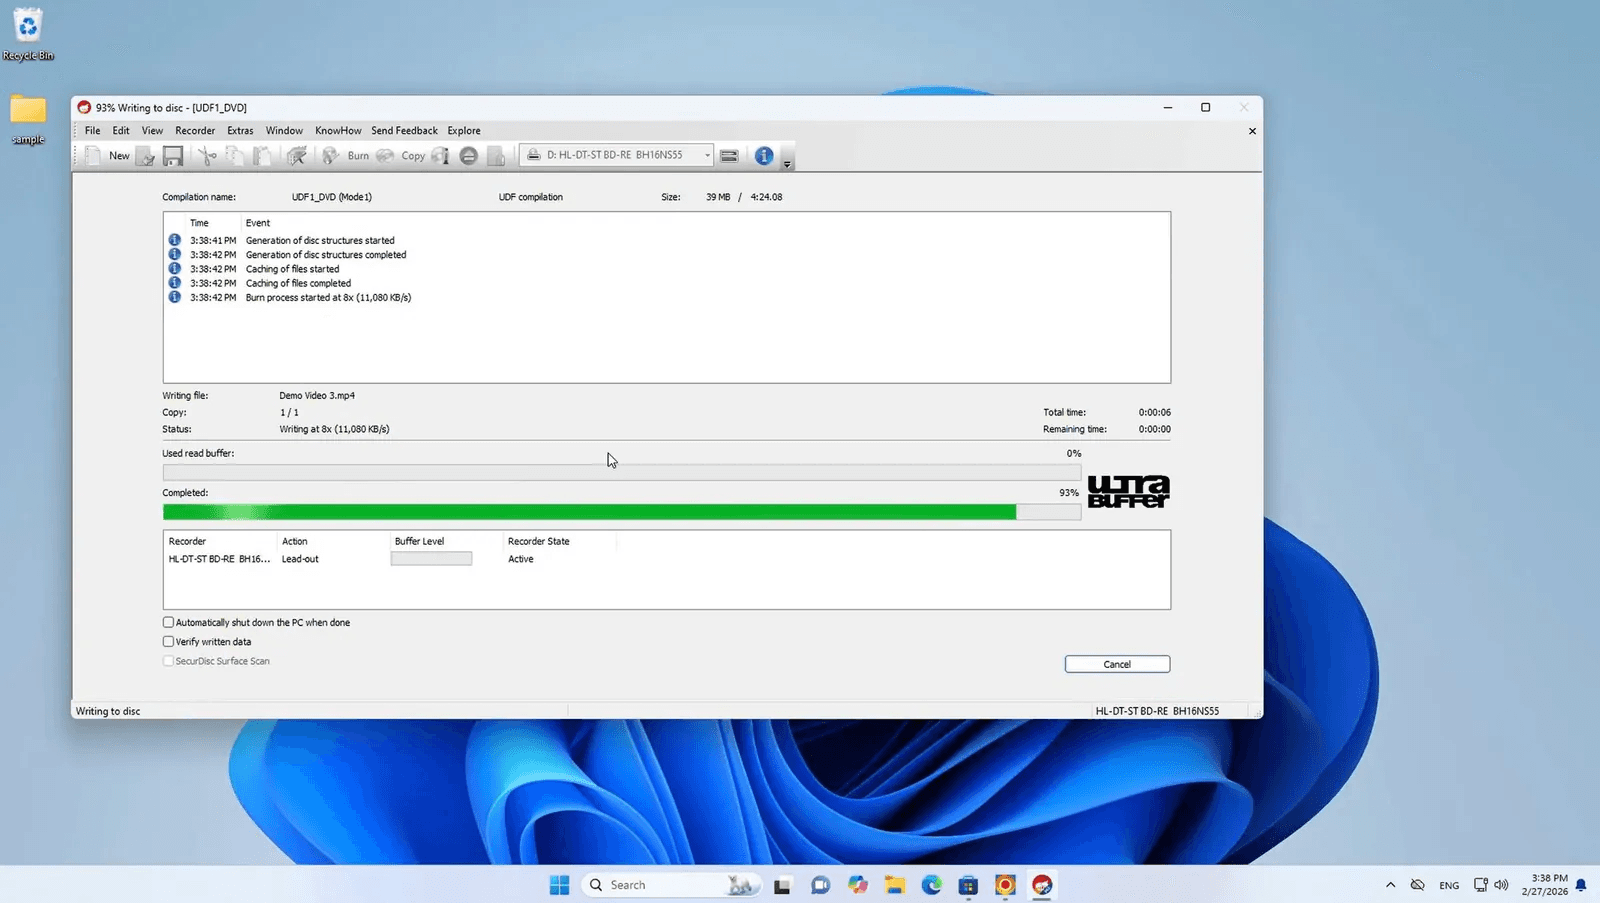
Once you click Burn Now, Nero begins the burning process:
The progress window shows write speed, buffer status, and time remaining
Optional settings: Verify disc data after burning (recommended for important data) and Allow files to be added later (multisession)
The process typically takes 5 to 15 minutes depending on disc speed, data volume, and verification settings
Do not remove the disc or close the application until the process reaches 100%.
Step 6: Verify Your Burned DVD
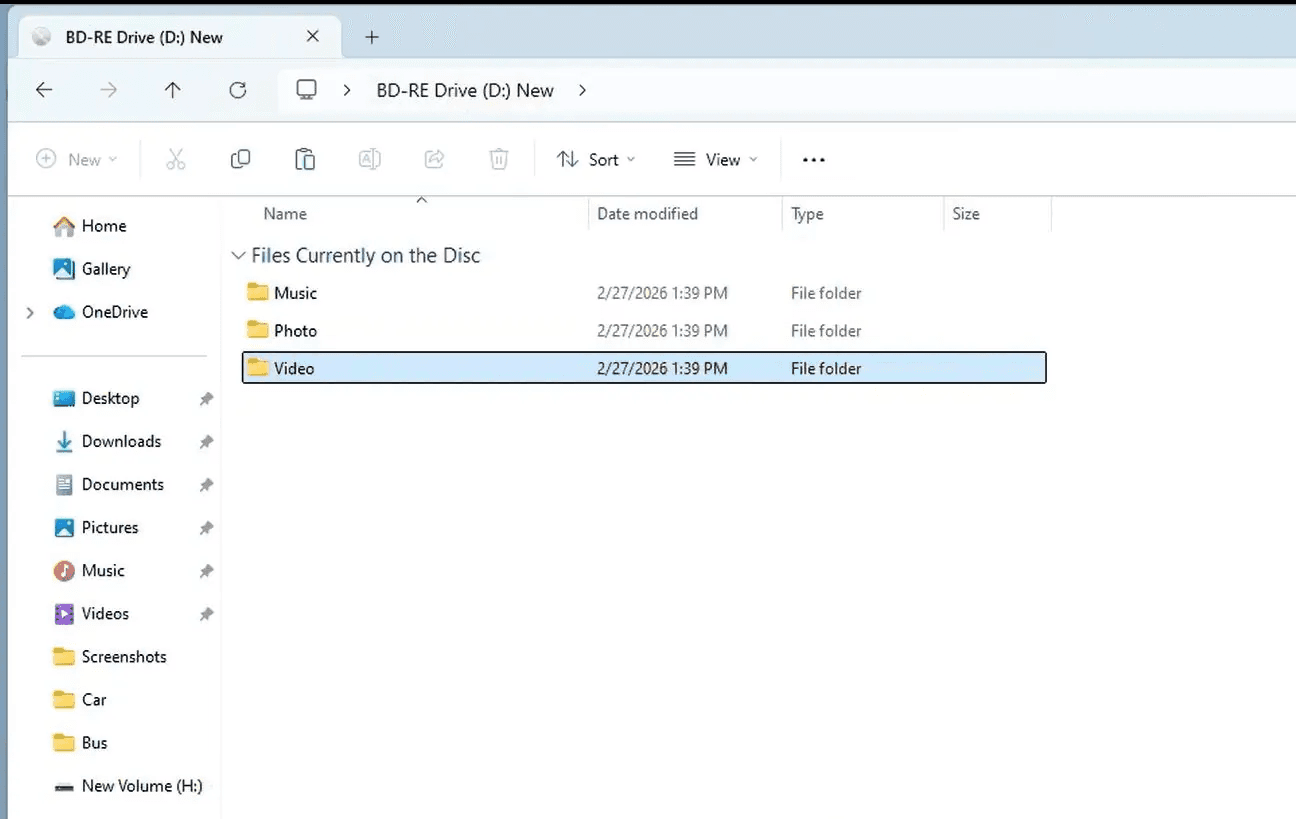
After the burn completes, verify your DVD:
Re-insert the DVD into your drive
Open File Explorer and navigate to your DVD drive
You should see all your burned folders and files
Try playing a video or opening a document to confirm everything works
Method 2: Burn a DVD on Windows 11 Using File Explorer (No Software Needed)
Best for: Quick data backups, file transfers, no third-party software
Windows 11 includes a built-in disc burning feature in File Explorer. This method is free and requires no additional software. It only creates data DVDs, though. It cannot create video DVDs that play in standard DVD players.
Step 1: Insert a Blank DVD
Insert a blank, recordable DVD into your DVD burner drive. If an AutoPlay dialog appears, close it.
Step 2: Open the DVD Drive in File Explorer
Open File Explorer (press
Win + E)Navigate to This PC
Double-click your DVD drive to open it
Step 3: Choose How to Use the Disc
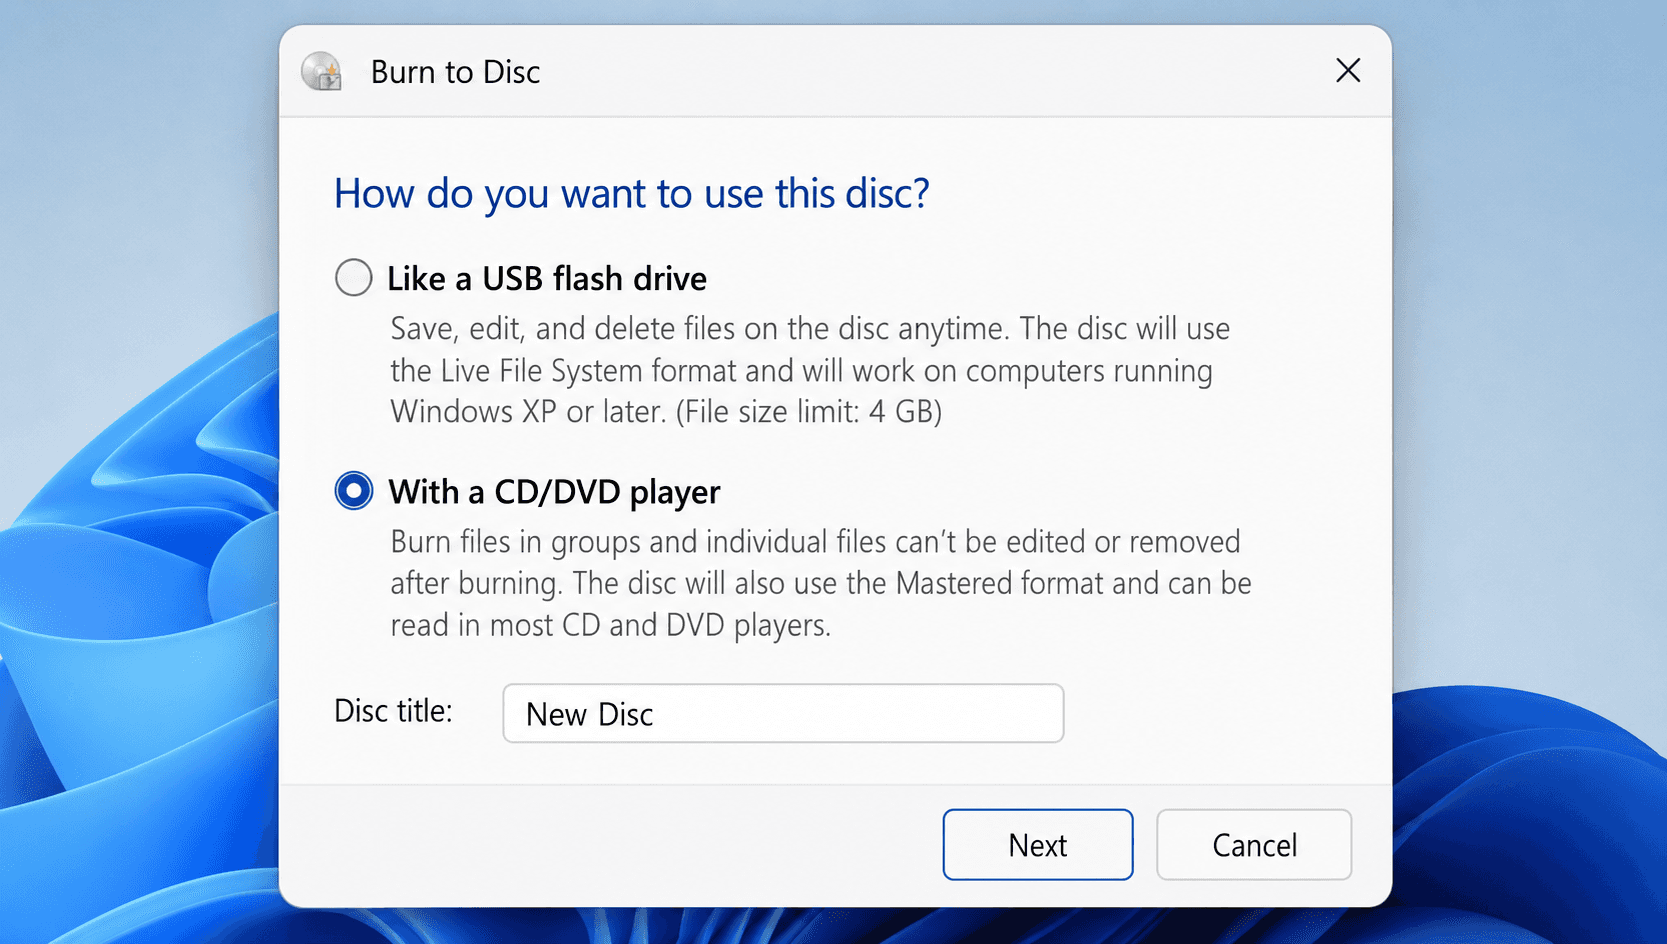
When you open the blank DVD drive, Windows 11 prompts you to choose how to use the disc:
"Like a USB flash drive" uses the Live File System. Files are written immediately. You can add or delete files later. This option works only on Windows PCs. Best for ongoing data transfer.
"With a CD/DVD player" uses the Mastered format. Files are staged and then burned in a single session. Works on most computers and DVD players. Best for final backups and maximum compatibility.
For most users, "With a CD/DVD player" is the better choice because it produces a more compatible disc.
Step 4: Add Files to the Disc
If you chose "With a CD/DVD player," a File Explorer window opens with a header labeled "Files Ready to Be Written to the Disc"
Open another File Explorer window with the files you want to burn
Drag and drop or copy-paste your files into the "Files Ready to Be Written to the Disc" area
Files from multiple locations can be added. They'll all be staged together.
Step 5: Finish Burning
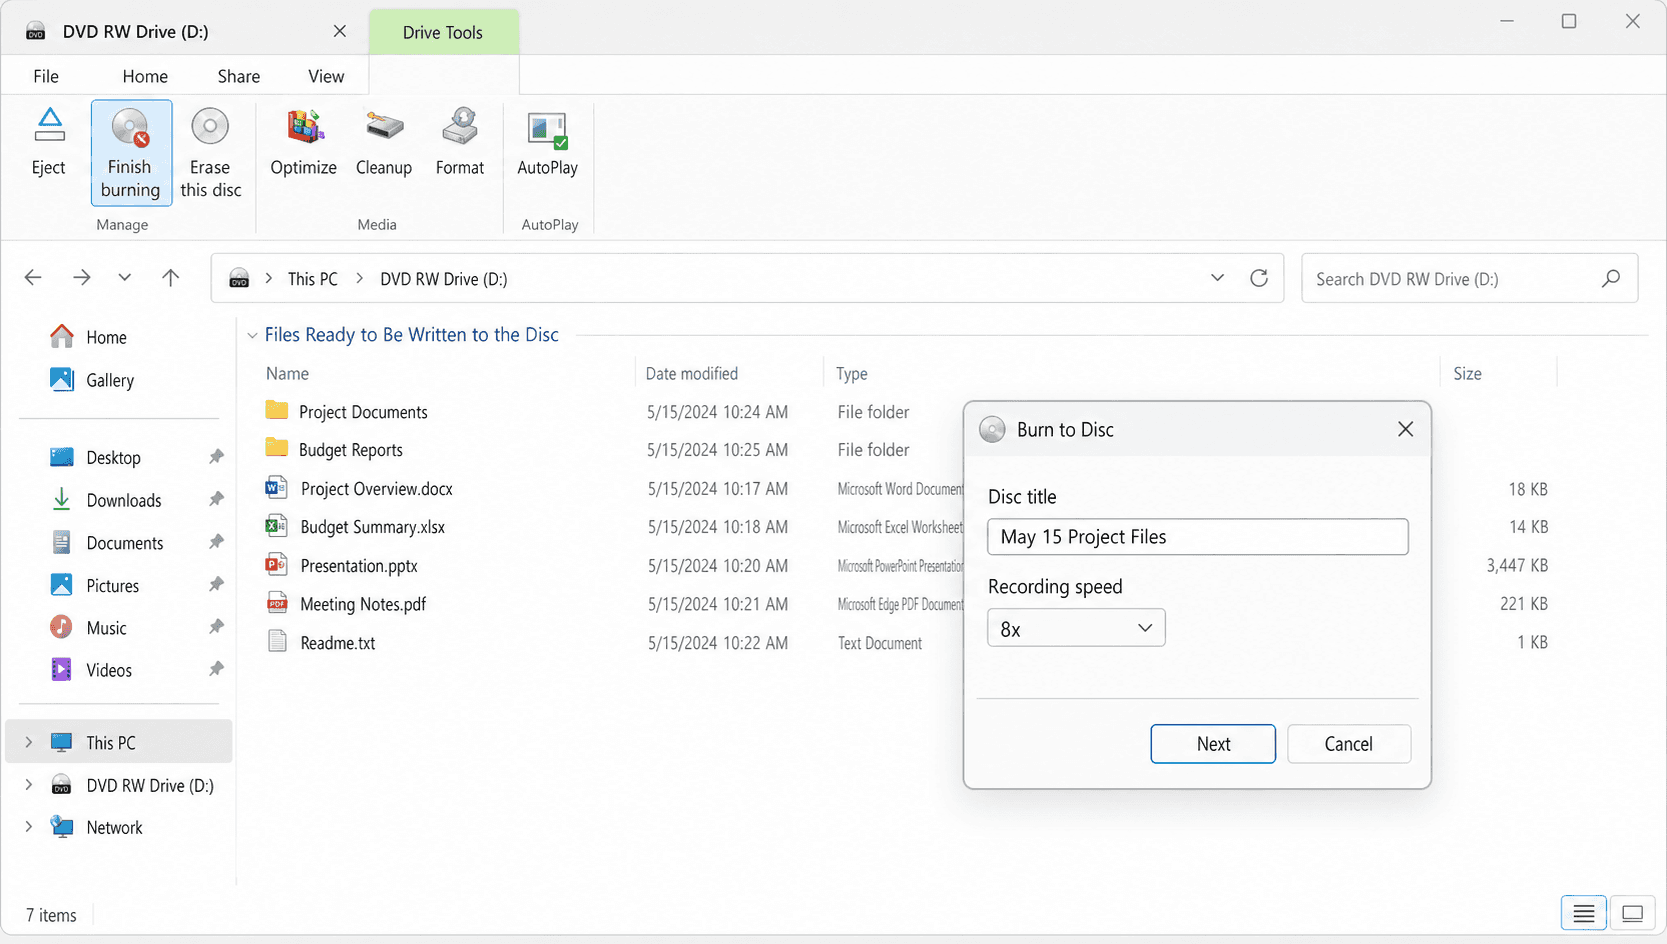
Click Drive Tools in the File Explorer ribbon (it appears when the DVD drive is selected)
Click Finish burning
In the Burn to Disc dialog, enter a disc title
Select a recording speed. Lower speeds like 4x or 8x produce more reliable burns. Higher speeds like 16x are faster but may increase error rates.
Click Next to begin burning
Wait for the process to complete. The disc will eject automatically when finished.
If you see the message "Files ready to be written to the disc," Windows has staged your files but hasn't burned them yet. To complete the burn, click the DVD drive in File Explorer, go to Drive Tools > Finish burning, enter a disc title and recording speed, and click Next.
Method 3: Burn a DVD on Windows 11 Using Windows Media Player
Best for: Burning music, photos, and videos to a data DVD
Windows Media Player on Windows 11 includes a DVD burning feature. It can burn audio CDs, data CDs, and data DVDs. A data DVD has approximately 4.7 GB capacity and can store music, pictures, and videos. Data DVDs burned this way are designed for computer playback. They will not play on most standard DVD players.
Step 1: Open Windows Media Player
Press
Win + Sto open the Search barType Windows Media Player and open the app
If the Player opens in Now Playing mode, click Switch to Library in the upper-right corner
Note: Windows Media Player is no longer pre-installed on all Windows 11 systems. If it’s missing, install it from the Microsoft Store as an optional feature. The newer Media Player app does not support DVD burning.
Step 2: Set Up the Burn
Insert a blank DVD into your DVD-ROM drive
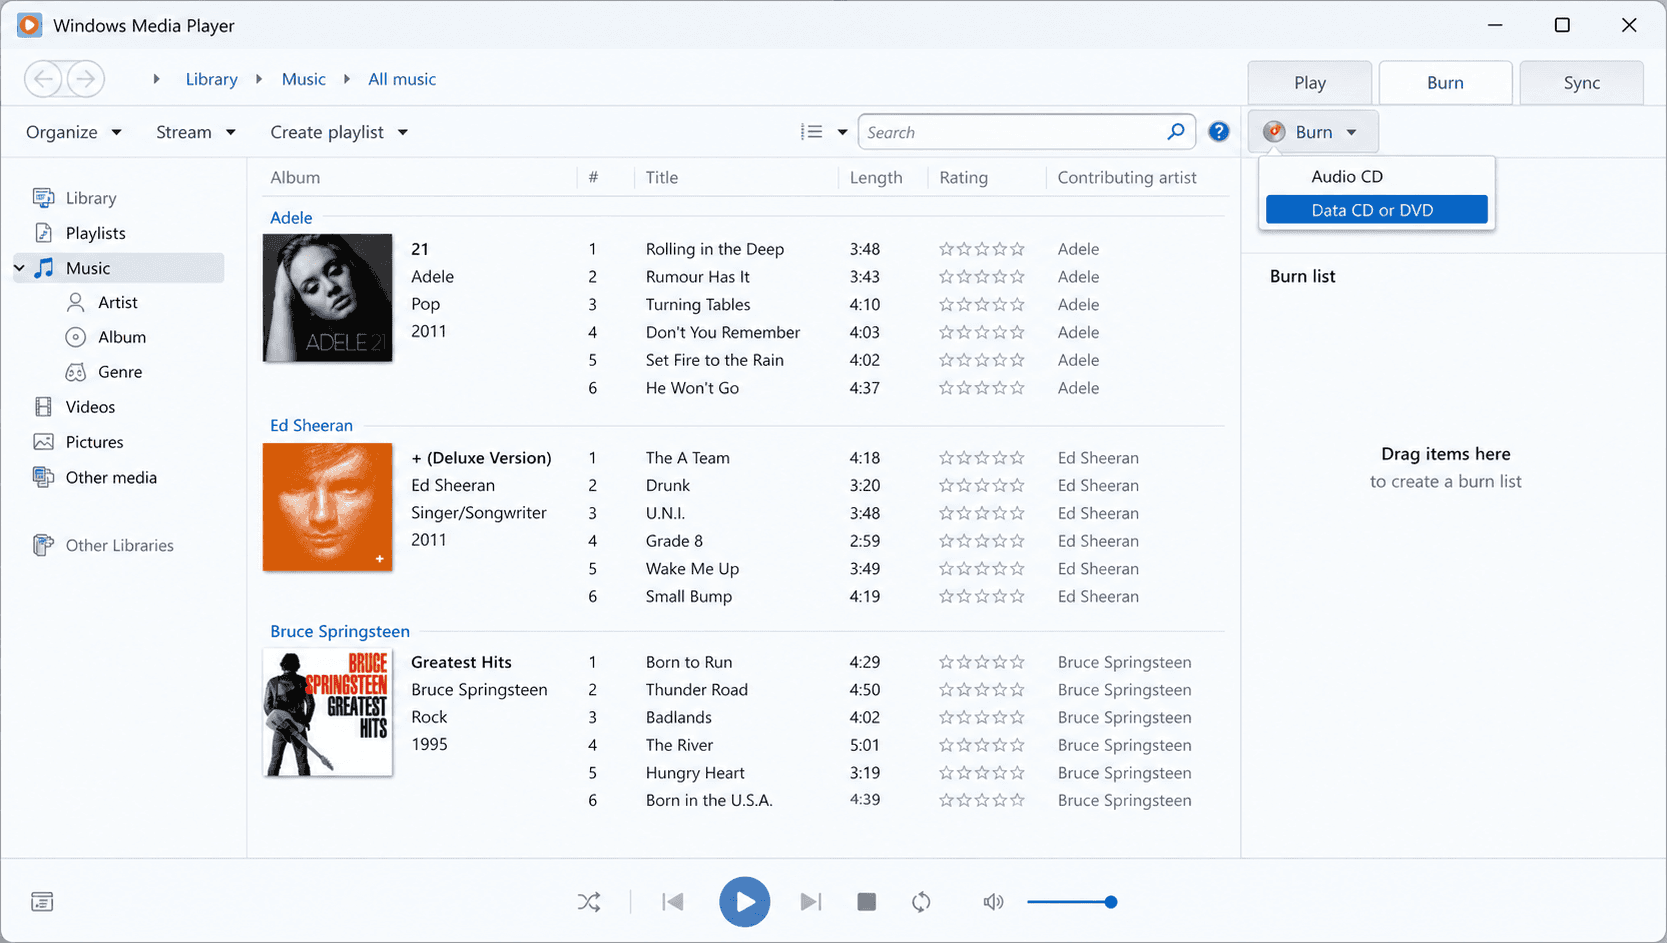
Click the Burn tab at the top right corner of the Player Library
Click the small arrow next to the Burn options button
Select Data CD or DVD (not Audio CD, which is for music CDs only)
Step 3: Add Files and Burn
Open the folder containing your files in another window
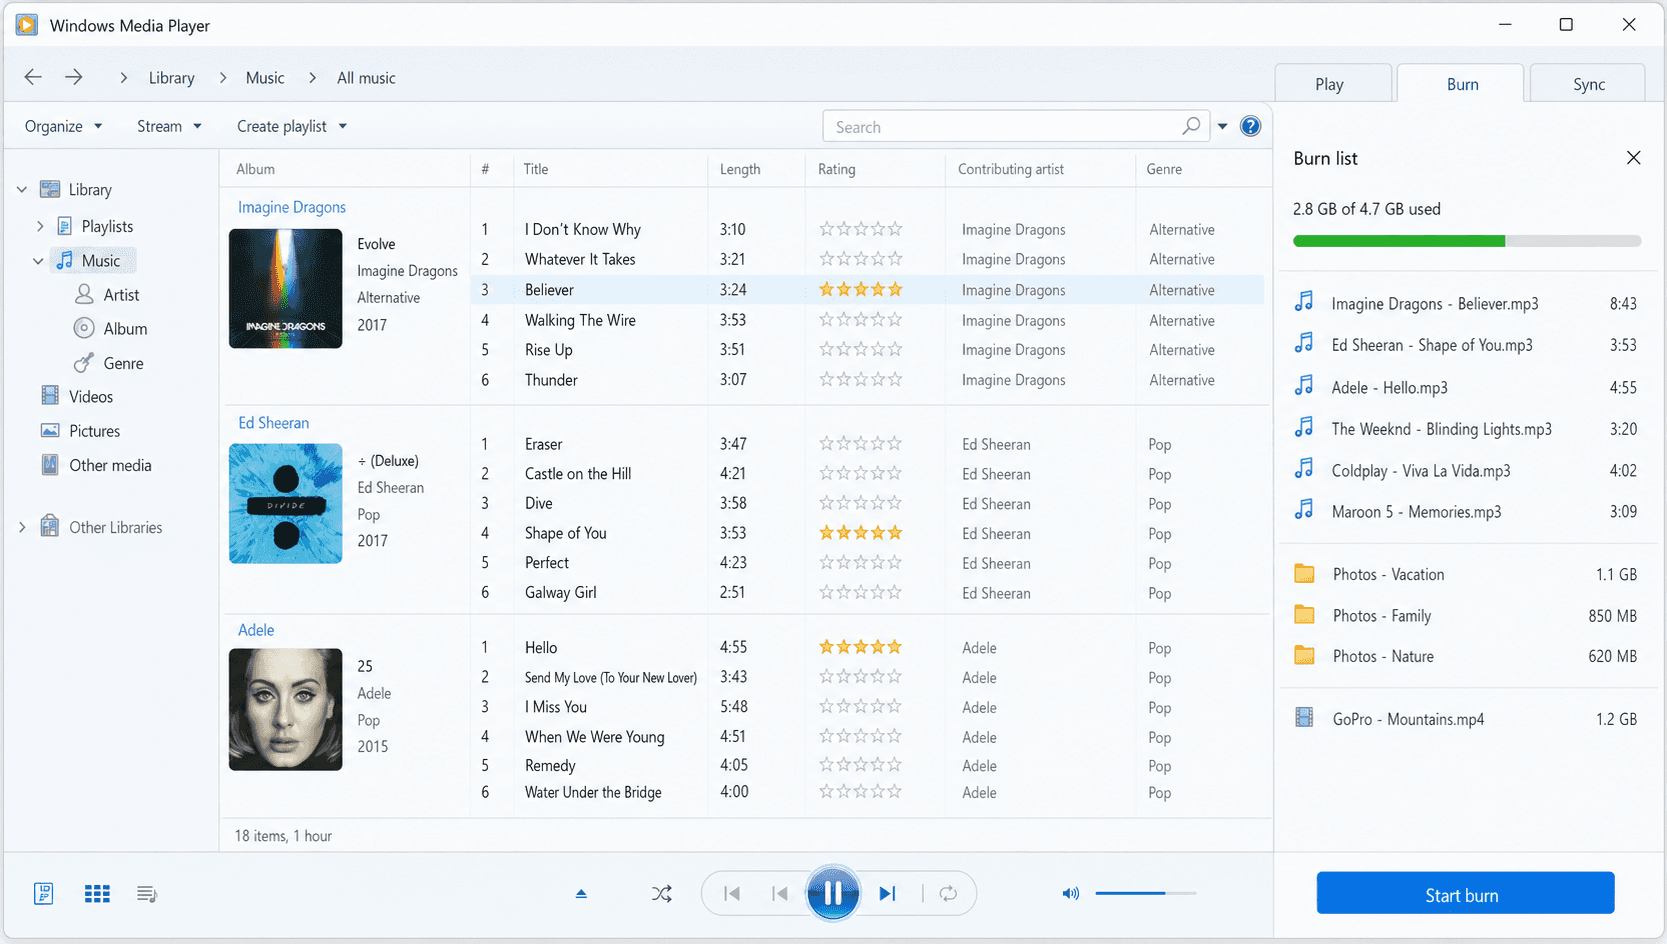
Drag and drop files into the Burn list on the right side
Arrange the order by dragging items up or down
Right-click any item to remove it from the list
Add files until the disc is full (the capacity bar shows remaining space)
Click Start burn to begin
The burning process may take several minutes depending on the amount of data and disc speed.
Beyond Data Discs: Video DVDs, ISO Images, Finalizing & Formatting
The three methods above cover standard data DVD burning. A few scenarios need different tools or extra steps.
Burning MP4 to a Playable DVD
Copying an MP4 file to a disc won’t make it play in a DVD player. The video must be converted to DVD-Video format, which uses a VIDEO_TS folder structure with VOB, IFO, and BUP files. Nero Burning ROM can burn pre-authored DVD-Video folders, but it does not convert video files. To convert MP4, AVI, MOV, or other formats, use Nero Video (part of the Nero suite).
Open Nero Video
Select the option to Burn DVD-Video
Import your MP4 files into the project
Nero Video converts the files to MPEG-2 DVD-Video format
Add a menu, chapters, or subtitles if desired
Insert a blank DVD and click Burn
The resulting disc will play in standard DVD players, gaming consoles, and computers with DVD drives.
Burning ISO Images to DVD
An ISO file is an exact disc image: a single file containing the complete contents and structure of a DVD. This is commonly used for operating system installation media, software distributions, and bootable rescue discs.
Option A: Windows Disc Image Burner (built-in). Right-click the ISO file in File Explorer, select Show more options (if on the simplified context menu) then Burn disc image. Select your DVD burner drive, check Verify disc after burning (recommended), and click Burn.
Option B: Nero Burning ROM. For more control over speed and verification, open Nero Burning ROM and go to File > Burn Image. Select your ISO file, choose write speed (4x or 8x is recommended for bootable discs), and click Burn.
Burning at lower speeds is especially important for bootable ISOs. Higher speeds can introduce subtle data errors that cause boot failures.
Finalizing a DVD
Finalizing a DVD writes a closing session that makes the disc readable on other devices. On write-once media, it also prevents further writes. Without finalization, some DVD players and computers may not be able to read the disc.
In Nero Burning ROM, finalization happens automatically when you burn a disc with the “Allow files to be added later” option unchecked (the default). To manually finalize a disc that was burned as multisession: open Nero Burning ROM, insert the unfinalized DVD, go to File > Continue Multisession Disc, click Burn without adding new files, ensure Finalize disc is checked in the Burn tab, then click Burn.
In File Explorer, the disc is automatically finalized when you click Finish burning with the “With a CD/DVD player” option selected. If you chose “Like a USB flash drive,” you can finalize later by opening the DVD drive in File Explorer and clicking Drive Tools > Close session.
Once a write-once DVD (DVD-R or DVD+R) is finalized, you cannot add more data to it. Rewritable DVDs (DVD-RW, DVD+RW) can be erased and reburned.
Formatting and Erasing a DVD
Formatting prepares a DVD for use with Windows 11’s Live File System (the “Like a USB flash drive” option). This is primarily relevant for rewritable DVDs (DVD-RW, DVD+RW). Insert the DVD, open File Explorer, right-click the DVD drive, select Format, choose UDF as the file system, and click Start.
To erase a rewritable DVD completely, right-click the DVD drive in File Explorer, select Erase this disc, and follow the wizard.
DVD Burning Methods Comparison
Method | Cost | Data DVD | Video DVD | ISO Burning | Disc Copy | Best For |
Nero Burning ROM | Paid (free trial) | Yes | Yes* | Yes | Yes | All-purpose, professional use |
File Explorer | Free | Yes | No | No | No | Quick file backups |
Windows Media Player | Free | Yes | No | No | No | Music and photo data DVDs |
Windows Disc Image Burner | Free | No | No | Yes | No | Burning ISO files only |
*Nero Burning ROM can burn pre-authored DVD-Video folders. To convert video files like MP4 to DVD-Video format, use Nero Video instead.
Want to compare more options? See our best DVD burning and disc copy software for Windows.
Troubleshooting Common DVD Burning Problems on Windows 11
"A disc burner wasn't found" Error
This means Windows 11 can't detect your DVD drive. Try these fixes:
Check physical connections. For external drives, try a different USB port (preferably USB 3.0).
Check Device Manager. Press
Win + X> Device Manager > DVD/CD-ROM drives. If the drive has a yellow exclamation mark, right-click and select Update driver.Run the Get Help troubleshooter. Open Settings, go to System > Troubleshoot > Other troubleshooters, and run the hardware troubleshooter. (Note: The old
msdt.exetroubleshooter was retired by Microsoft in 2025 and replaced by the Get Help app.)Check BIOS/UEFI. Restart and enter BIOS to confirm the drive is detected at the hardware level.
"Burn to Disc" Option Is Grayed Out
Ensure a blank, writable disc is inserted
Try a different brand of disc. Some burners are picky about media.
Check if the disc is already full or finalized
Restart Windows Explorer: Press
Ctrl + Shift + Esc> Task Manager > find Windows Explorer > right-click > Restart
DVD Won't Play After Burning
Verify the disc was finalized. Unfinalized discs may not be readable on other devices.
Check burn speed. Try burning at a lower speed (4x or 8x).
Enable verification. Always use the "Verify disc data after burning" option in Nero.
Check disc compatibility. Some older DVD players don't read DVD+R/RW discs. Try DVD-R instead.
Clean the disc. Fingerprints and dust can cause read errors.
Burning Process Fails or Produces Errors
Use quality media. Cheap discs have higher failure rates.
Close other applications. CPU- and memory-intensive programs can cause buffer underruns.
Update your burner firmware. Check the manufacturer website for updates.
Try a different disc format. If DVD+R fails, try DVD-R, or vice versa.
Check available disk space. Windows needs temporary space for staging files.
Frequently Asked Questions
Can Windows 11 burn DVDs without extra software?
Yes. Windows 11 includes File Explorer (for data DVD burning), Windows Media Player (for data DVDs with music and media), and Windows Disc Image Burner (for burning ISO files to DVD). None of these built-in tools can create a playable video DVD from video files like MP4. For that, you need third-party software like Nero Burning ROM or Nero Video.
What is the best DVD burning software for Windows 11?
It depends on your needs. For all-around use including data DVDs, ISO burning, and disc copying, Nero Burning ROM is the most comprehensive option. For free, basic data DVD burning, the built-in File Explorer is sufficient. To convert video files to a playable DVD, Nero Video or WinX DVD Author are good choices.
Can I burn a Blu-ray disc on Windows 11?
Yes, if you have a Blu-ray burner drive. Nero Burning ROM supports Blu-ray burning (BD-R, BD-RE) for data, video, and disc images. Windows 11's built-in tools do not support Blu-ray burning.
What's the difference between a data DVD and a video DVD?
A data DVD stores files (MP4, documents, photos) in their original format. It can only be read by computers. A video DVD stores video in DVD-Video format (MPEG-2 with VIDEO_TS folder structure). It can be played by standard DVD players, gaming consoles, and computers. Data DVDs are for backup and file transfer. Video DVDs are for playback on entertainment devices.
How long does it take to burn a DVD on Windows 11?
Burning a full 4.7 GB DVD on Windows 11 typically takes 5 to 15 minutes. A data DVD burned at 16x speed takes about 6 minutes. Video DVD conversion and burning can take 15 to 45 minutes depending on video length and encoding settings. Adding verification adds 3 to 5 minutes.
Conclusion
Match the tool to the task. File Explorer handles simple file transfers, Windows Media Player covers media data DVDs, and Windows Disc Image Burner takes care of ISO files. Nero Burning ROM fills the gaps with video DVD burning (via Nero Video for conversion), disc copying, verification, and SecurDisc protection.