Every family has that one photograph — faded, soft, too small to print — that someone swears is the only picture of Grandma as a young woman. The traditional fix is mailing it to a studio and waiting: as of 2026, professional restoration runs roughly $19–$59 for a light refresh and $50–$150 for scratch and fade repair, with turnaround measured in days.
You can now restore old photos with AI in minutes instead. Nero AI Image Upscaler is built for exactly the files most editors give up on — small, soft, grainy, heavily compressed originals — rebuilding resolution, sharpening faces, and cleaning up damage without a single manual selection. Here's which model to pick, which enhancement layers to stack on top, and what to expect across four real scenarios.
The short version: drop your photo into Nero AI Image Upscaler, choose an upscale model — Photograph for family portraits, Iris for tiny or heavily compressed prints, Reconstruct for missing detail — set the rate to ×2 or ×4 (or more, according to your need), then switch on the Recover and Skin Retouch layers for any photo with faces. Most images finish in seconds.
Still comparing your options? See our guide to the best AI image upscalers in 2026 for a side-by-side look at Nero AI, Topaz Gigapixel, AVCLabs, HitPaw, and Fotor.
Why Old Photos Degrade — and What AI Can Actually Fix
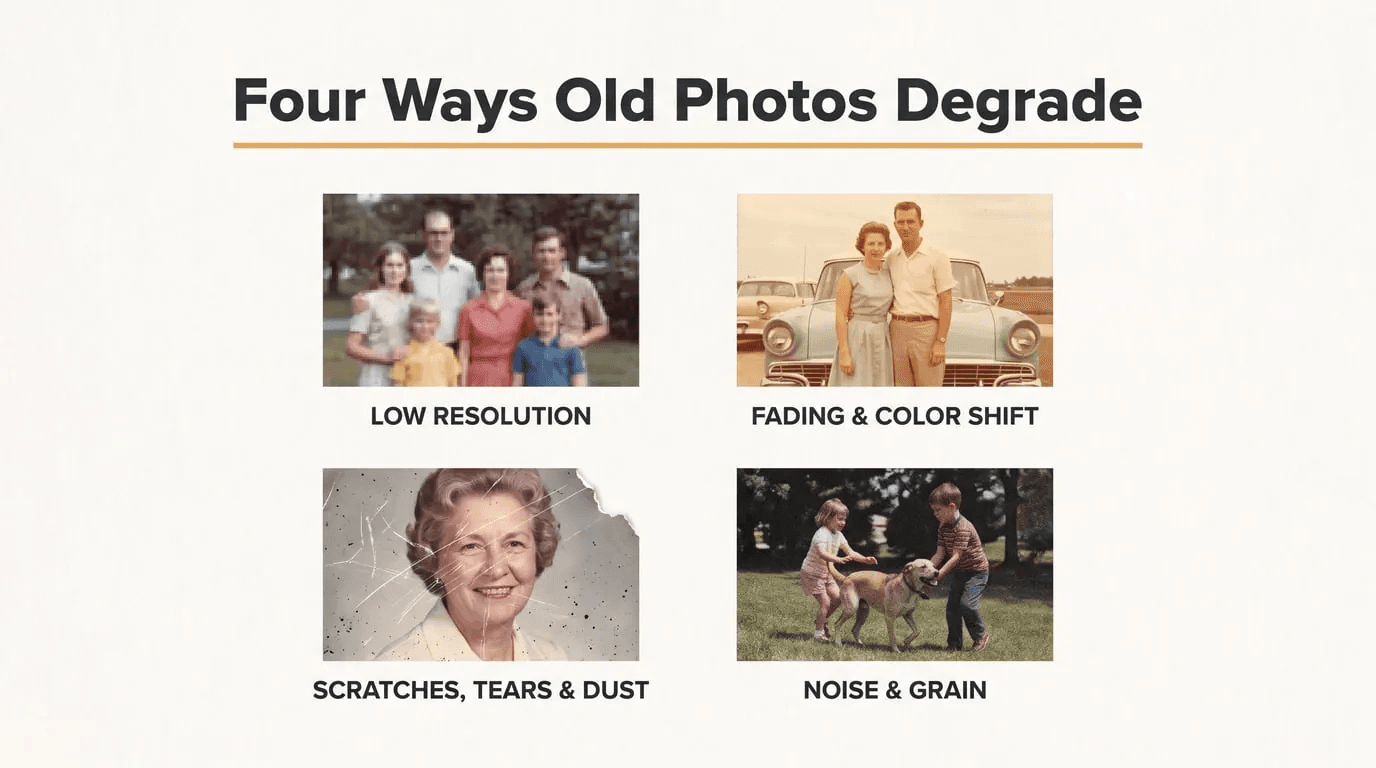
Old photographs fail in four distinct ways, and each one responds to a different AI technique. Knowing which problem you're actually looking at tells you which model and which enhancement layers to reach for — and stops you from over-processing a photo that only needed one fix:
Problem | What It Looks Like | What Fixes It |
|---|---|---|
Low resolution | Soft, pixelated, no fine detail when enlarged | AI upscaling (adds real pixels and texture) |
Fading & color shift | Yellowed, washed-out, shifted hues | AI upscaling restores contrast; fine-tune colors in PhotoSnap |
Scratches, tears, dust | White lines, rips, specks across the image | AI restoration / inpainting |
Noise & grain | Grainy, muddy textures, especially in shadows | AI denoising |
Most heirloom photos carry several of these at once — a small, scratched, faded, grainy print from the 1960s is the classic case. That's the real advantage of an AI pipeline: you handle each layer of damage in sequence instead of fighting every flaw by hand with a clone stamp. What used to be an afternoon in Photoshop is now a checkbox and a few seconds of processing.
How to Restore Old Photos with AI: Step-by-Step
The workflow below uses Nero AI Image Upscaler on Windows or Mac. If your old photos are already on your phone, you can also restore them directly with Nero Lens on iPhone or Android. The desktop version gives you the most control and the largest selection of AI models. Budget a few minutes end to end for a single photo.
Step 1 — Get the Photo Onto Your Computer
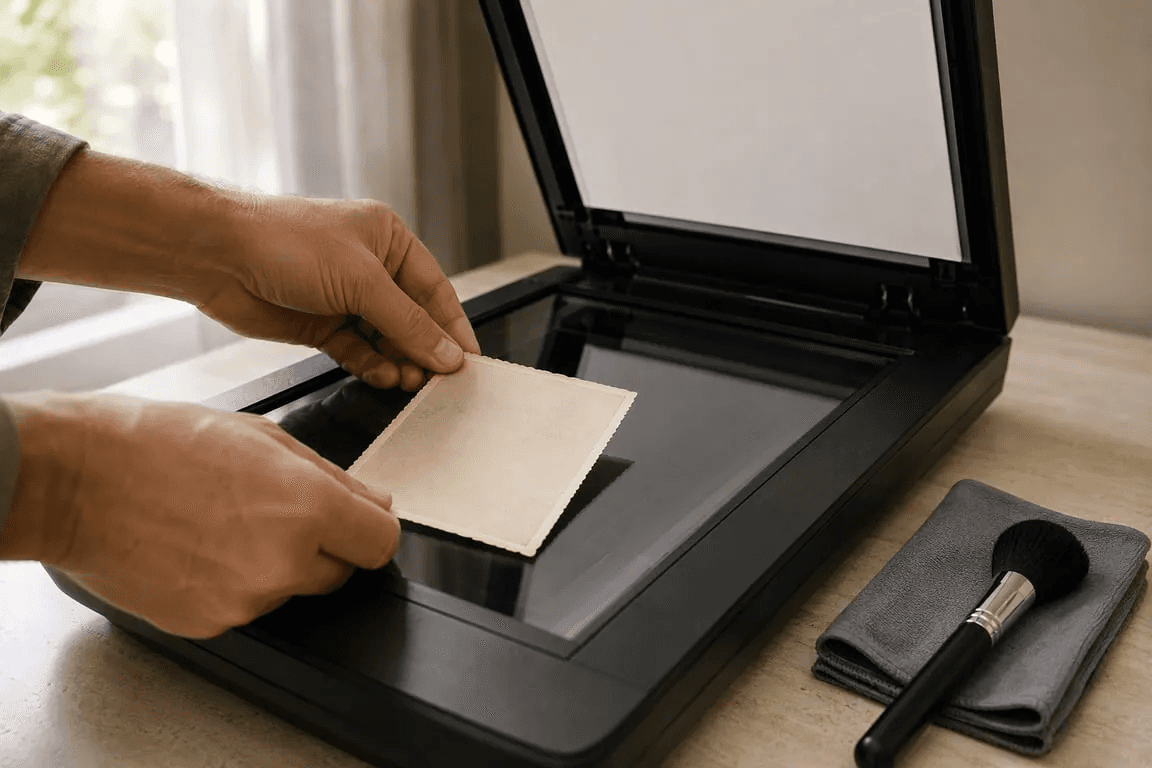
You don't need a pristine source file, and you shouldn't wait until you have one. Nero AI Image Upscaler is designed for low-resolution input — small prints, soft scans, compressed JPEGs — so use whatever version of the photo you can get your hands on: a flatbed scan at your scanner's default setting, a phone snap of a print at a family gathering, or a file that's already sitting on your drive.
Two habits are worth the thirty seconds they cost. If you're scanning, wipe the glass first so you're not adding fresh dust to a photo you're about to clean up. If you're shooting a print with your phone, hold the camera parallel to the surface and use soft indirect light — a window works — so you don't bake a glare patch into the file. Beyond that, don't go hunting for a better original. Rebuilding detail from a weak file is the job the AI was trained for.
Step 2 — Import into Nero AI Image Upscaler
Open the app and drag your scanned file onto the workspace. You can import up to 100 images at once for batch processing — useful when you're digitizing an entire family album in one sitting.
Step 3 — Choose Your Upscale Model
This is the decision that shapes everything downstream. Under Upscale Model, pick the engine that matches your image — the comparison table in the next section breaks down all five. For most old family photos, Photograph is the safest opening move; switch to Iris when the source is extremely small or heavily compressed, and to Reconstruct when you really want the details to shine.
Step 4 — Select Upscale Rate and Process
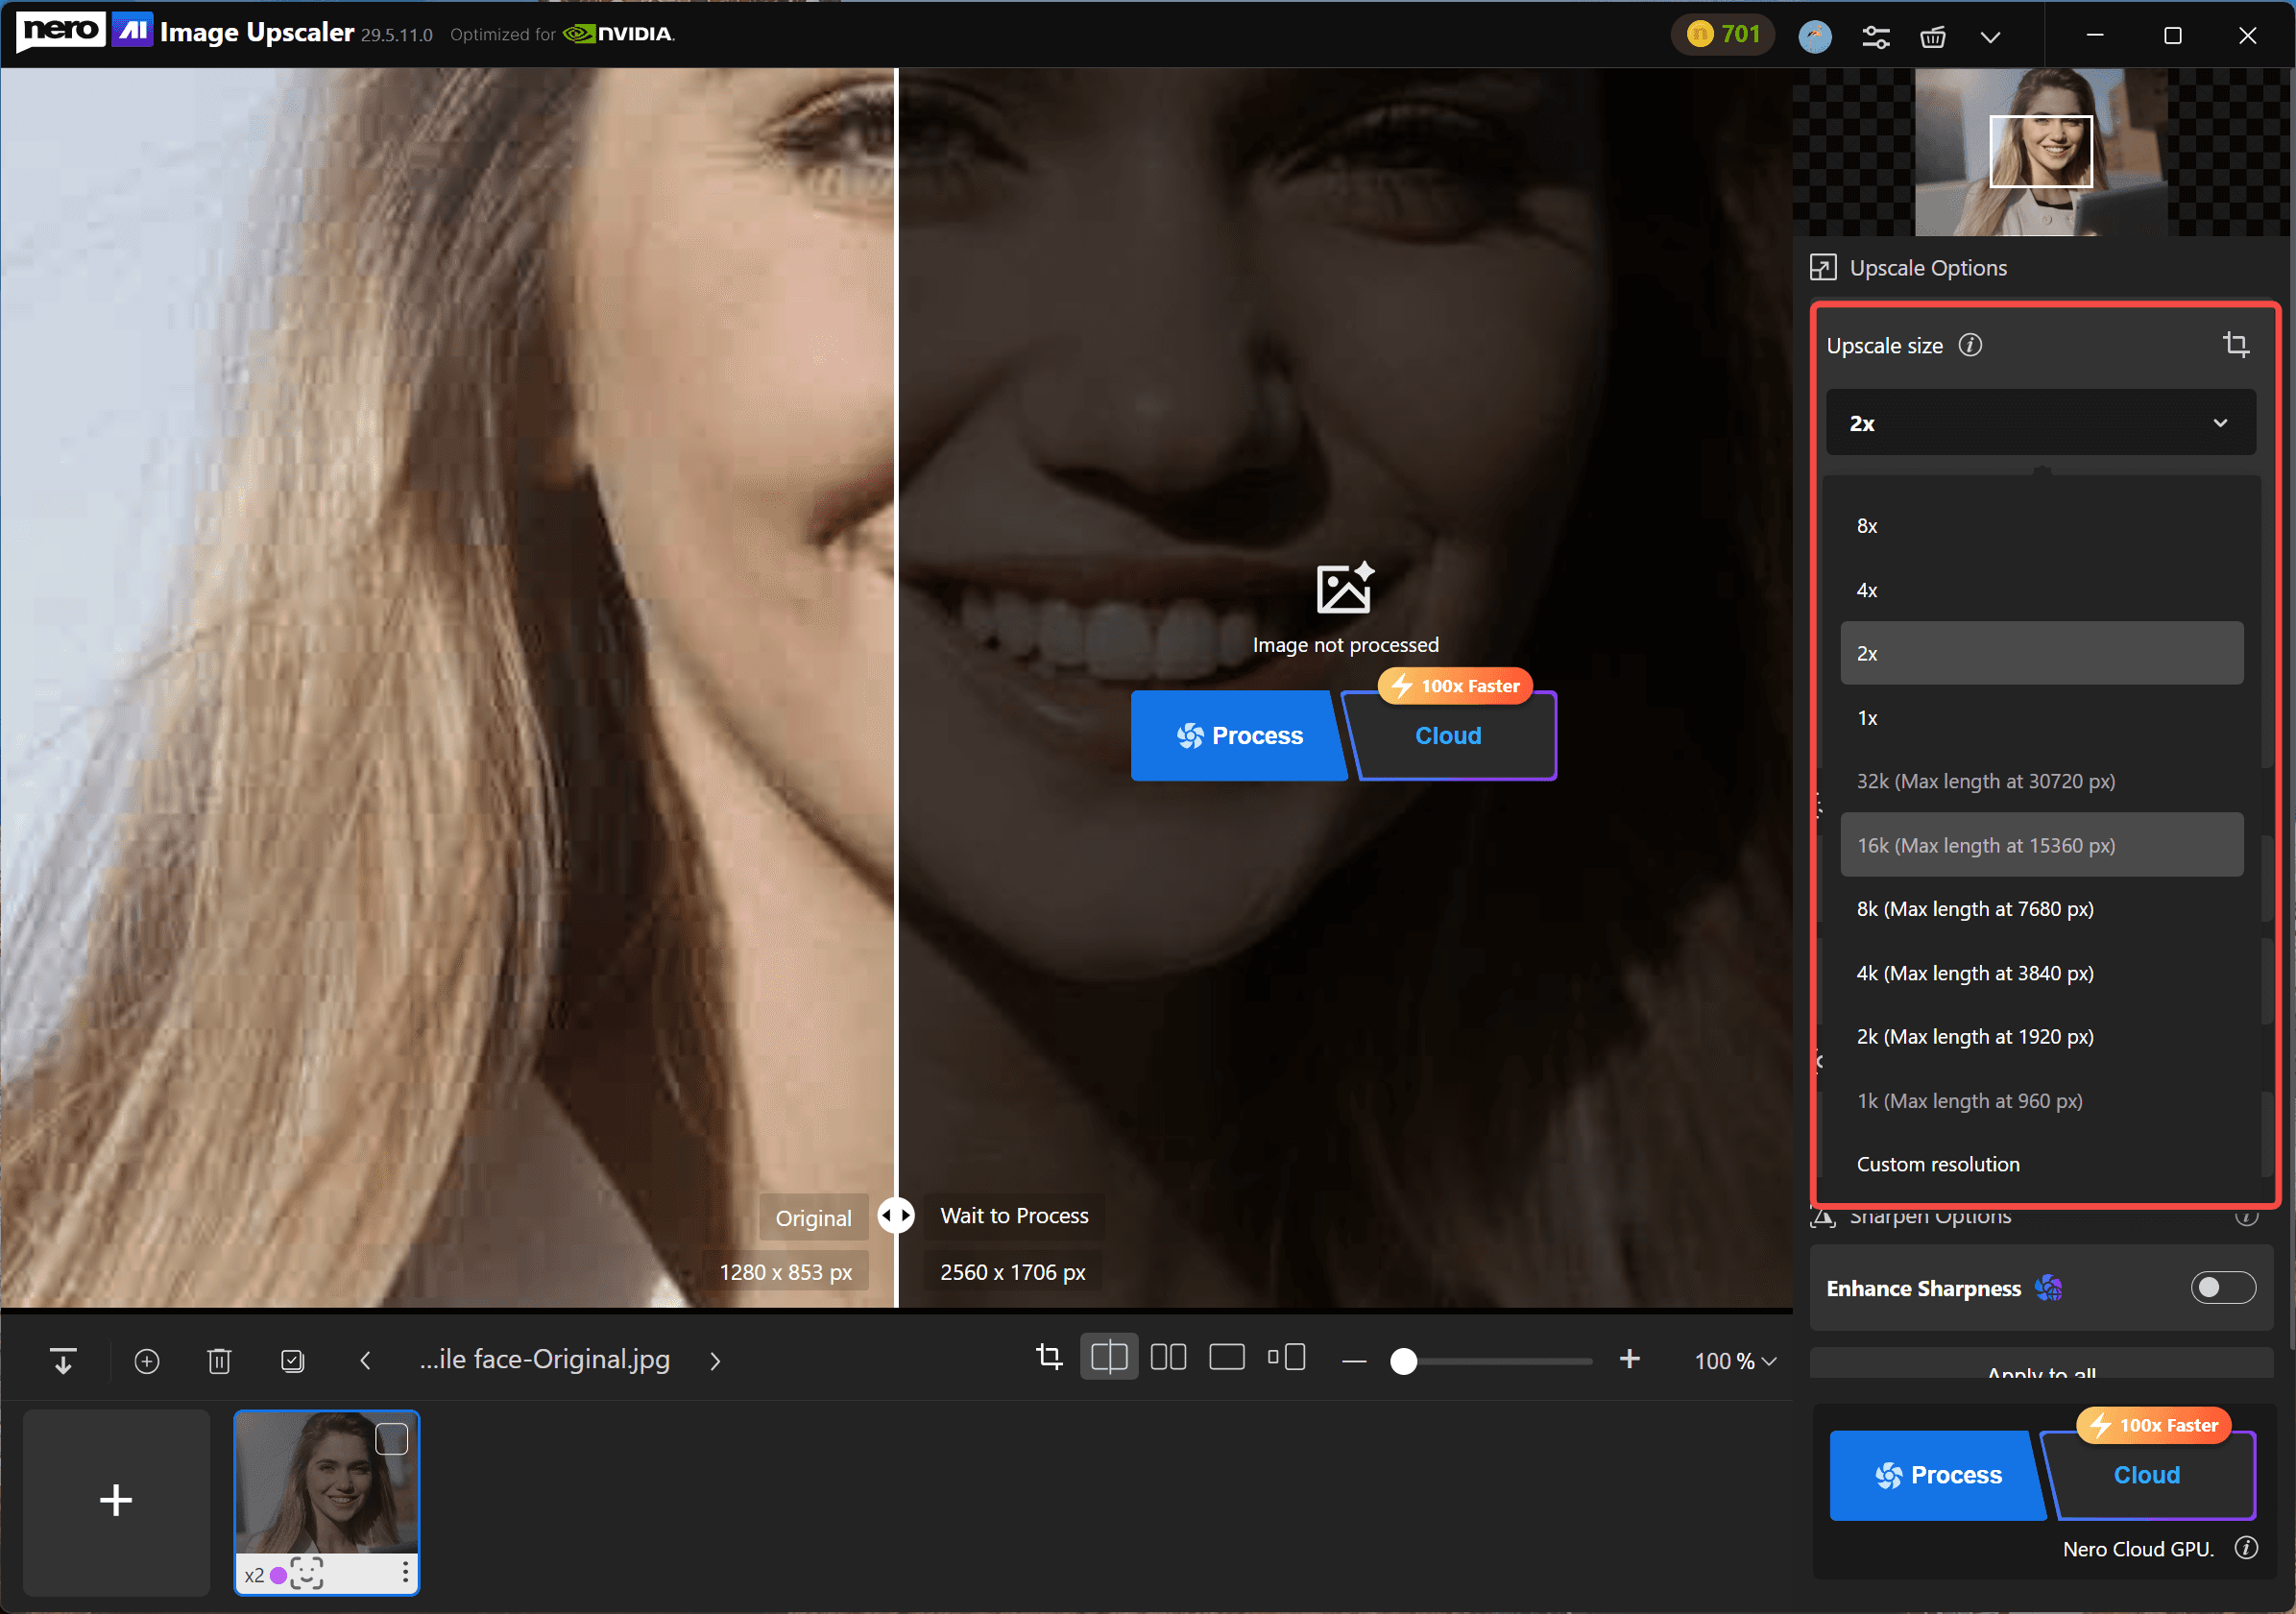
Choose how much to enlarge: 2x, 4x, 8x, or Custom Size. A 2-inch snapshot headed for a 5×7 reprint only needs 4x; save 8x for wall prints or originals so small there's barely anything to work with. Bigger isn't automatically better here — pushing a decent scan to 8x mostly gives you a heavier file, not a better photo.
Step 5 — Enable Enhancement Layers
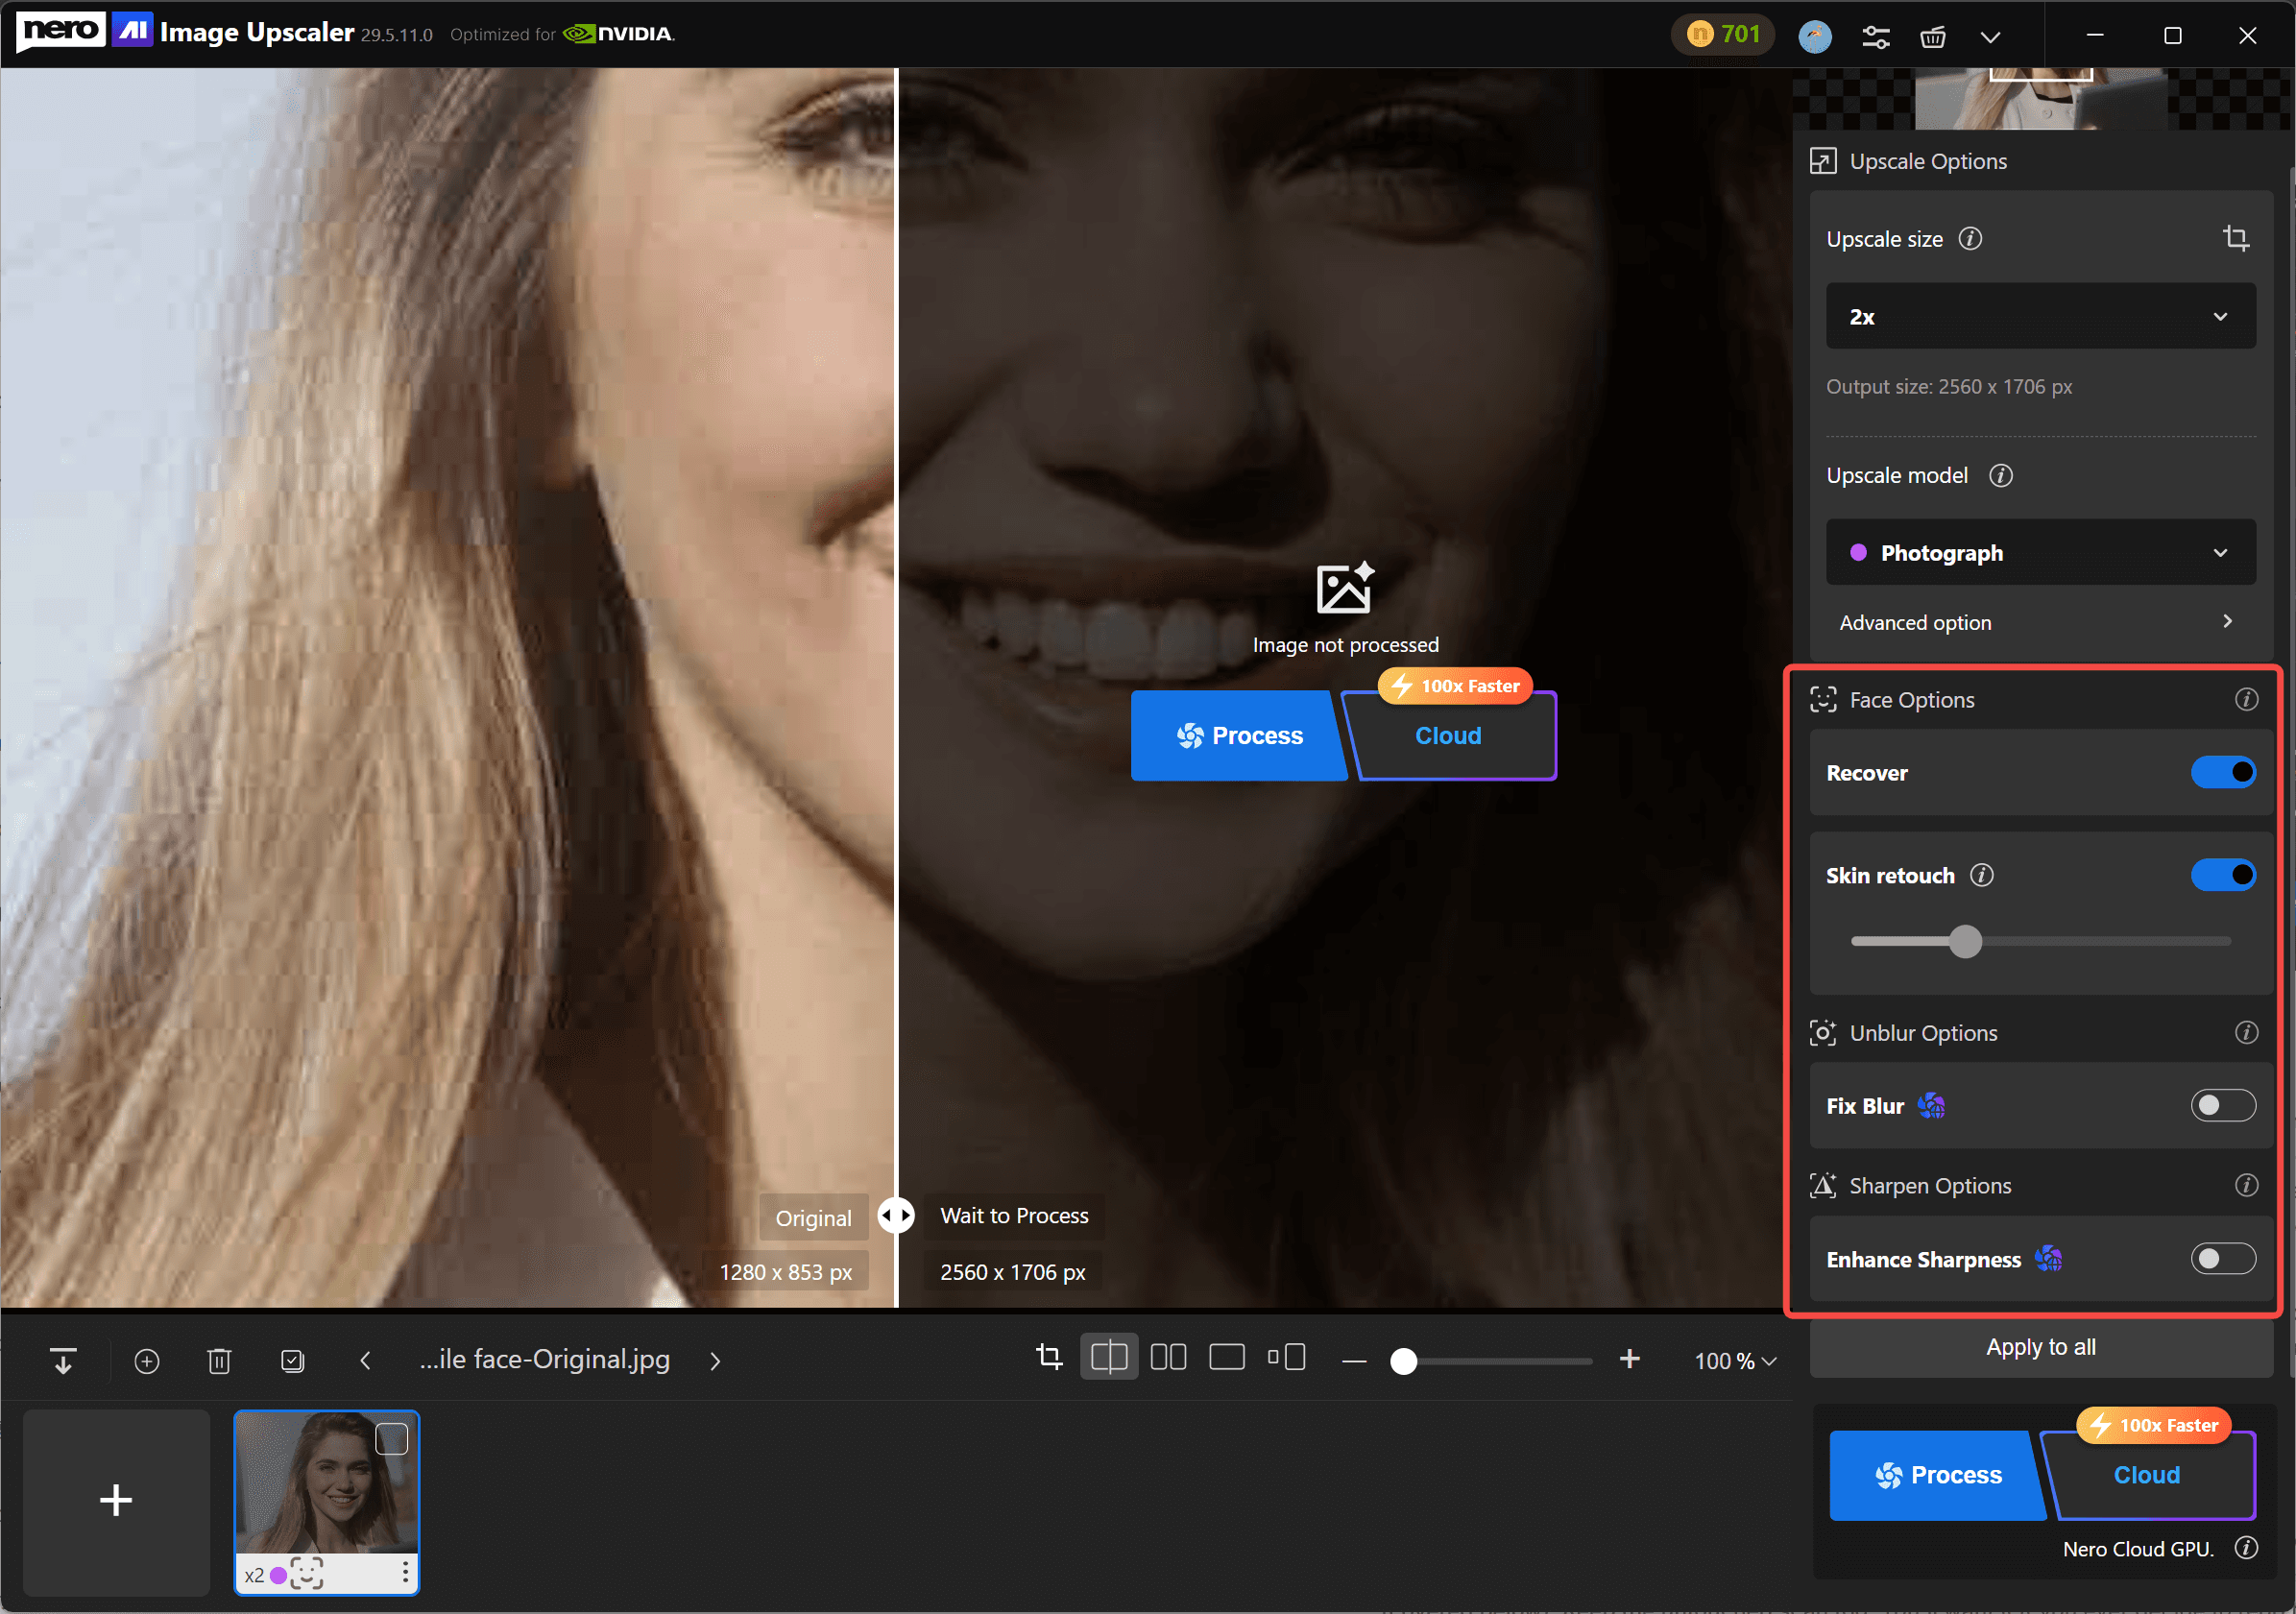
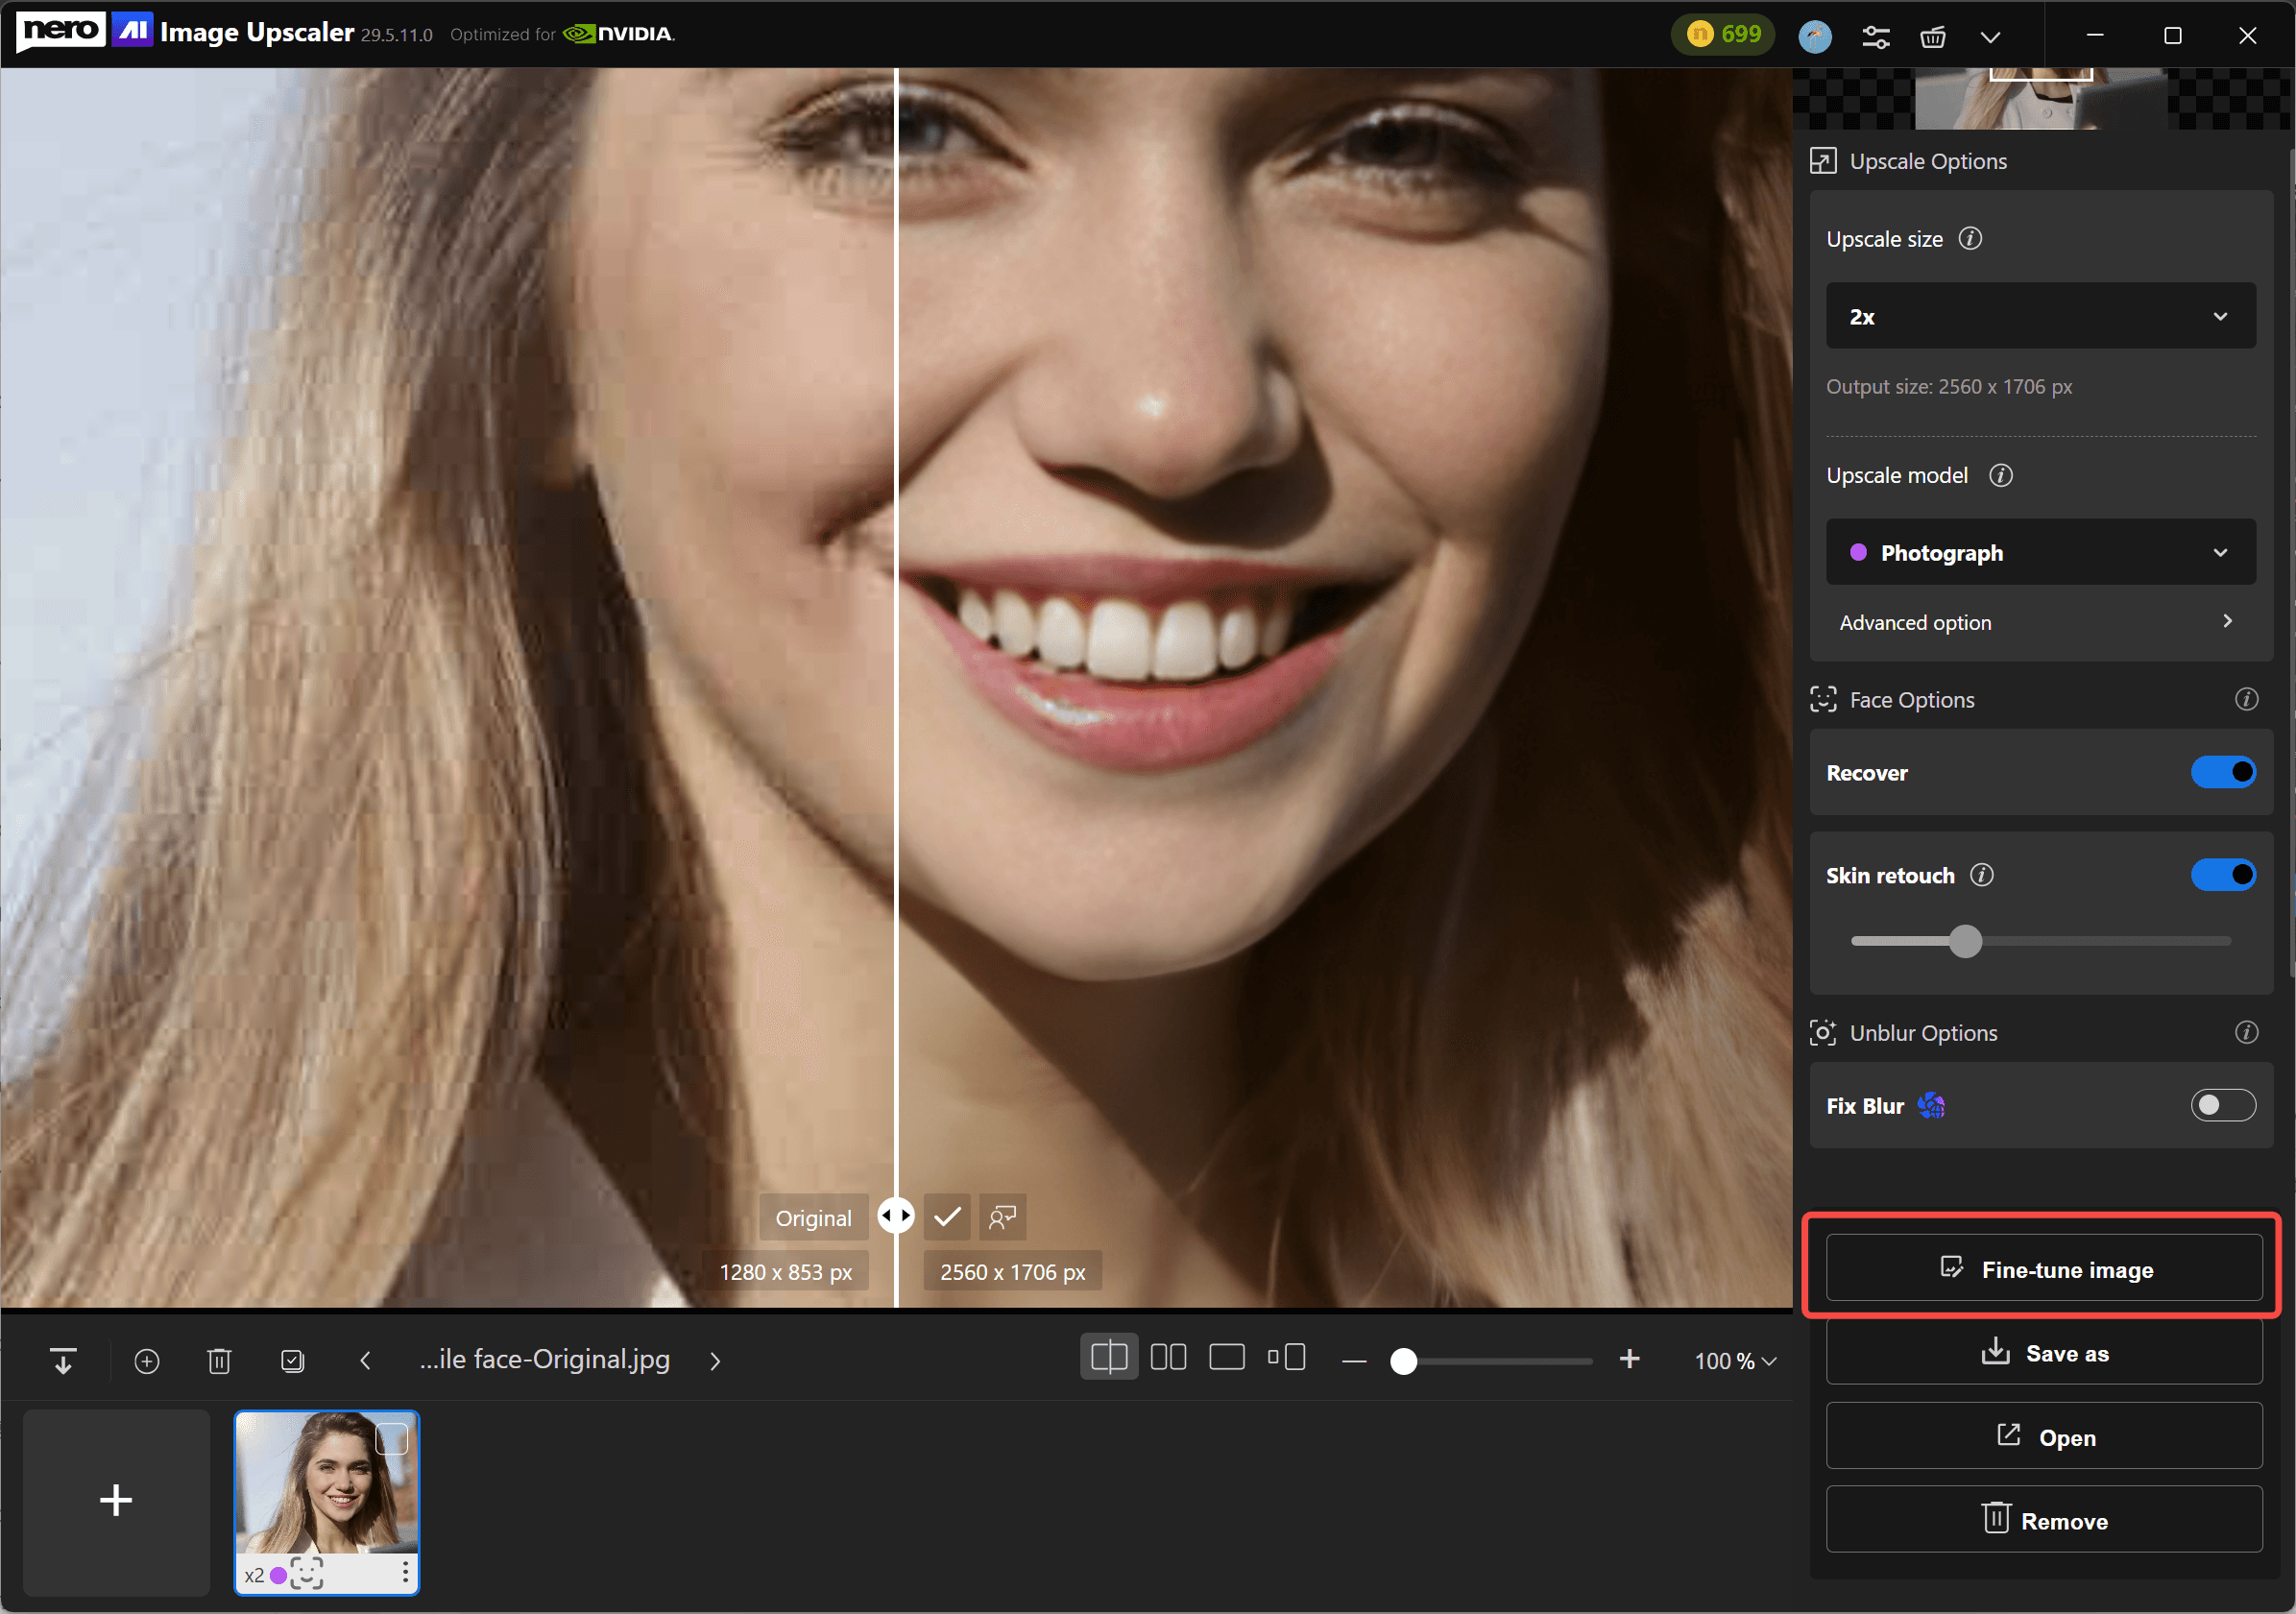
If the photo has people in it — and heirloom photos almost always do — turn on Recover under Face Options, which rebuilds facial structure and clarity on top of whatever upscale model you picked. For portraits, add Skin Retouch to smooth skin tones without flattening the face.
If the image is soft or blurry, enable Fix Blur (Unblur Options, cloud only) and Enhance Sharpness (Sharpen Options, cloud only).
Every enhancement layer stacks with every upscale model, so a real run might look like Standard ×2 + Recover + Skin Retouch. Add layers one at a time rather than switching all four on at once — it's the fastest way to tell which one is actually doing the work, and which one is pushing the photo into uncanny territory.
When the settings are ready, click Process (or Cloud for a faster online processing) to start enhancing.
Step 6 — Export (and Optionally Colorize)
Save the enhanced image. From here you can open it in PhotoSnap (Click Save > Fine-tune image) — Nero's photo editor — to adjust color, apply filters, and handle final retouches, or move on to colorization if the original is black-and-white (covered below). Keep the untouched scan too. You'll want it if you ever decide to redo the process with different settings.
How to Restore Old Photos on iPhone or Android
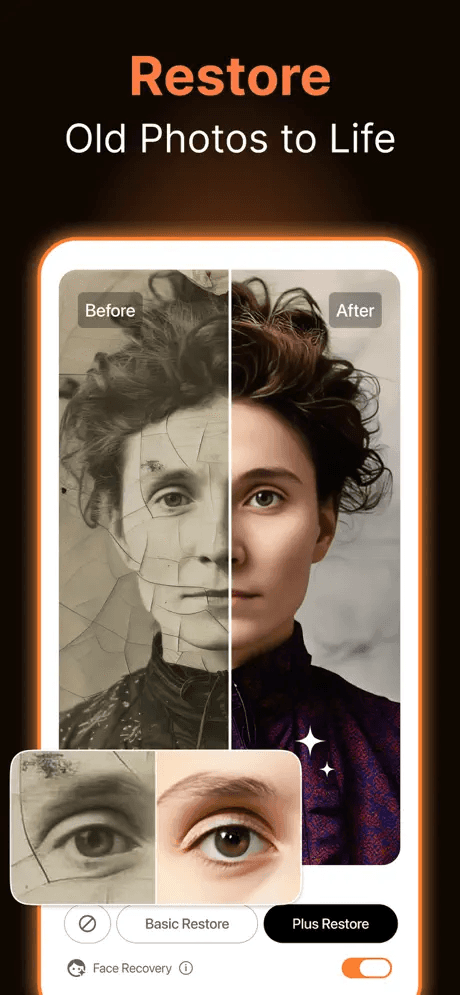
If your old photo is already on your phone, you don't need to transfer it to a computer first. Nero Lens lets you restore faded, blurry, or scratched photos directly on iPhone and Android.
Step 1: Add your old photo
Open Nero Lens and choose the old photo you want to repair from your gallery. If you only have a physical print, photograph it in even lighting and keep your phone parallel to the photo to reduce glare and distortion.
Step 2: Restore the photo with AI
Choose the restoration tool that matches the problem. You can restore faded photos, repair scratches, reduce noise, or improve blurry details. For black-and-white photos, you can also add color after restoring the image.
Step 3: Preview and save
Compare the restored result with the original, then save the version you prefer back to your phone. For photos that also need a higher resolution, you can upscale them in Nero Lens before printing or sharing.
Download Nero Lens on the App Store or get it on Google Play.
Which AI Model Should You Use? Standard vs. Photograph vs. Anime vs. Iris vs. Reconstruct
The model you pick determines how the AI reconstructs detail — two engines given the same scan will produce visibly different faces. Here's how to choose when you upscale old photos:
Model | Best For | How It Handles Old Photos |
|---|---|---|
Standard | General photos — scenery, architecture, products | Balanced enhancement; a good default when the subject isn't a person |
Photograph | Portraits, nature, everyday real-life photos | Smoother, more natural results — the ideal starting point for family photos |
Anime | Illustrations, comics, anime-style artwork | Optimized for line art and flat color — not suited for real photographs |
Iris | Fine textures like hair, fur, eyes | Recovers delicate contrast detail that other models blur — best for tiny, degraded prints |
Reconstruct (☁ cloud) | Photos with text, fine texture, or delicate details; or a strong fix for extremely low-res photos | The strongest AI fix available; rebuilds detail that other models can't recover. Cloud-only — requires an internet connection and credits for the online engine |
Recover (enhancement layer — Face Options) | Any photo with people | Restores blurry or unclear faces, improving facial structure and clarity. Stacks with any upscale model |
Skin Retouch (enhancement layer — Face Options) | Portraits, close-ups | Smooths skin tones naturally while preserving realistic facial features. Stacks with any upscale model |
Fix Blur (enhancement layer — Unblur Options, ☁ cloud) | Photos with motion blur or soft focus | Reduces blur and sharpens edges that the upscale model alone can't fully resolve. Runs on Nero's cloud engine |
Enhance Sharpness (enhancement layer — Sharpen Options, ☁ cloud) | Photos needing extra crispness | Boosts fine detail and micro-contrast for a crisper, more defined result. Runs on Nero's cloud engine |
The key distinction is worth internalizing, because it's where most people get confused. Standard, Photograph, Anime, Iris, and Reconstruct are upscale models — you pick exactly one, based on what kind of image you're holding. Recover, Skin Retouch, Fix Blur, and Enhance Sharpness are enhancement layers — you toggle them on alongside whichever model you chose, and you can run several at once.
In practice, that means the setting you're looking for is a combination, not a single choice. For a typical old family portrait, Photograph + Recover is the combination that wins most of the time. Reserve Iris + Recover for worst-case prints — tiny, grainy, barely-there images where the other models turn faces into mush. When detail is genuinely gone rather than just soft, as with torn corners or an obliterated face, switch to Reconstruct.
One practical caveat: Fix Blur, Enhance Sharpness, and Reconstruct all run on Nero's cloud engine (marked ☁ in the table), so they need an internet connection and valid Nero Credits. Everything else processes locally on your machine, which is worth knowing if you're working through an album on a flight.
Four Real Scenarios: Which Settings to Use and What to Expect
Generic advice falls apart the moment you're staring at an actual photo. So here are four situations that cover the overwhelming majority of what families bring to an upscaler, along with the exact settings for each and an honest read on what you'll get back.
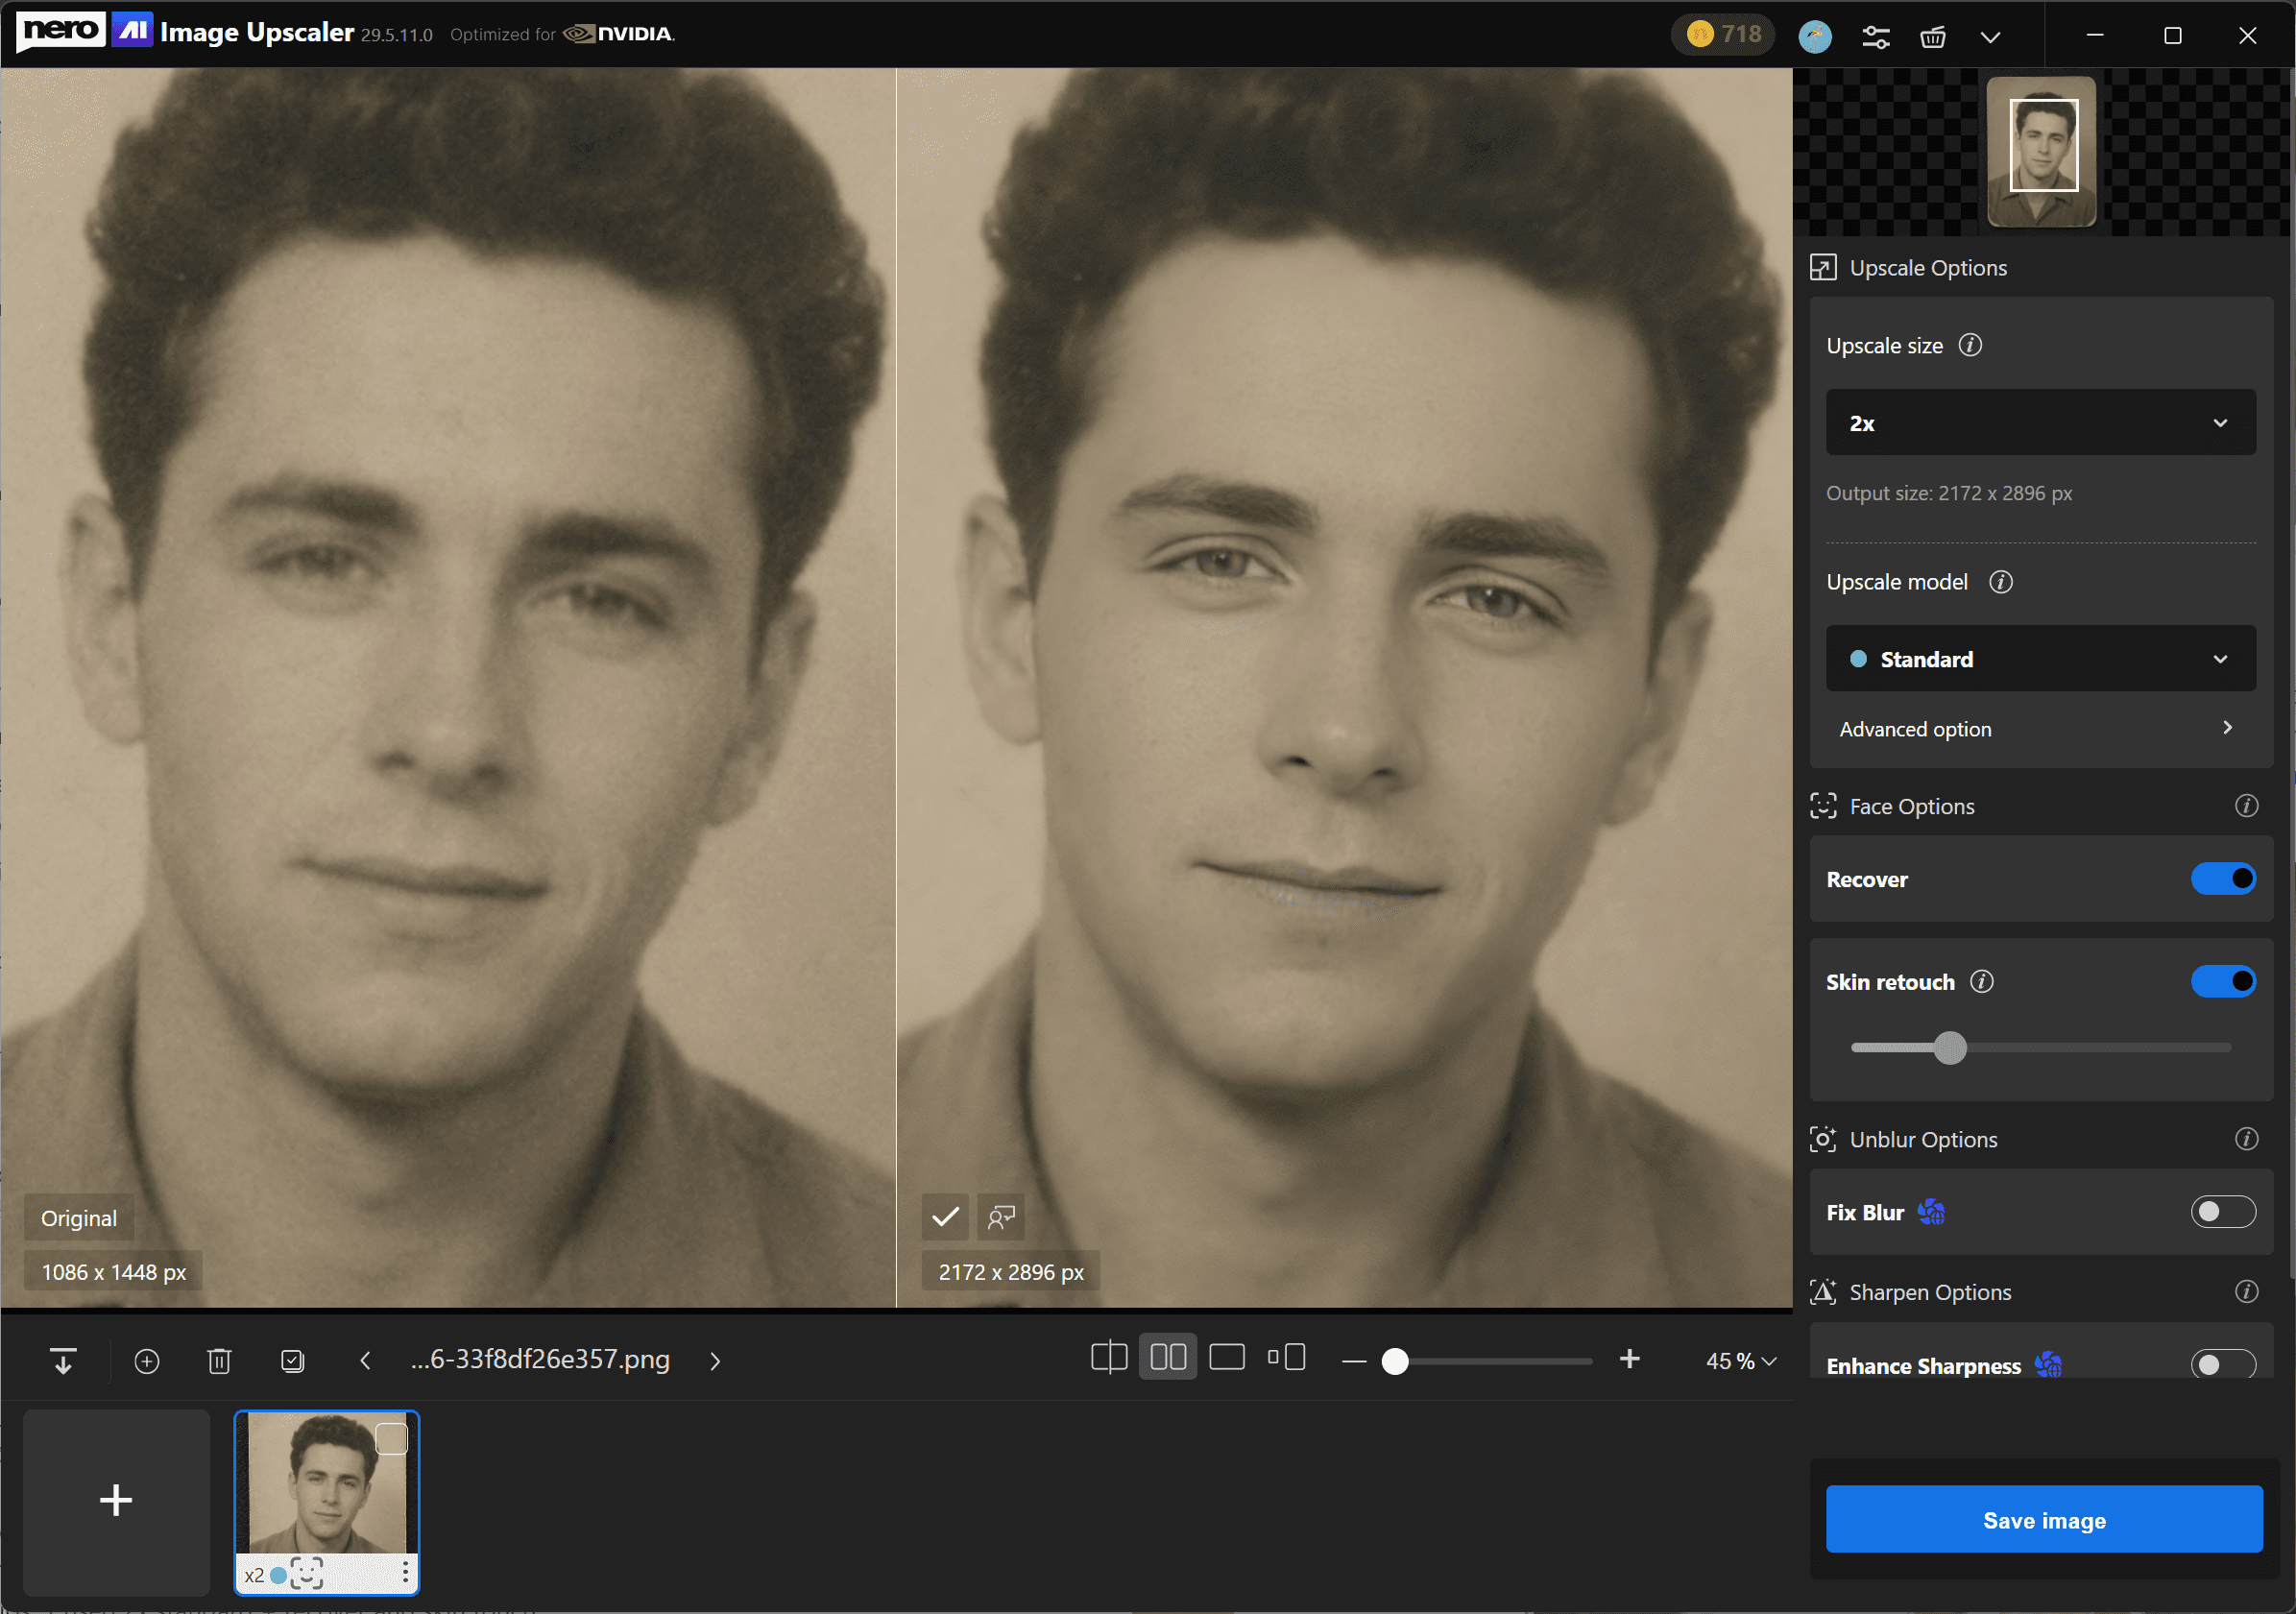
Scenario 1 — The 1950s Wallet Snapshot.
A small black-and-white print in decent physical shape — no tears, no heavy damage — but soft from the low resolution of the original camera, with facial features that never quite come into focus.
Settings: 2x Standard + Recover + Skin Retouch. Fine detail sharpens, skin reads as natural rather than muddy, and the file becomes clean enough to print at 5×7. This is the single most common reason people go looking for a way to fix old family photos, and it's the one that tends to get an emotional reaction — a face that was always slightly out of reach suddenly looks like someone you know.
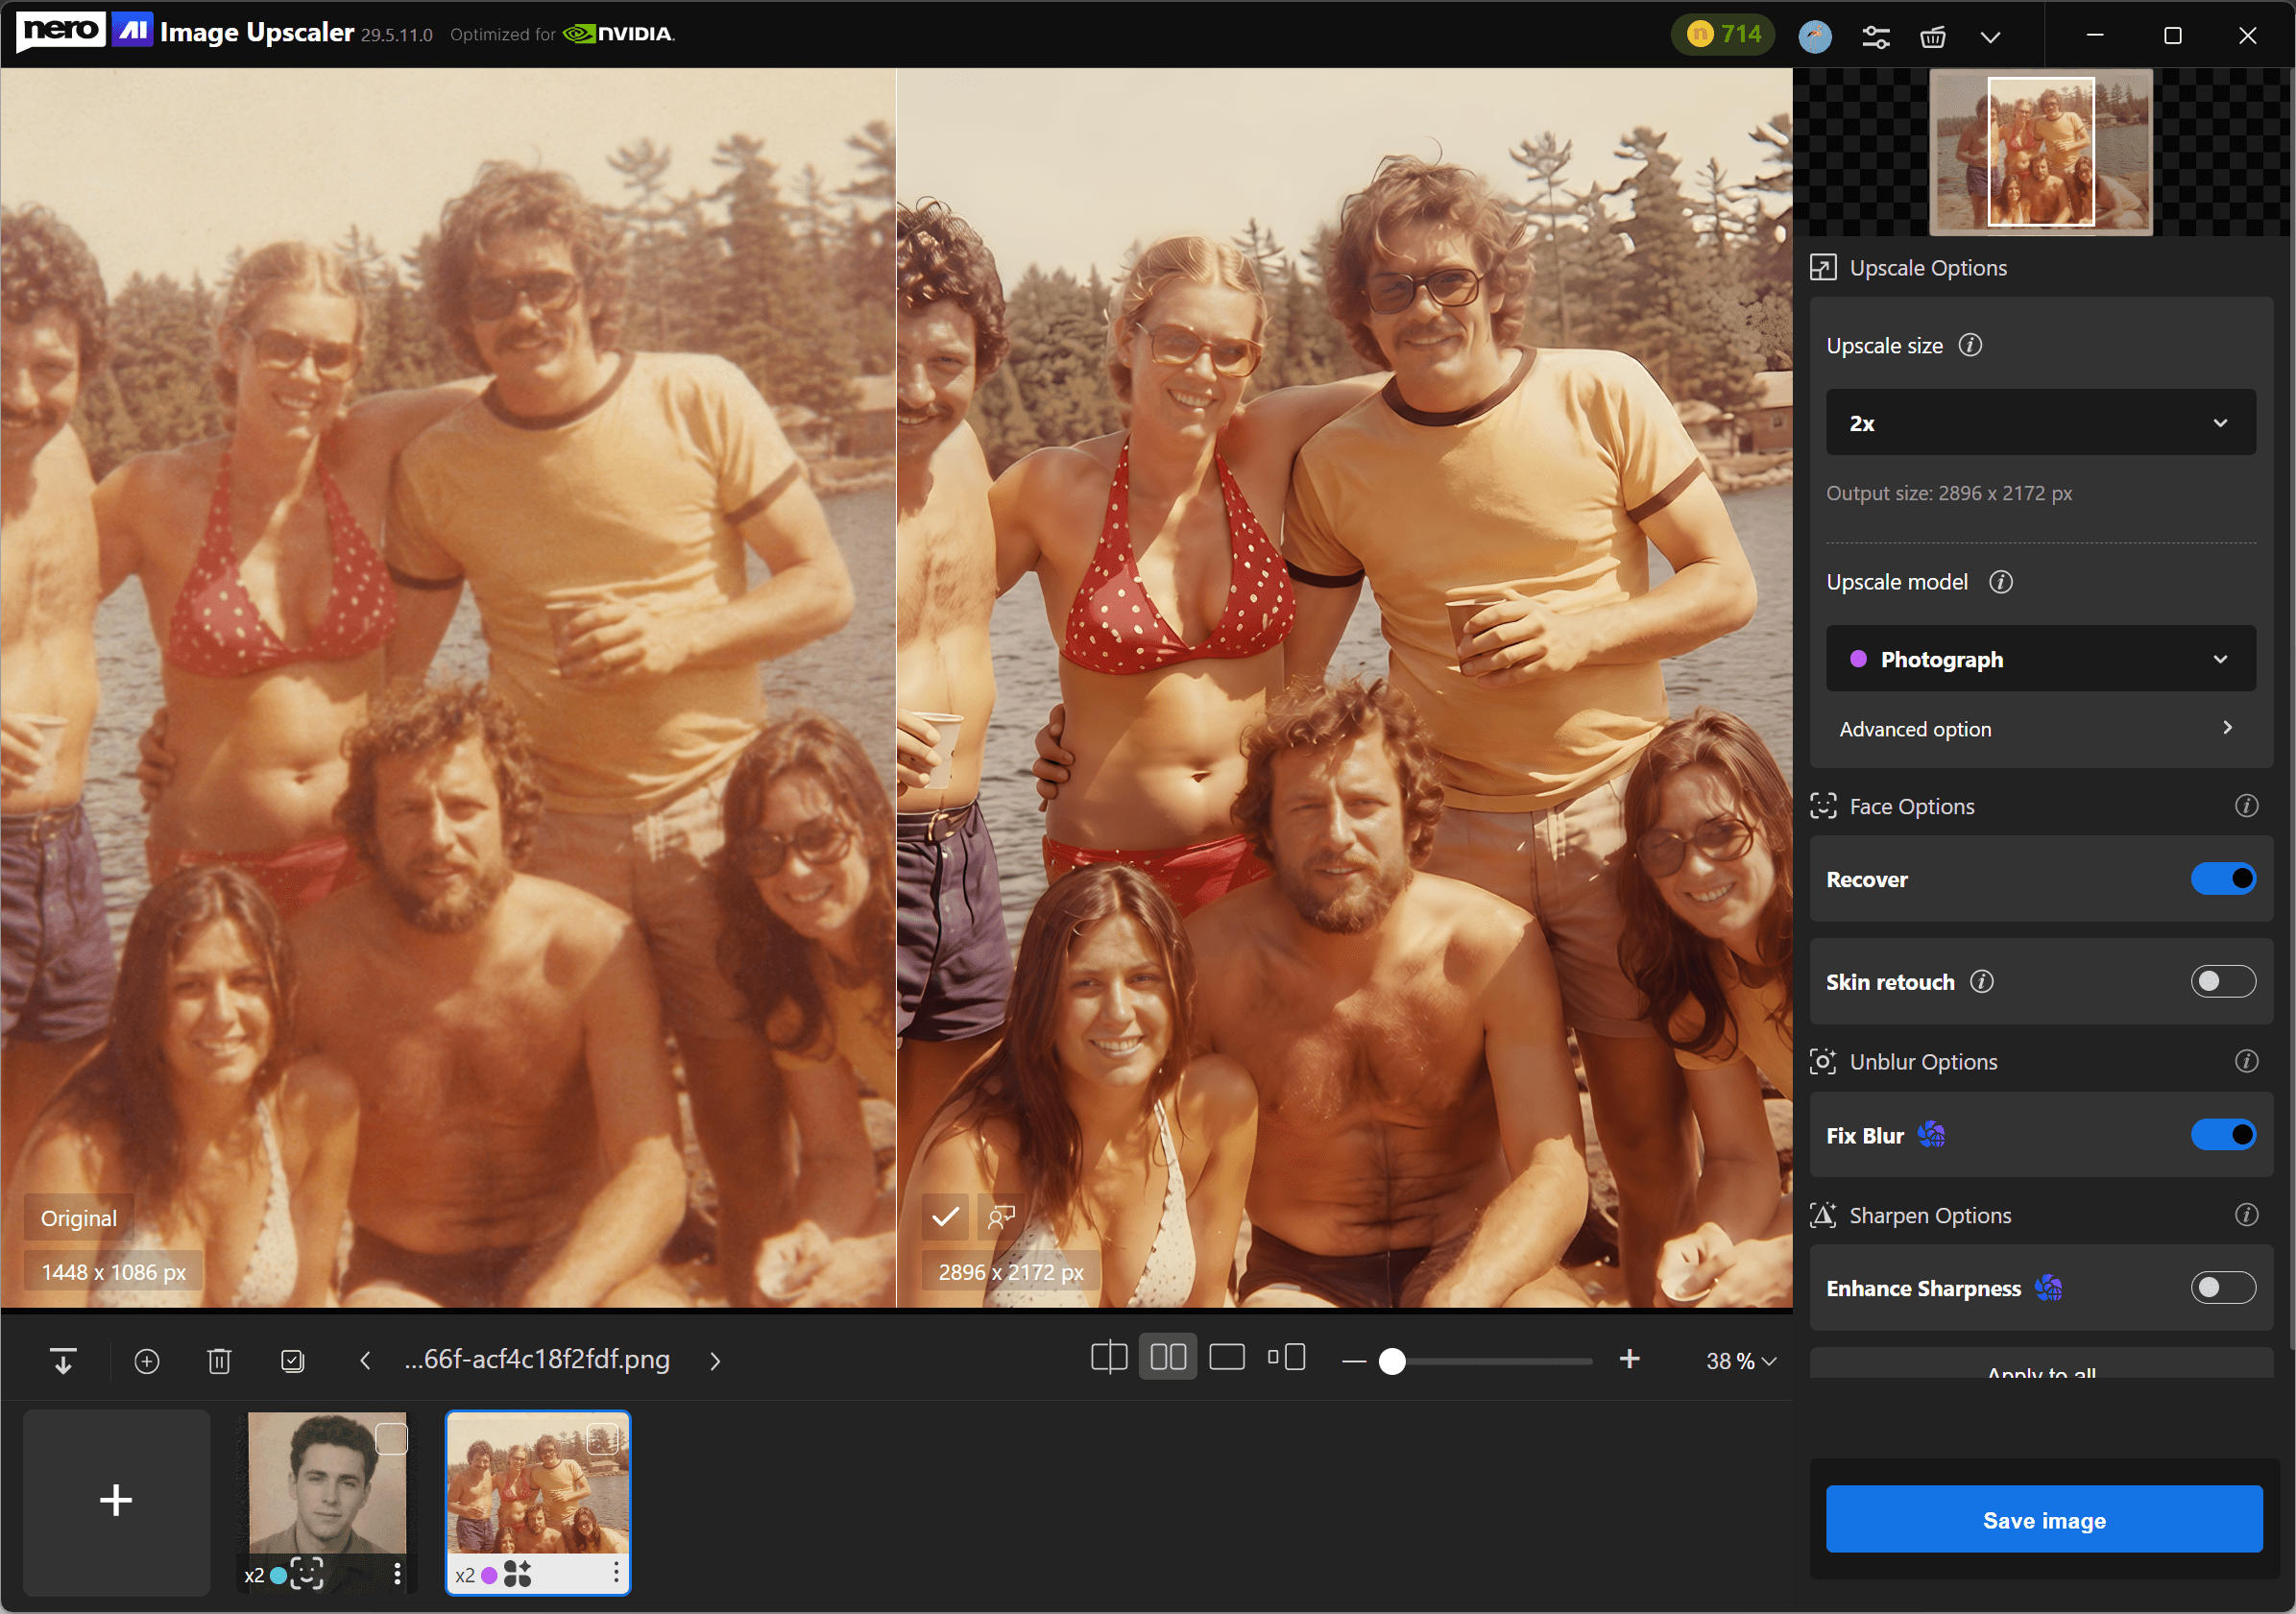
Scenario 2 — The Faded 1970s Color Print.
An intact color snapshot whose emulsion has simply aged — colors drifted warm with a slight magenta cast, contrast gone flat.
Settings: 2x Photograph + Recover + Fix Blur. Clarity returns to faces and edges, and background detail you'd stopped noticing comes back: wallpaper patterns, the weave in someone's cardigan, the label on a bottle. Worth being clear about scope, though — the upscaler restores detail and structure, not color balance.
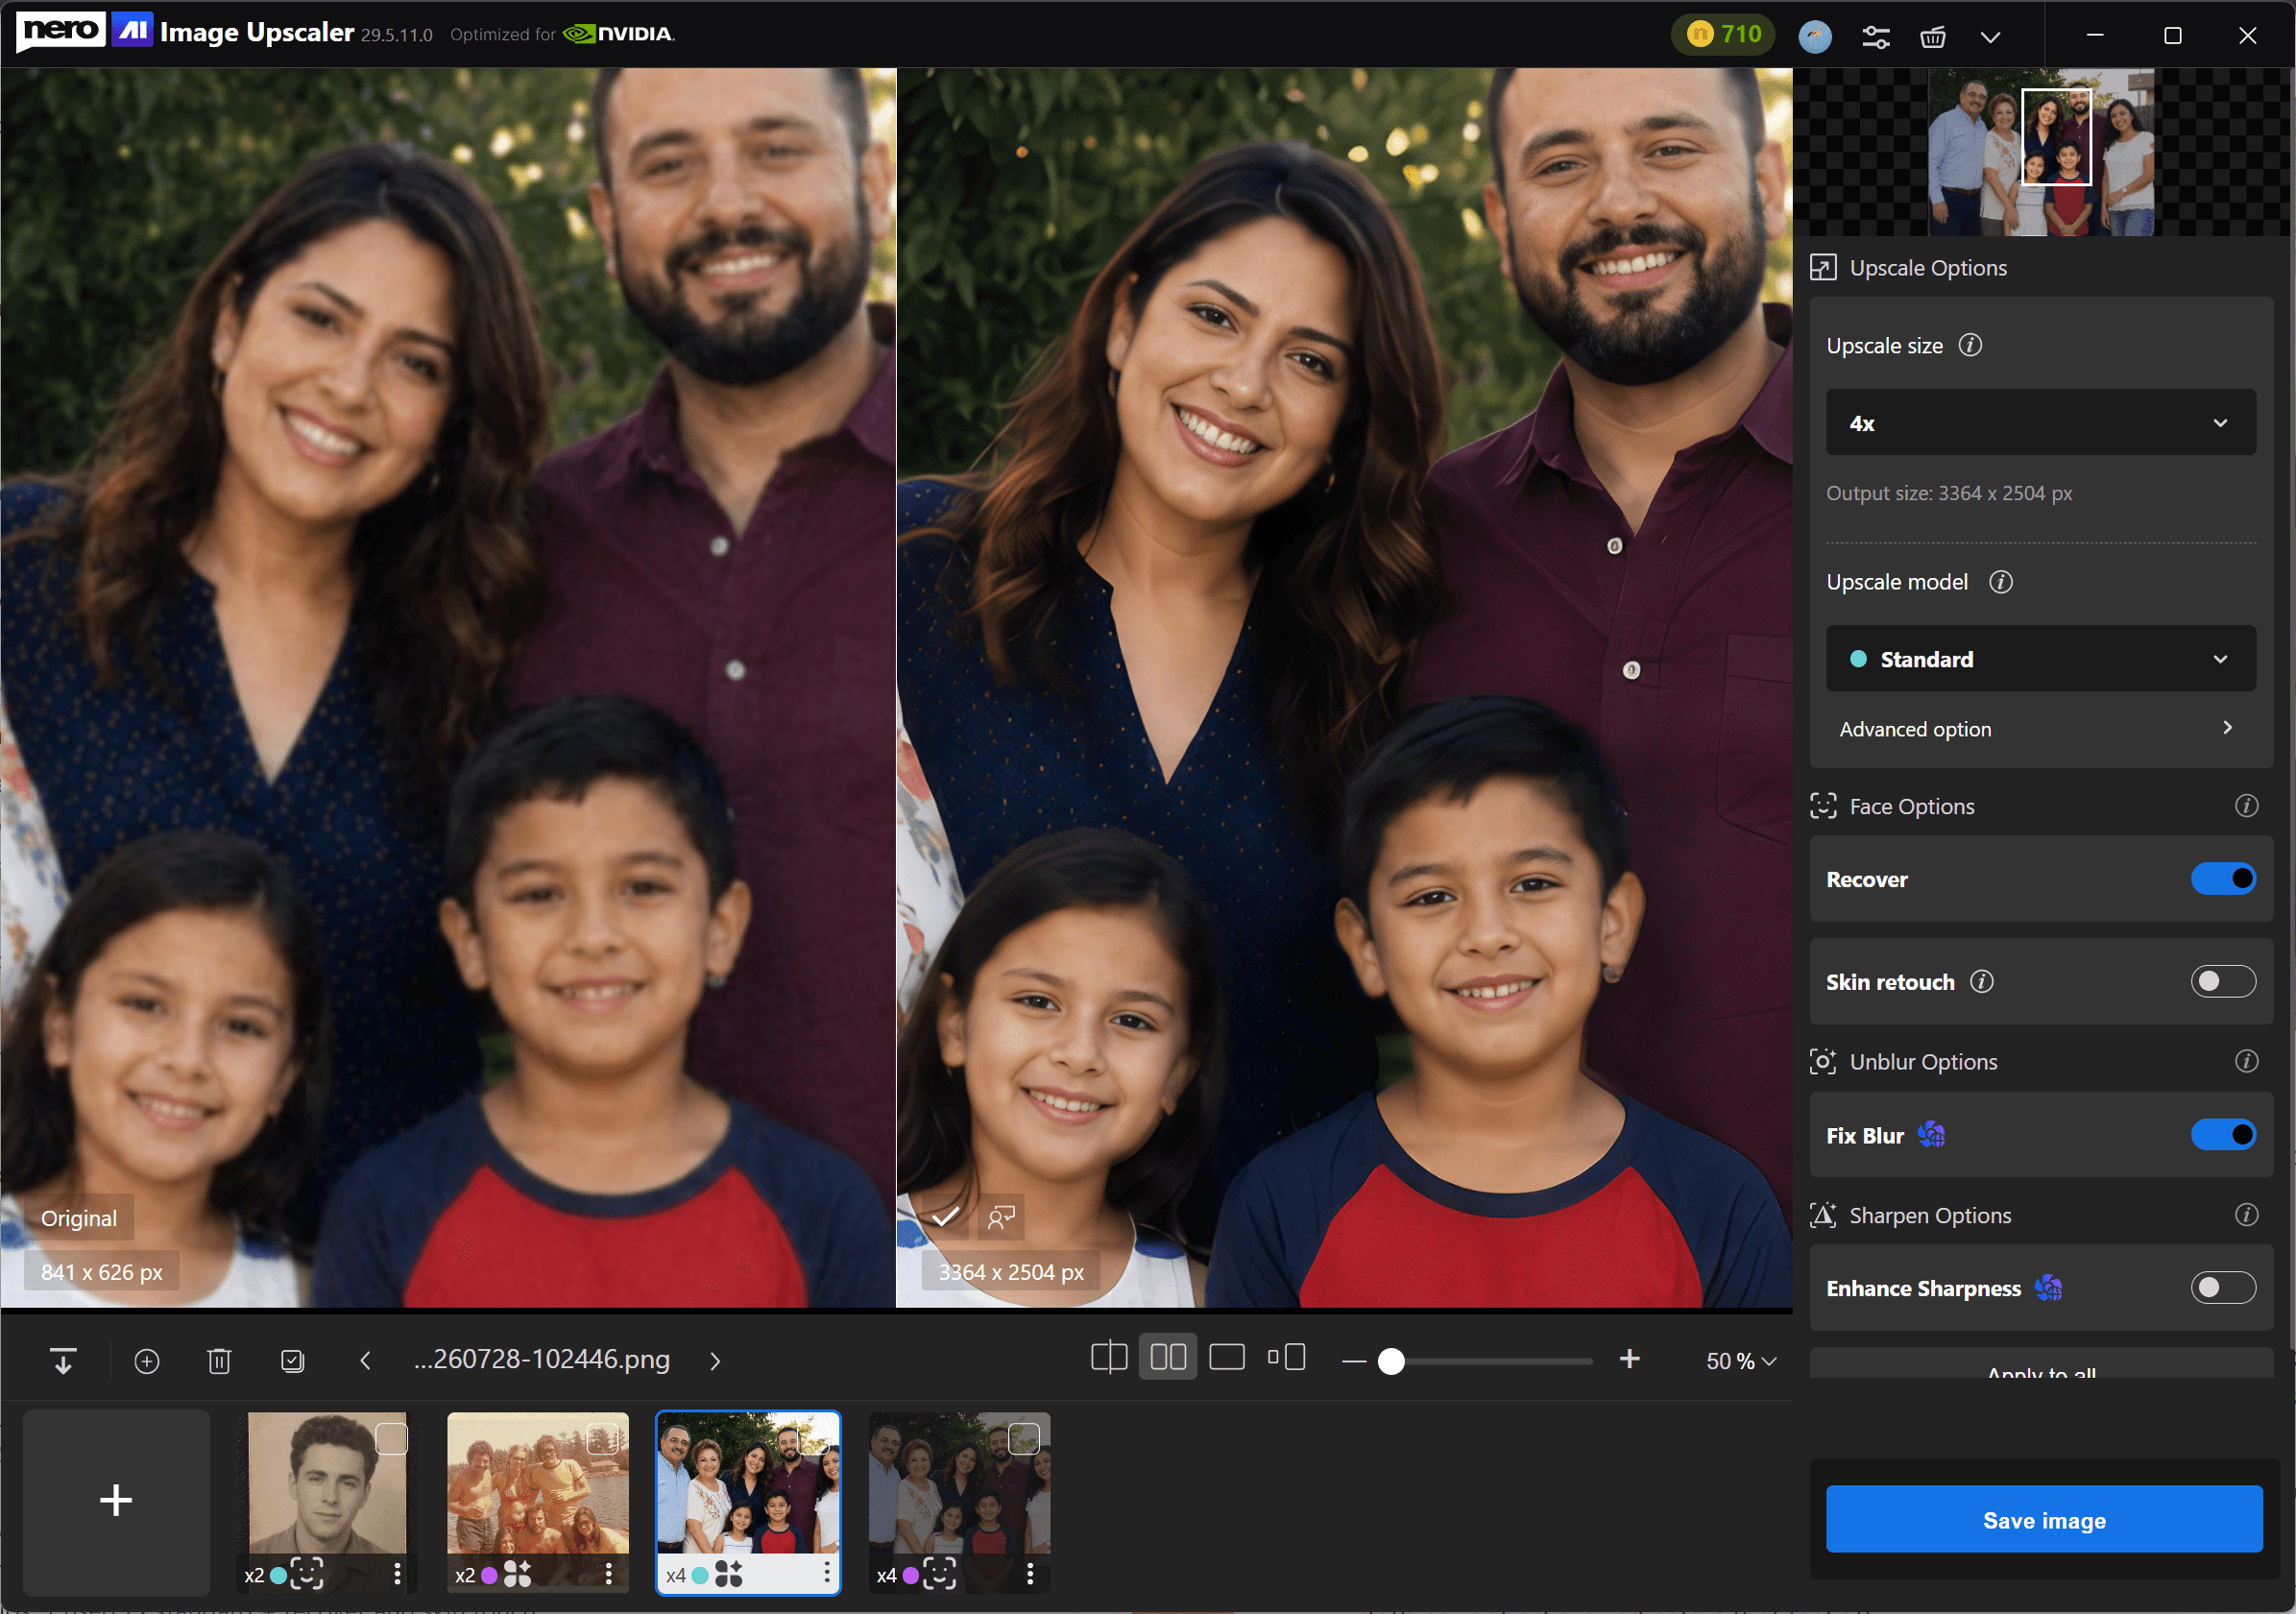
Scenario 3 — The Compressed Digital Photo.
A snapshot that's been forwarded through messaging apps and email one too many times. Every hop re-compressed it, so what you're left with is a small file, slightly blocky, with detail that dissolved somewhere along the way — and often no access to whoever still has the original.
Settings: 4x Standard + Recover + Fix Blur. Compression artifacts smooth out, soft edges firm up, and the result reads as a full-resolution photo rather than a forwarded thumbnail. The ×4 rate matters here: you're not just sharpening, you're rebuilding pixels the file no longer contains.
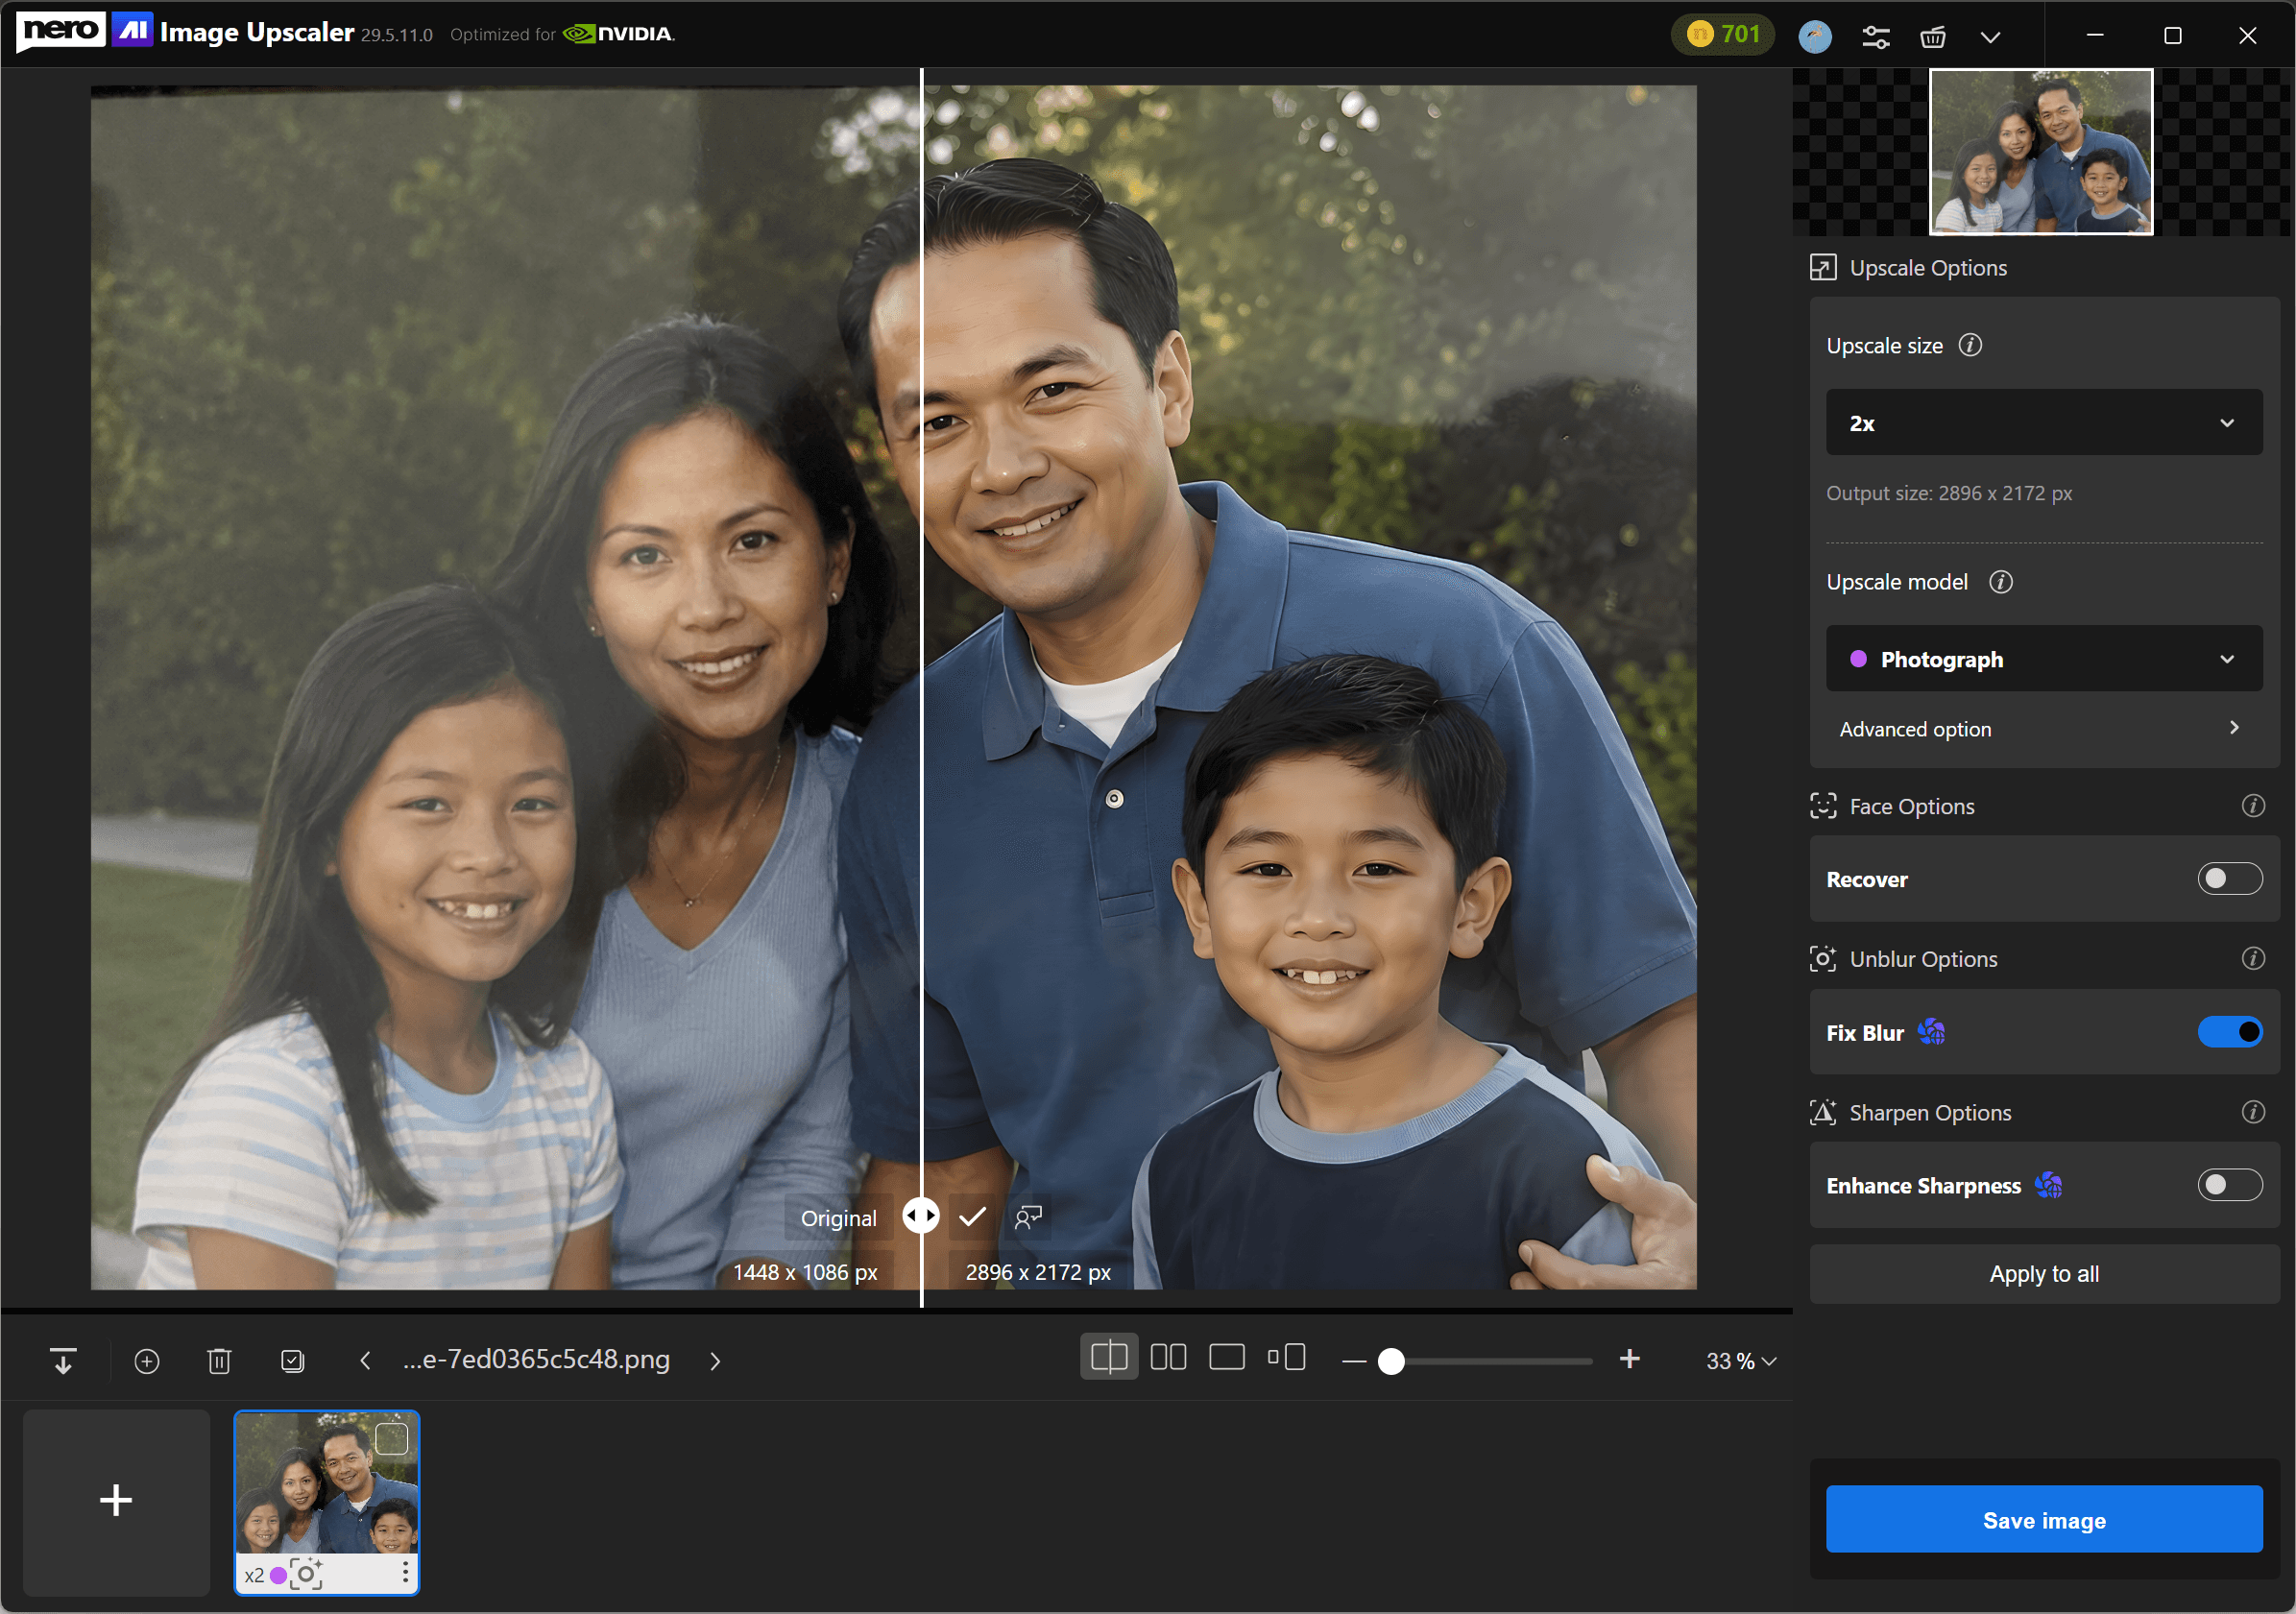
Scenario 4 — The Phone Photo of a Print.
A relative held up a photo at a family gathering and you snapped it with your phone. The print itself is fine; your capture is the weak link — slightly soft, mildly JPEG-compressed, with a faint reflection across one corner.
Settings: 2x Photograph + Fix Blur. Detail tightens, soft edges firm up, and the file starts to look like a scan instead of a photo-of-a-photo. Note there's no Recover here: the faces weren't damaged, just captured badly, and adding face reconstruction on top would be solving a problem the image doesn't have.
If the photo is still on your phone, you can also run this kind of quick cleanup directly in Nero Lens instead of transferring the image to your computer first.
How to Colorize Old Black-and-White Photos
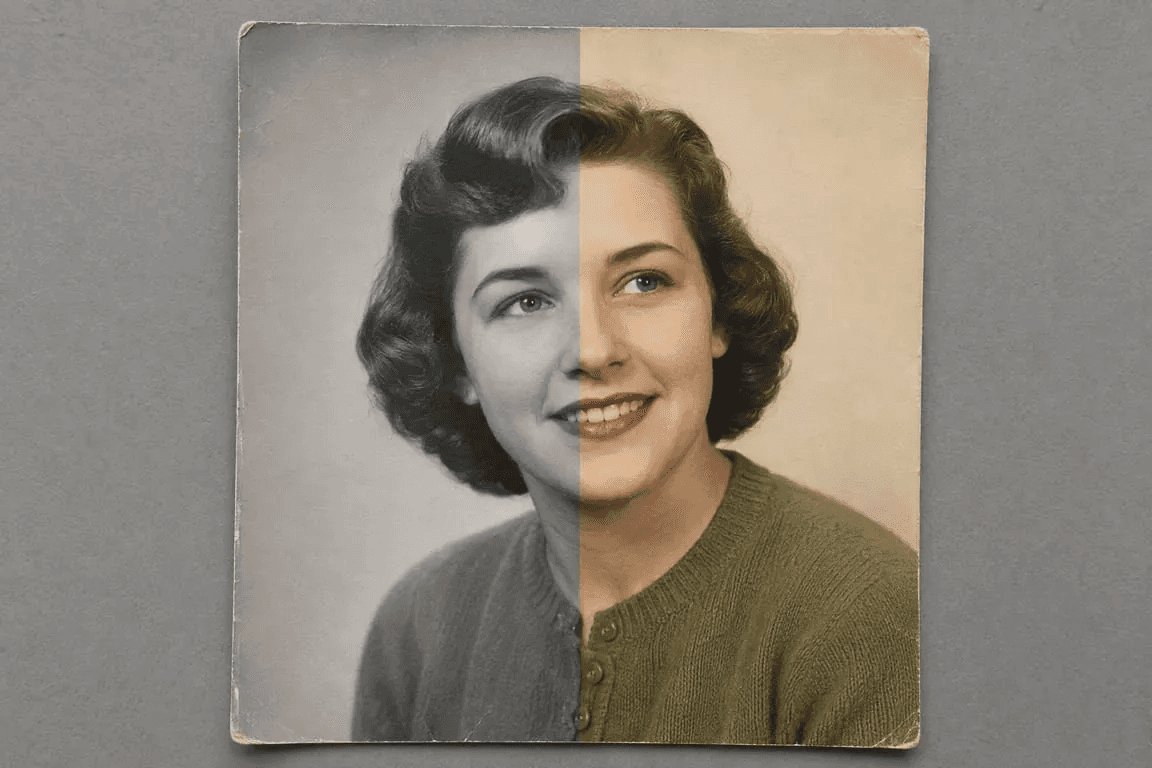
Colorization is the step that makes people cry — in the best way. Something about seeing a grandparent in color for the first time lands differently than a sharper black-and-white ever does. Once your photo is upscaled and cleaned up in Nero AI Image Upscaler, head to Nero AI Colorize Photo, a separate online tool that recognizes what's in the image and applies historically plausible color automatically.
Bring Restored Photos to Life with Face Animation
Once the photo is sharp, there's one more step available: make it move. Nero AI's Face Animation maps natural facial movement — smiles, blinks, small head turns — onto a still portrait, turning a static heirloom into a few seconds of video. It's the difference between a repaired photo of Grandma and Grandma looking back at you.
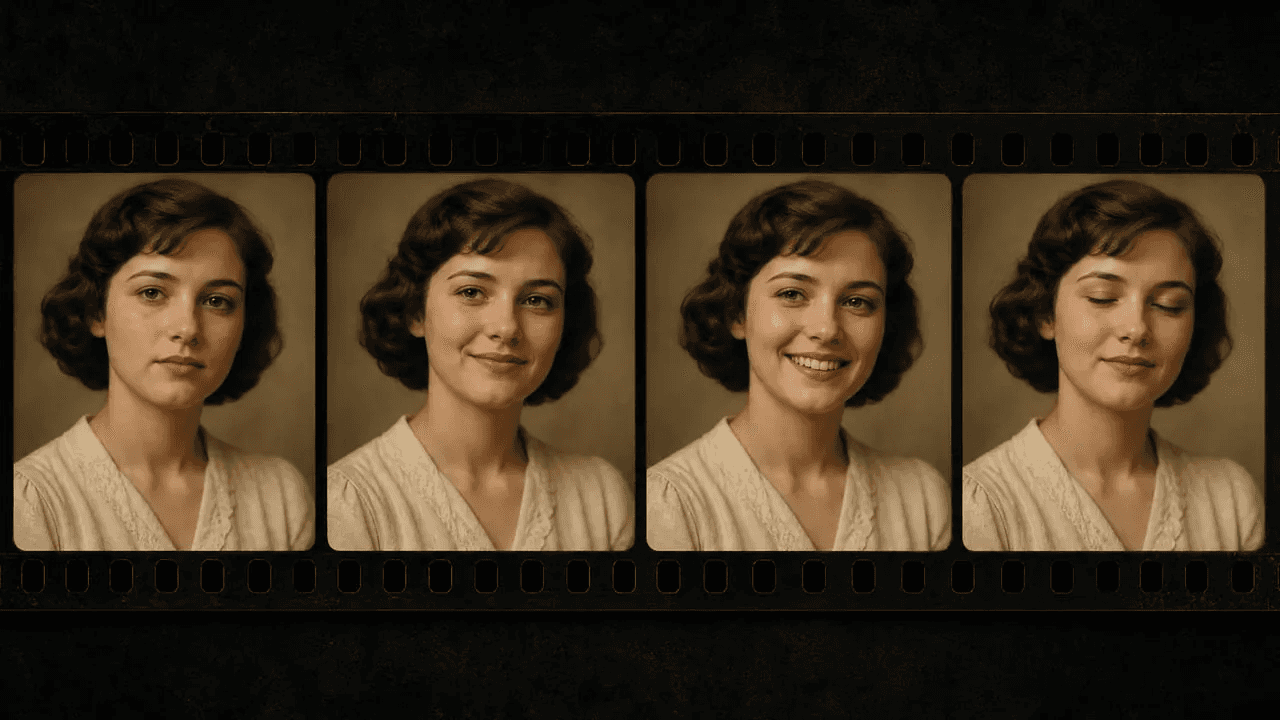
Animation models work from facial landmarks, so an upscaled, face-corrected image yields smoother and more convincing movement; feed one the untouched original and the result wobbles.
Frequently Asked Questions
Can AI restore photos that are torn in half?
Yes, but not in the Upscaler — that app rebuilds resolution and clarity, not physical damage. Tears, creases, scratches and missing corners are a different job, and they go to Nero AI Photo Restoration, a separate online service built specifically for damaged prints. Scan both halves together as a single image, then run Restore+ or Natural+, which combines scratch and damage repair with face enhancement, colorization and denoising in one pass.
One honest caveat worth knowing before you upload: the model infers what belongs in a damaged area by reading the pixels around it, so a tear running straight through a face has less to work from and can come back distorted. Repair the damage first, then bring the restored file into Nero AI Image Upscaler if you still want more resolution.
Will AI upscaling make my old photo look fake?
It can, if you over-process it. Start with Photograph + Recover at ×2 or ×4 and resist stacking every enhancement layer at once. The goal is to make what was already in the photo easier to see — not to replace a real face with a plausible-looking synthetic one.
Is it better to colorize before or after upscaling?
Always after. Colorization models infer color from the shapes and textures they can identify, so upscaling first gives them substantially more detail to read, which produces more accurate and natural-looking color.
How many photos can I restore at once?
Nero AI Image Upscaler handles batch processing of up to 100 images in a single click, which makes digitizing an entire album a one-session job rather than a weekend project.
Do I need an internet connection?
Only for some features. Standard, Photograph, Anime, and Iris — plus the Recover and Skin Retouch layers — process locally on your machine. Fix Blur, Enhance Sharpness, and Reconstruct run on Nero's cloud engine and require a connection with valid Nero Credits.
My photo is tiny and low-resolution — is it too far gone?
That's the case this tool exists for. Reconstruct is built specifically for extremely small and heavily compressed images. Start at ×4 instead of ×2 when the original is very small: at that point you're rebuilding pixels the file never had, not just sharpening the ones it does.
Which combination should I use for a typical old family portrait?
Photograph ×2 with Recover switched on covers most cases. Add Skin Retouch for close-up portraits, and Fix Blur if the original is soft. Switch to Iris only when the source is tiny or heavily compressed.
Start With One Photo
Here's the honest advice: don't start with the whole album. Pick the one photo you've always wished you could see properly — the wallet snapshot, the faded print in the frame, the picture nobody has a better copy of. Get it onto your computer however you can, run Photograph ×2 with Recover, and look at what comes back.
That first result is usually what convinces people. The faces you'd half-forgotten sharpen into someone specific, and a photo that had been quietly sliding toward unusable becomes something you'd print and hang again. It takes a few minutes and costs nothing to try. Everything else in this guide is just refinement on top of that.