Is your Windows computer running slower than it used to? You're not alone. Over time, Windows PCs accumulate junk files, registry errors, unnecessary startup programs, and bloatware that significantly impact performance. Whether you're using Windows 11 or Windows 10, system optimization is essential for maintaining peak performance.
In this comprehensive guide, we'll walk you through every feature of Nero TuneItUp PRO, a powerful PC optimization tool that can help you clean, speed up, and maintain your Windows computer. By following these steps, you can free up disk space, fix system errors, and dramatically improve your PC's speed and responsiveness.
📥 Download Nero TuneItUp (PC Cleaner):
Get it from Microsoft Store
💎 Learn More:
Visit Nero PC Cleaner
What you'll learn:
How to diagnose and analyze your PC's health
Ways to clean and optimize your system
How to manage programs and files efficiently
System monitoring and maintenance tips
Part 1: Getting Started & Diagnosing Your PC
Step 1: Launch Nero TuneItUp
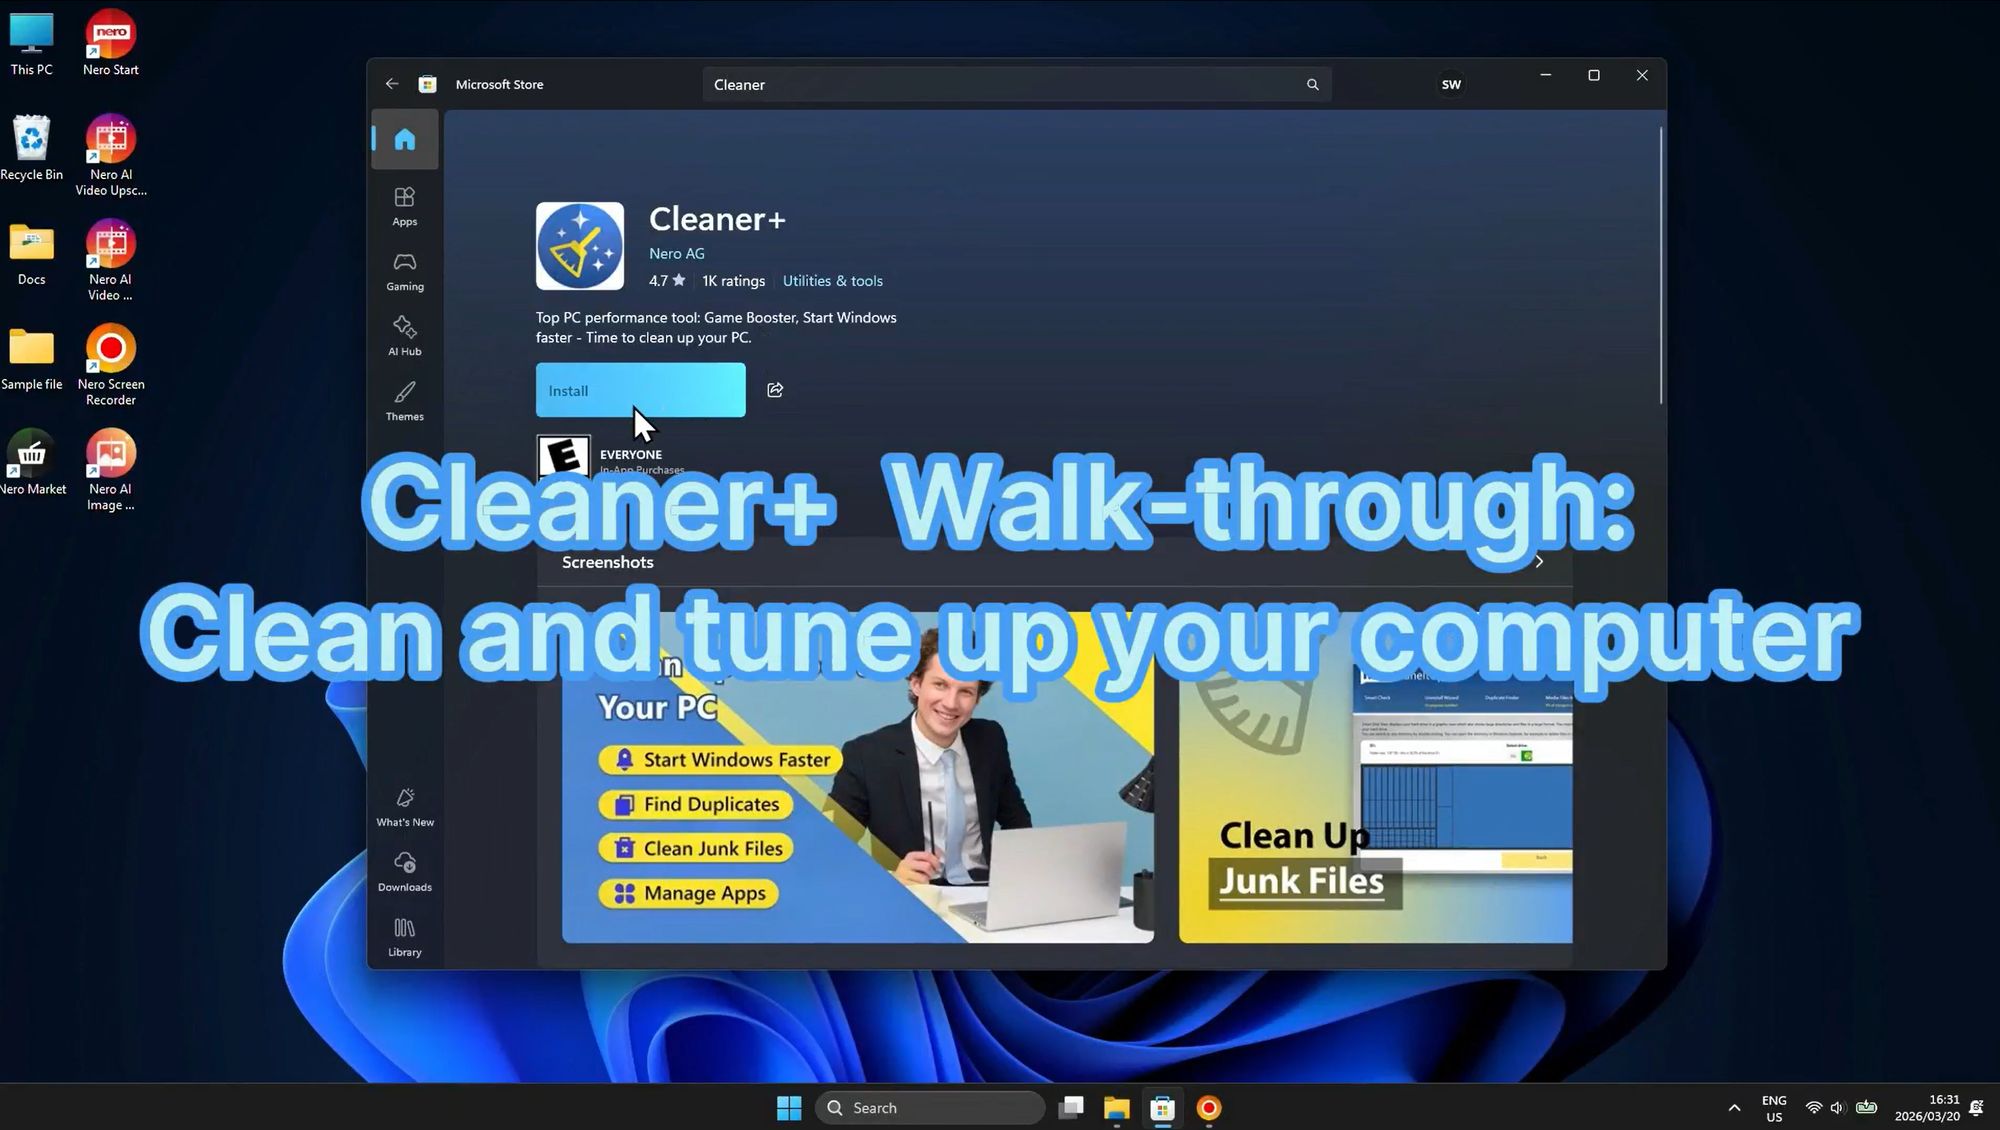
When you first launch Nero TuneItUp, you'll be greeted with the Cleaner+ interface, which serves as your central hub for PC optimization. This intuitive dashboard provides quick access to all the essential tools you need to clean and tune up your computer.
The Cleaner+ walk-through introduces you to the main features:
Start Windows Faster - Optimize boot time by managing startup programs
Find Duplicates - Locate and remove duplicate files wasting storage space
Clean Junk Files - Remove temporary files and system clutter
Game Boost - Optimize system resources for better gaming performance
This user-friendly interface makes PC optimization accessible even for beginners, with clear options and straightforward navigation that guides you through each optimization step.
Step 2: Run Smart Check to Analyze Your PC
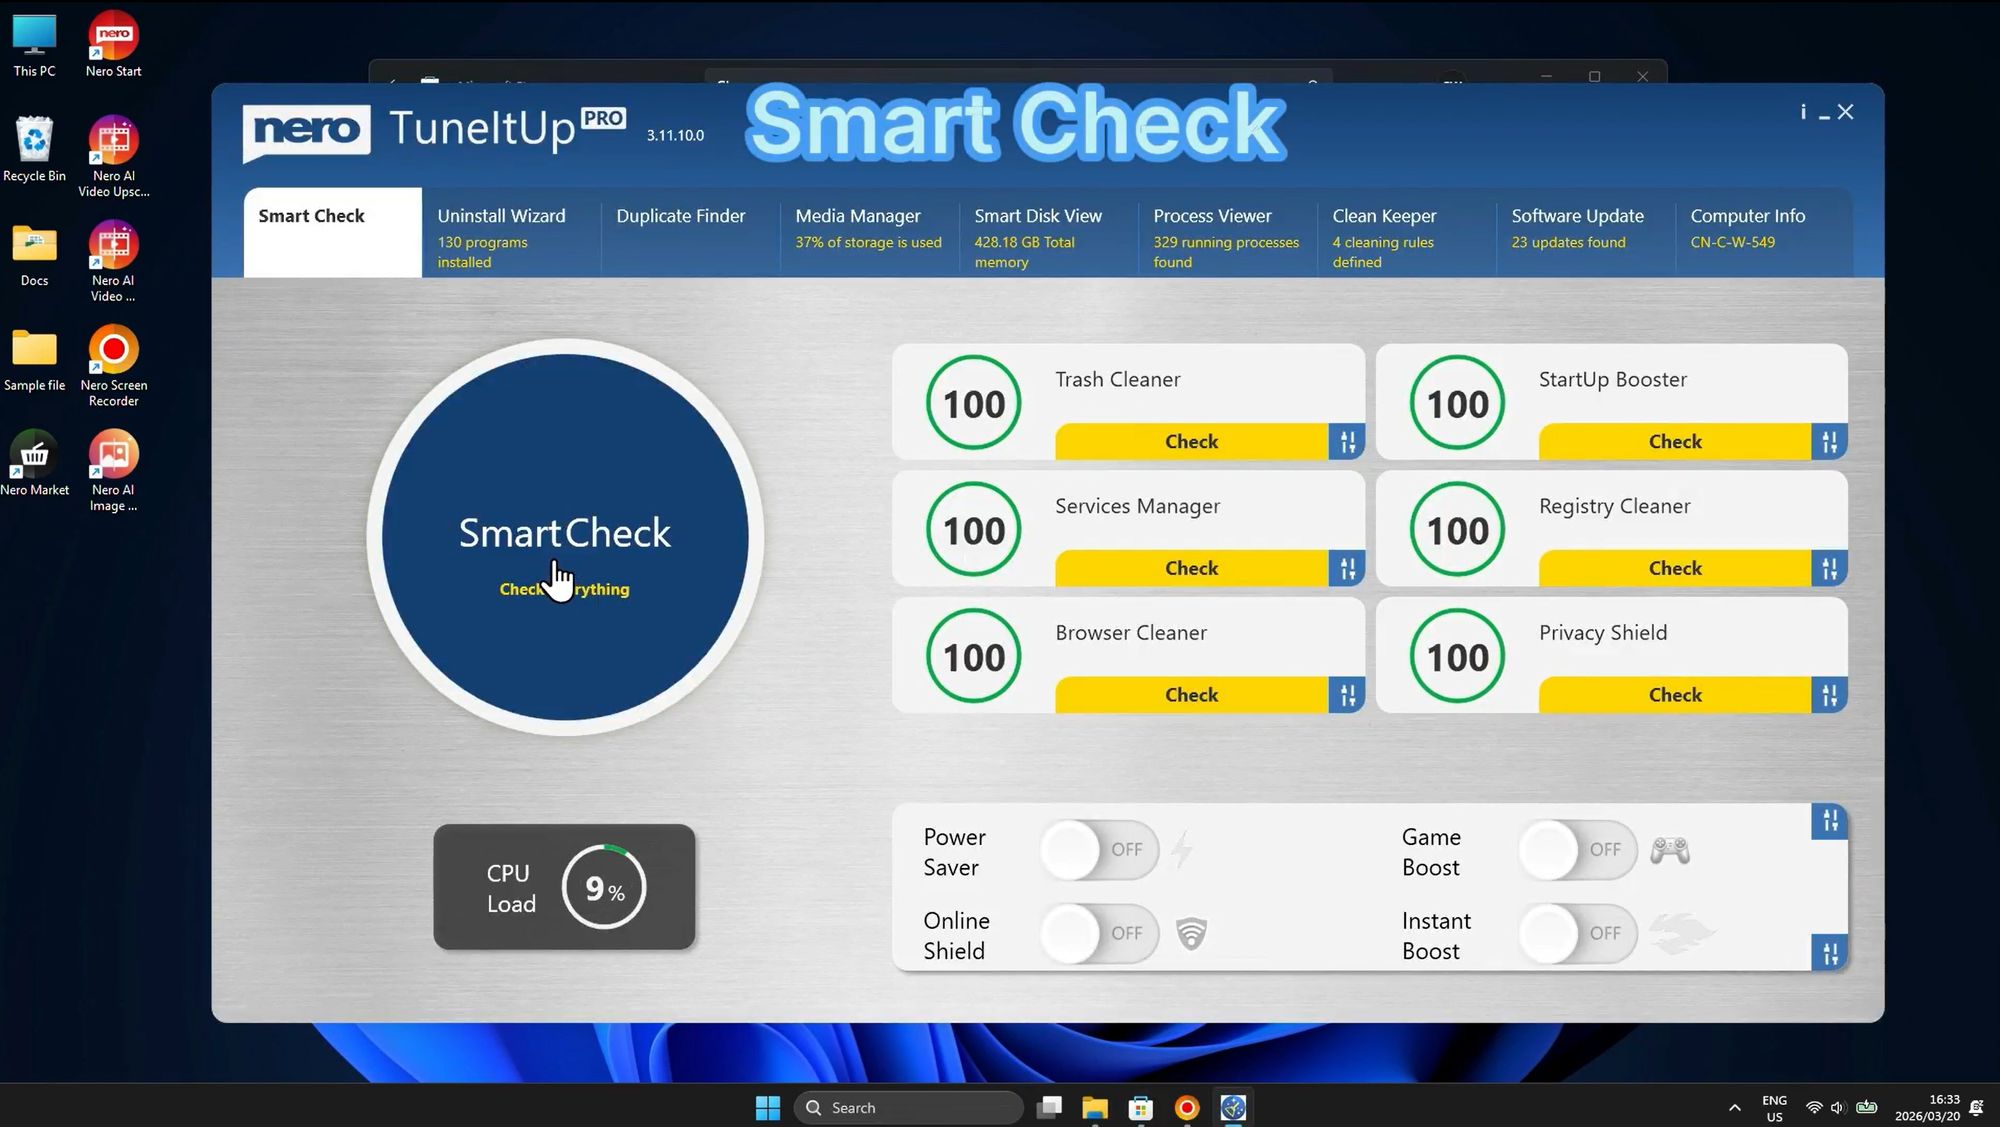
The Smart Check feature is the heart of Nero TuneItUp's optimization system. It performs a comprehensive analysis of your PC's health and identifies areas that need attention. With a single click, Smart Check scans your entire system and provides a detailed report of optimization opportunities.
What Smart Check analyzes:
Trash Cleaner - Identifies how much disk space can be recovered by removing temporary files, cache, and other unnecessary data. In this example, 4.03 GB of cleanable data was found.
Services Manager - Windows runs numerous background services, many of which you may not need. Smart Check identifies 21 optimizable services that can be disabled to improve system performance.
Browser Cleaner - Over time, browsers accumulate cookies, cache, and browsing history. The scan found 5,575 entries that can be safely removed to protect your privacy and speed up browsing.
StartUp Booster - Shows which programs launch at Windows startup and slow down boot time.
Registry Cleaner - Detects corrupted or obsolete registry entries that need fixing.
Privacy Shield - Ensures your privacy settings are optimal.
Performance toggles available:
Power Saver - Reduce energy consumption
Online Shield - Protect against online threats
Game Boost - Optimize for gaming performance
Instant Boost - Quick performance enhancement
The Smart Check dashboard gives you a complete overview of your system's health at a glance, with a performance score of 100 indicating optimal condition. Any issues detected are clearly highlighted, allowing you to prioritize which optimizations to perform first.
Step 3: Monitor Real-Time Performance
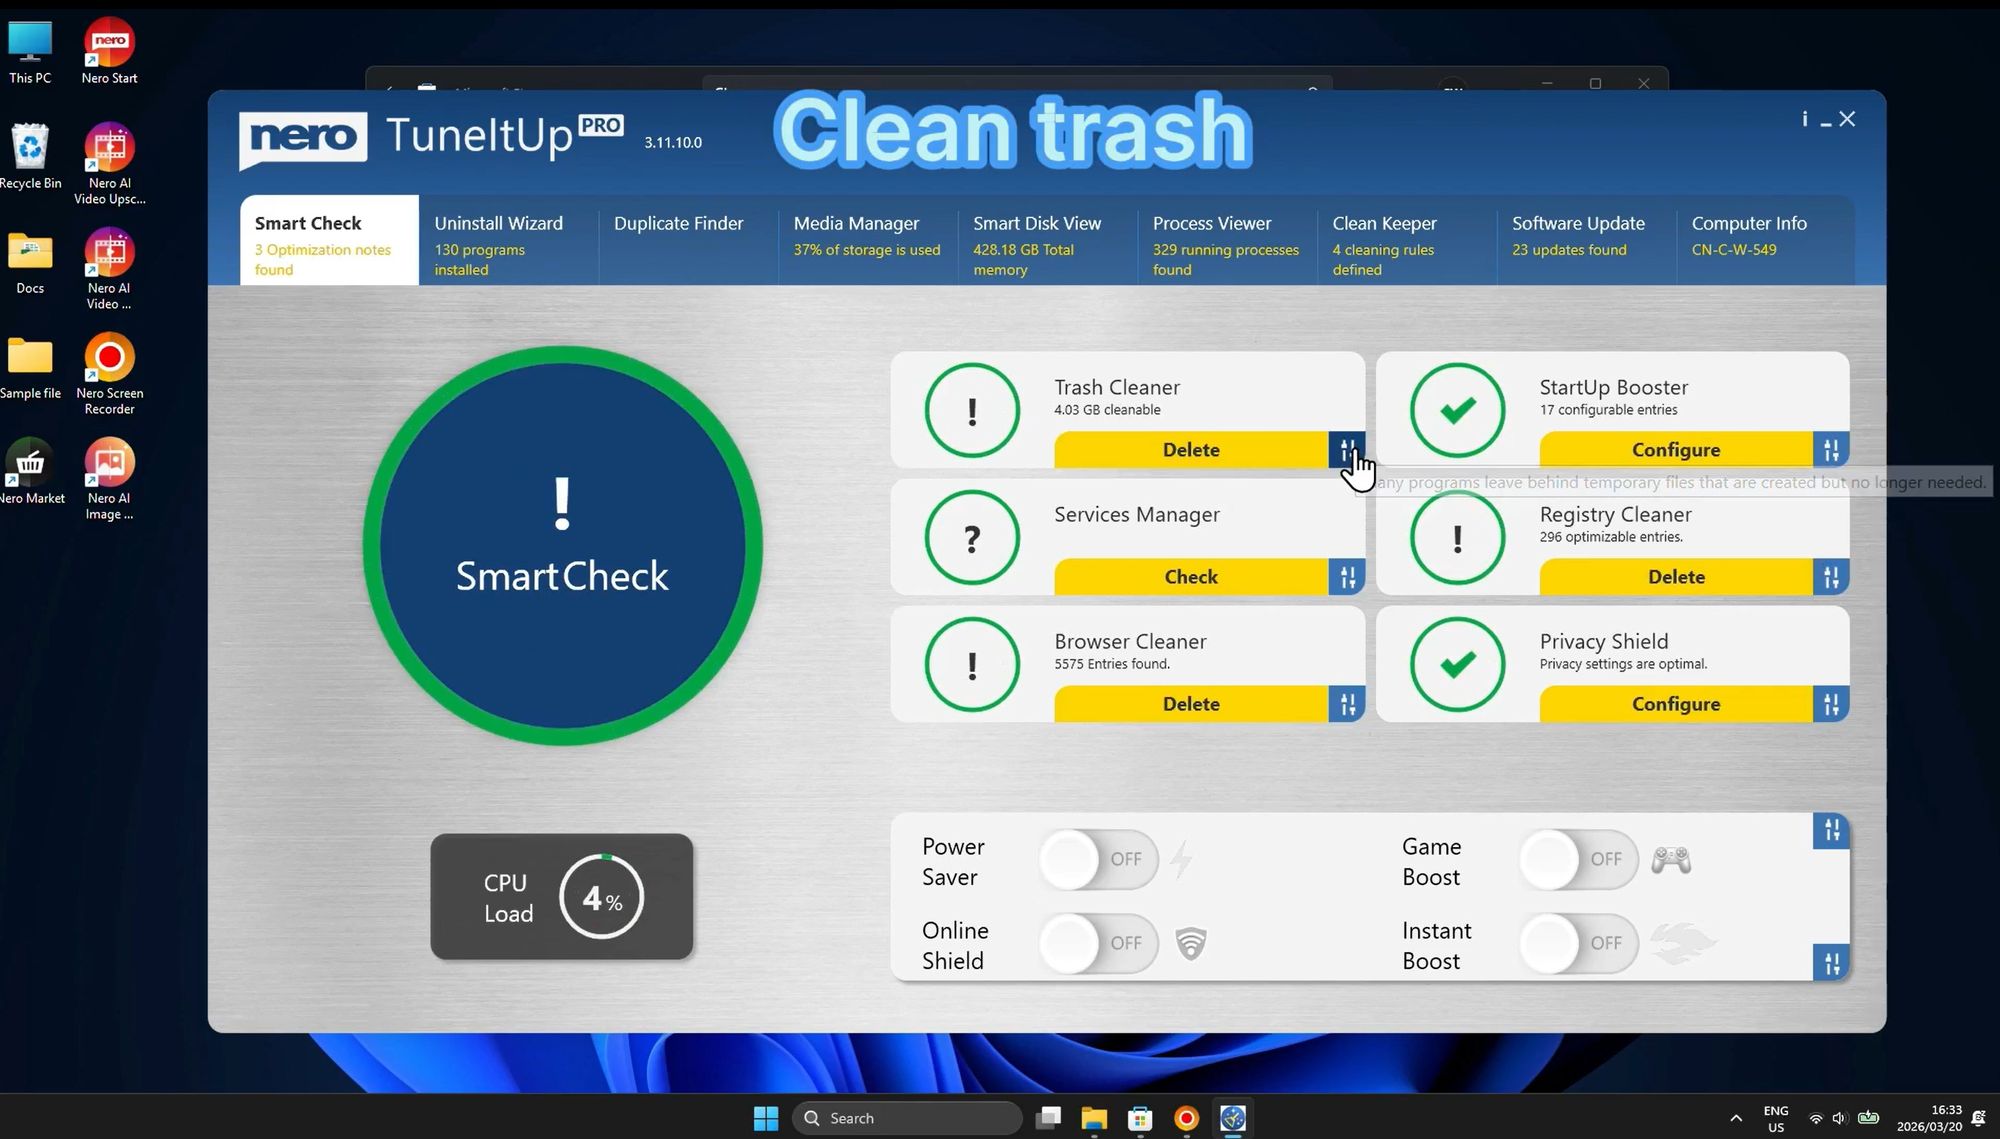
Real-time system monitoring is crucial for understanding your PC's performance. Nero TuneItUp provides a CPU load indicator that shows you exactly how much processing power is being used at any given moment. In this example, the CPU load is at a healthy 4%, indicating that the system is running efficiently with plenty of resources available.
This monitoring feature helps you:
Identify when your system is under heavy load
Detect resource-hungry applications
Understand when optimization is needed
Track performance improvements after cleanup
The circular performance indicator provides an at-a-glance view of your system's current state, making it easy to spot when your PC needs attention. Combined with the optimization tools available on the right side of the interface, you have complete control over your system's performance.
Part 2: Cleaning & Optimizing Your System
Step 1: Clean Junk Files to Free Up Space
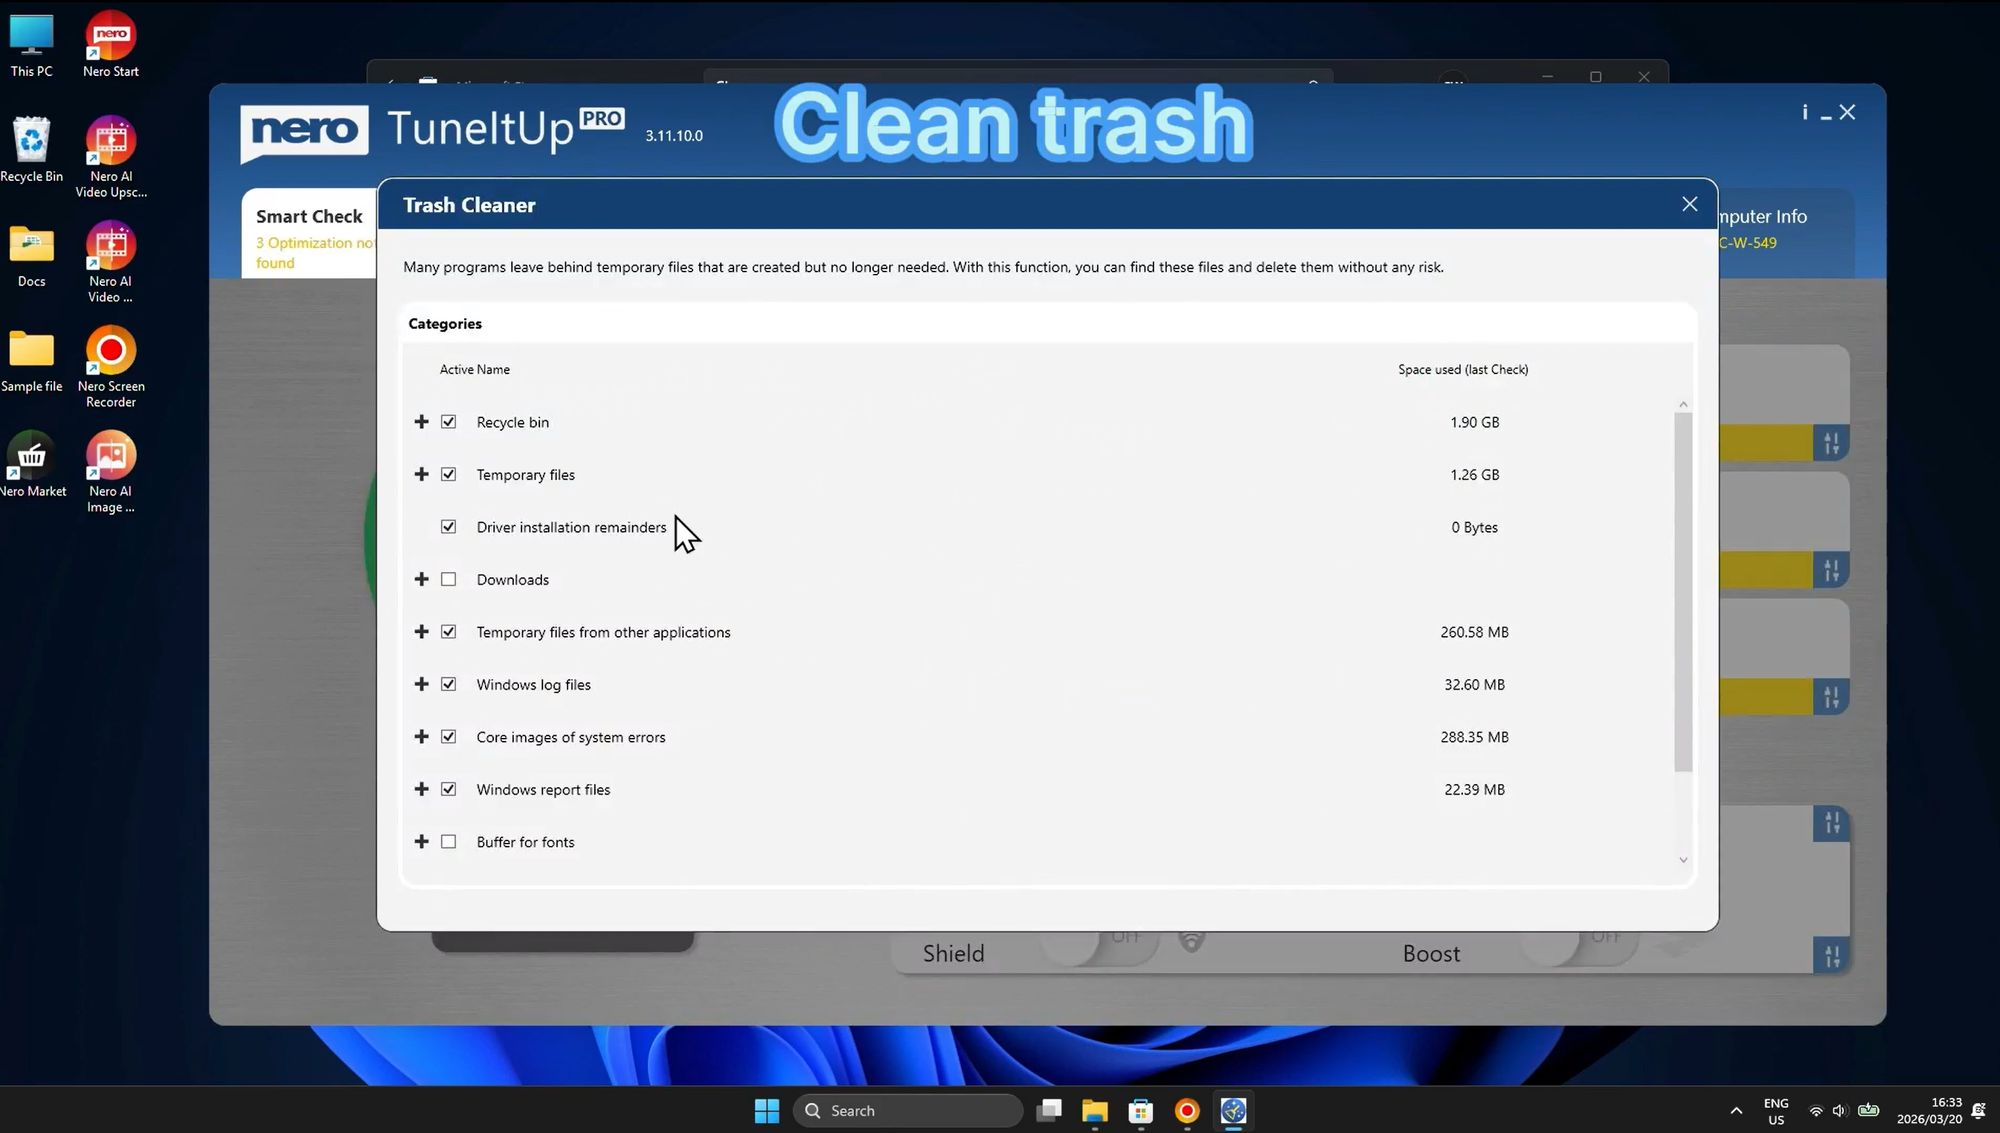
One of the most effective ways to speed up your PC is by removing unnecessary files that accumulate over time. The Trash Cleaner feature scans your system for various types of junk files and allows you to delete them safely.
Categories of files cleaned:
Recycle Bin - Files you've deleted but are still taking up space (1.90 GB in this example)
Temporary Files - Windows and applications create temporary files that often remain on your system (1.26 GB)
Driver Installation Remainders - Old driver installation files (0 Bytes in this case)
Temporary files from other applications - App cache and temp data (260.58 MB)
Windows log files - System logs that accumulate over time (32.60 MB)
Core images of system errors - Error diagnostic files (288.35 MB)
Windows report files - System report files (22.39 MB)
By regularly cleaning these categories, you can recover gigabytes of storage space and improve system performance. The interface clearly shows how much space each category is using, allowing you to make informed decisions about what to clean. Simply check the boxes next to the categories you want to clean and click the "Clean trash" button to free up space instantly.
Step 2: Optimize Windows Services
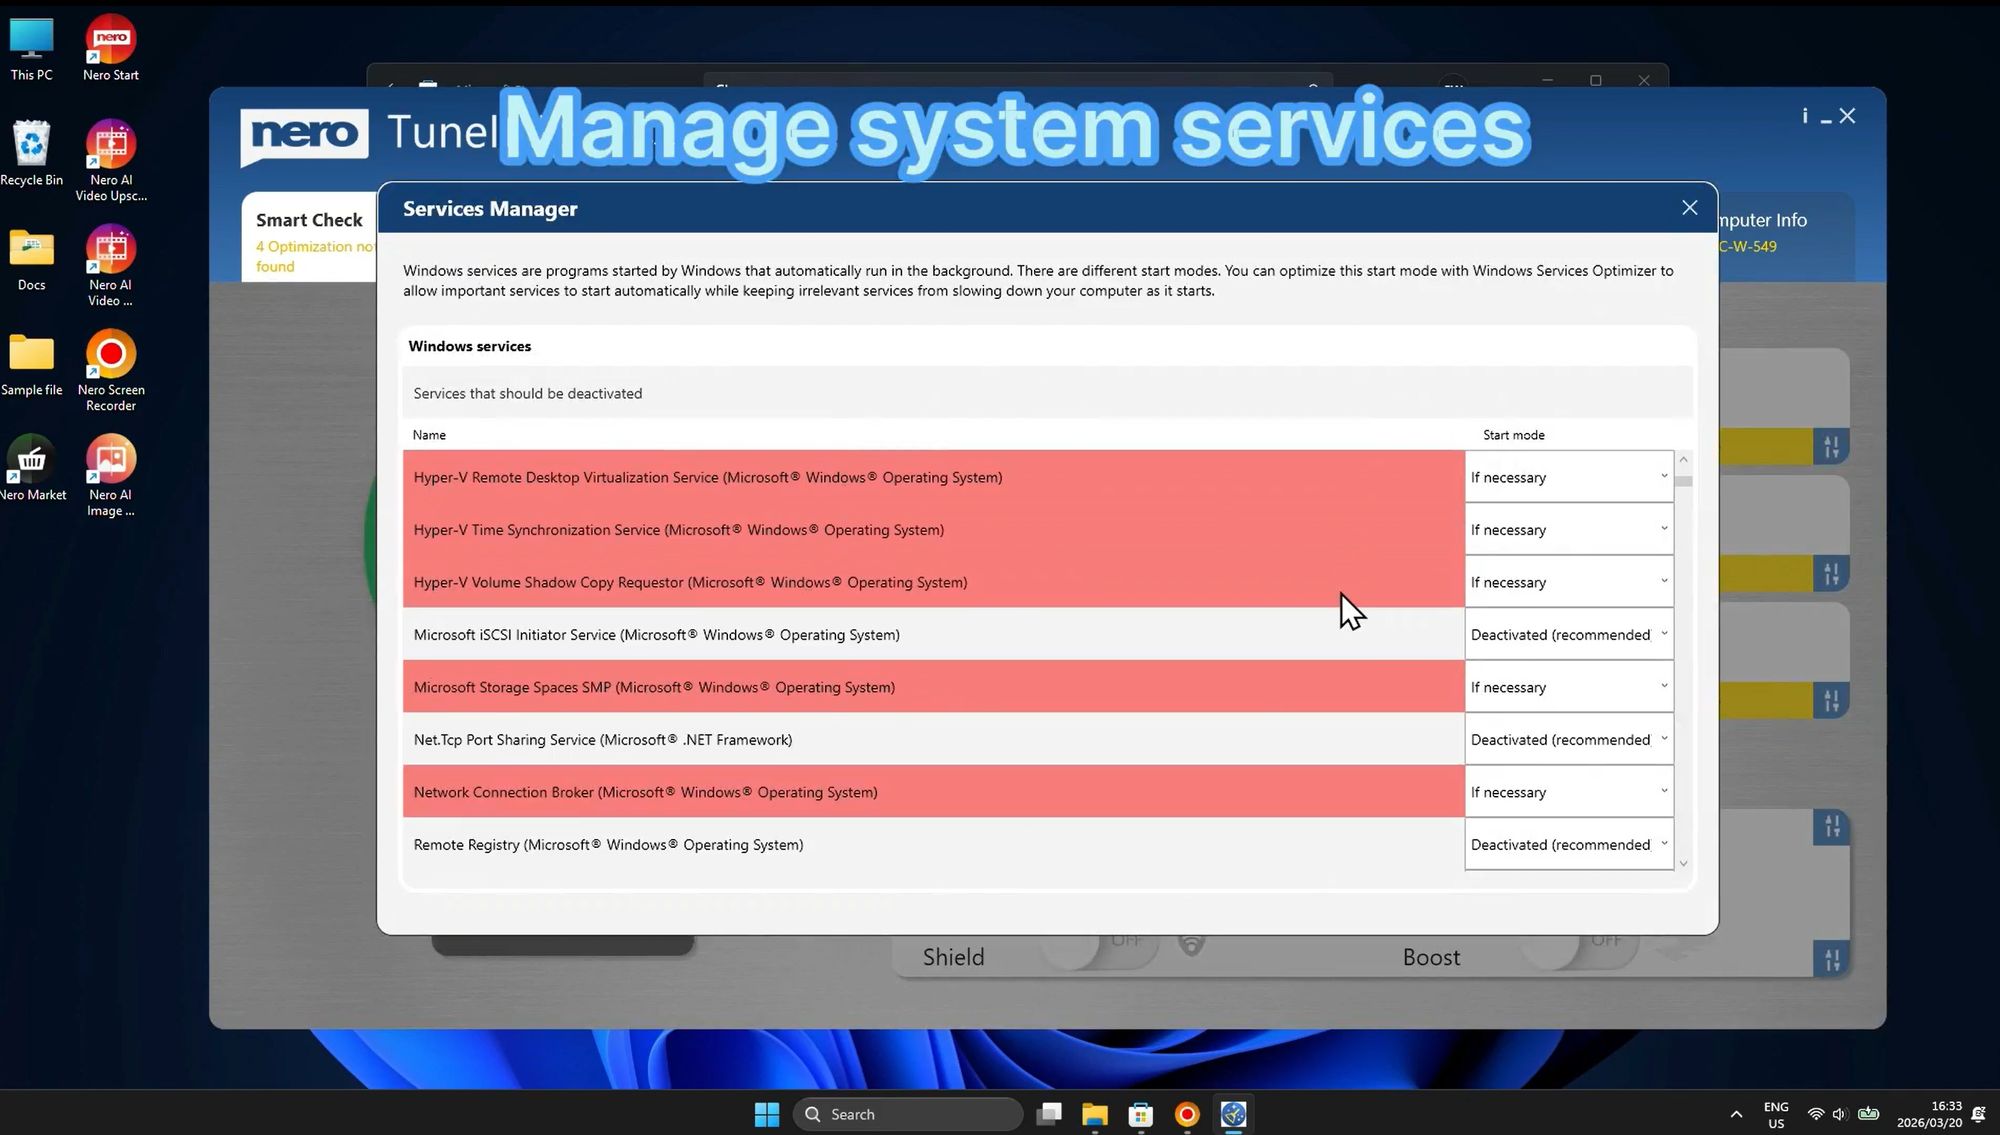
Windows runs dozens of background services, many of which you may never use. These services consume system resources like RAM and CPU, potentially slowing down your computer. The Services Manager feature helps you identify and disable unnecessary services to optimize performance.
How Services Manager works:
The tool analyzes all Windows services and highlights those that can be safely deactivated. Services marked in red are recommended for deactivation if you don't need their functionality. This intelligent analysis ensures you won't accidentally disable critical system services.
Examples of services that can often be disabled:
Hyper-V Remote Desktop Virtualization Service - Only needed if you're using Hyper-V virtual machines. Most home users don't require this service.
Hyper-V Time Synchronization Service - Related to virtual machine time sync
Hyper-V Volume Shadow Copy Requestor - Virtual machine backup service
Microsoft Storage Spaces SMP - Related to storage pool management
Network Connection Broker - Manages connections for Microsoft Store apps
Benefits of optimizing services:
Reduced RAM usage
Lower CPU consumption
Faster system startup
Improved overall responsiveness
The Services Manager provides detailed information about each service, including its name and what it does, helping you make informed decisions. By deactivating unnecessary services, you can reclaim valuable system resources and noticeably improve your PC's performance, especially on older or lower-spec machines.
Step 3: Clean Browser Data for Privacy & Speed
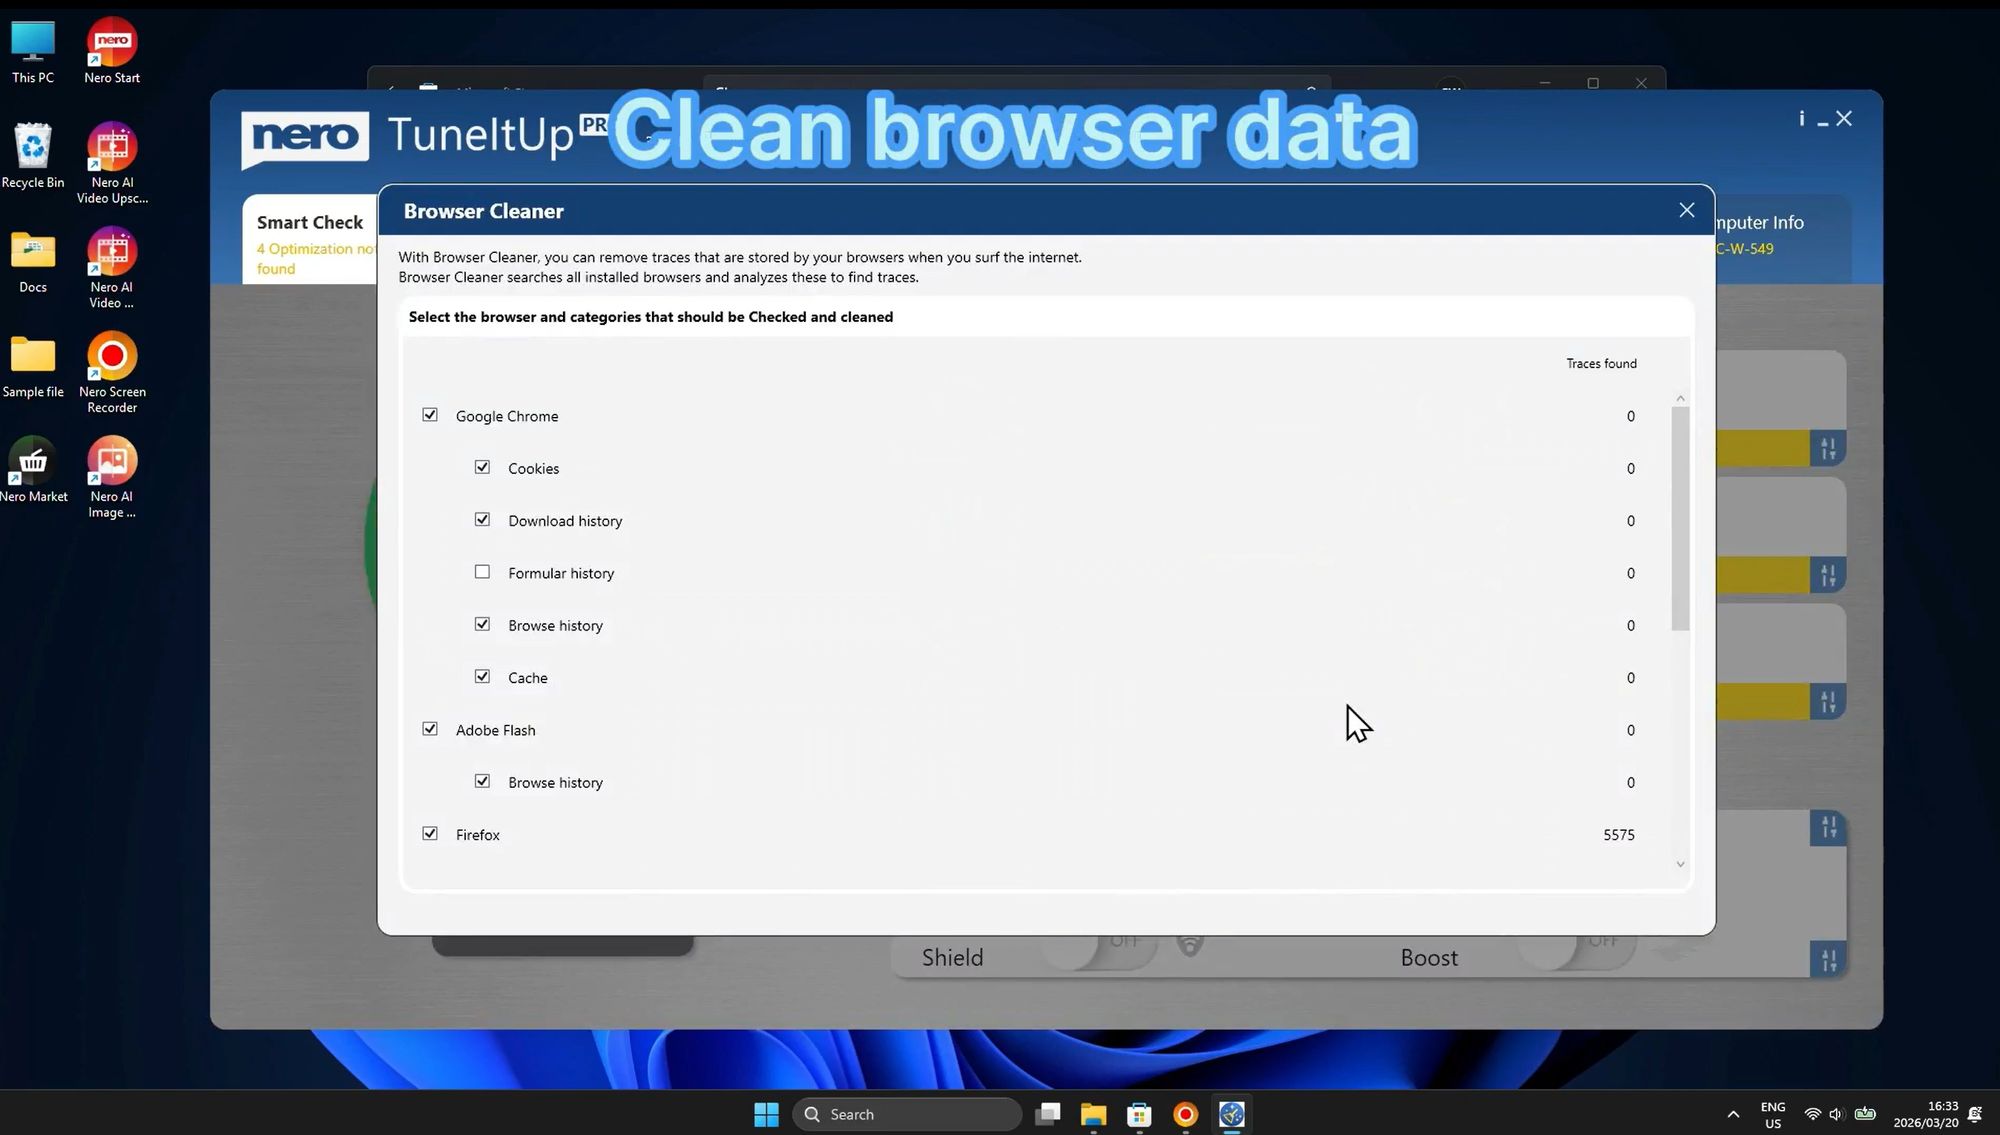
Your web browser stores vast amounts of data as you surf the internet, including cookies, browsing history, cache files, and form data. While some of this data improves your browsing experience, it can also slow down your browser, compromise your privacy, and consume significant disk space.
What Browser Cleaner removes:
Cookies - Small files that websites store on your computer to track your activity
Download History - A record of every file you've downloaded (doesn't delete actual files)
Form History - Saved form data like addresses and search terms
Browse History - A complete record of websites you've visited
Cache - Temporary copies of web pages, images, and other content
Supported browsers:
Google Chrome
Mozilla Firefox
Microsoft Edge
Adobe Flash (legacy support)
The Browser Cleaner interface allows you to select specific browsers and specific types of data to remove. You can clean one browser or all browsers at once, giving you complete control over what gets deleted. This selective approach ensures you don't lose important saved passwords or bookmarks while still benefiting from improved privacy and performance.
In the example shown, Firefox has 5,575 traces found that can be cleaned. Regular browser cleaning is essential for maintaining fast browsing speeds and protecting your online privacy. It's recommended to perform this cleanup at least once a month, or more frequently if you browse extensively.
Step 4: Optimize Startup Programs
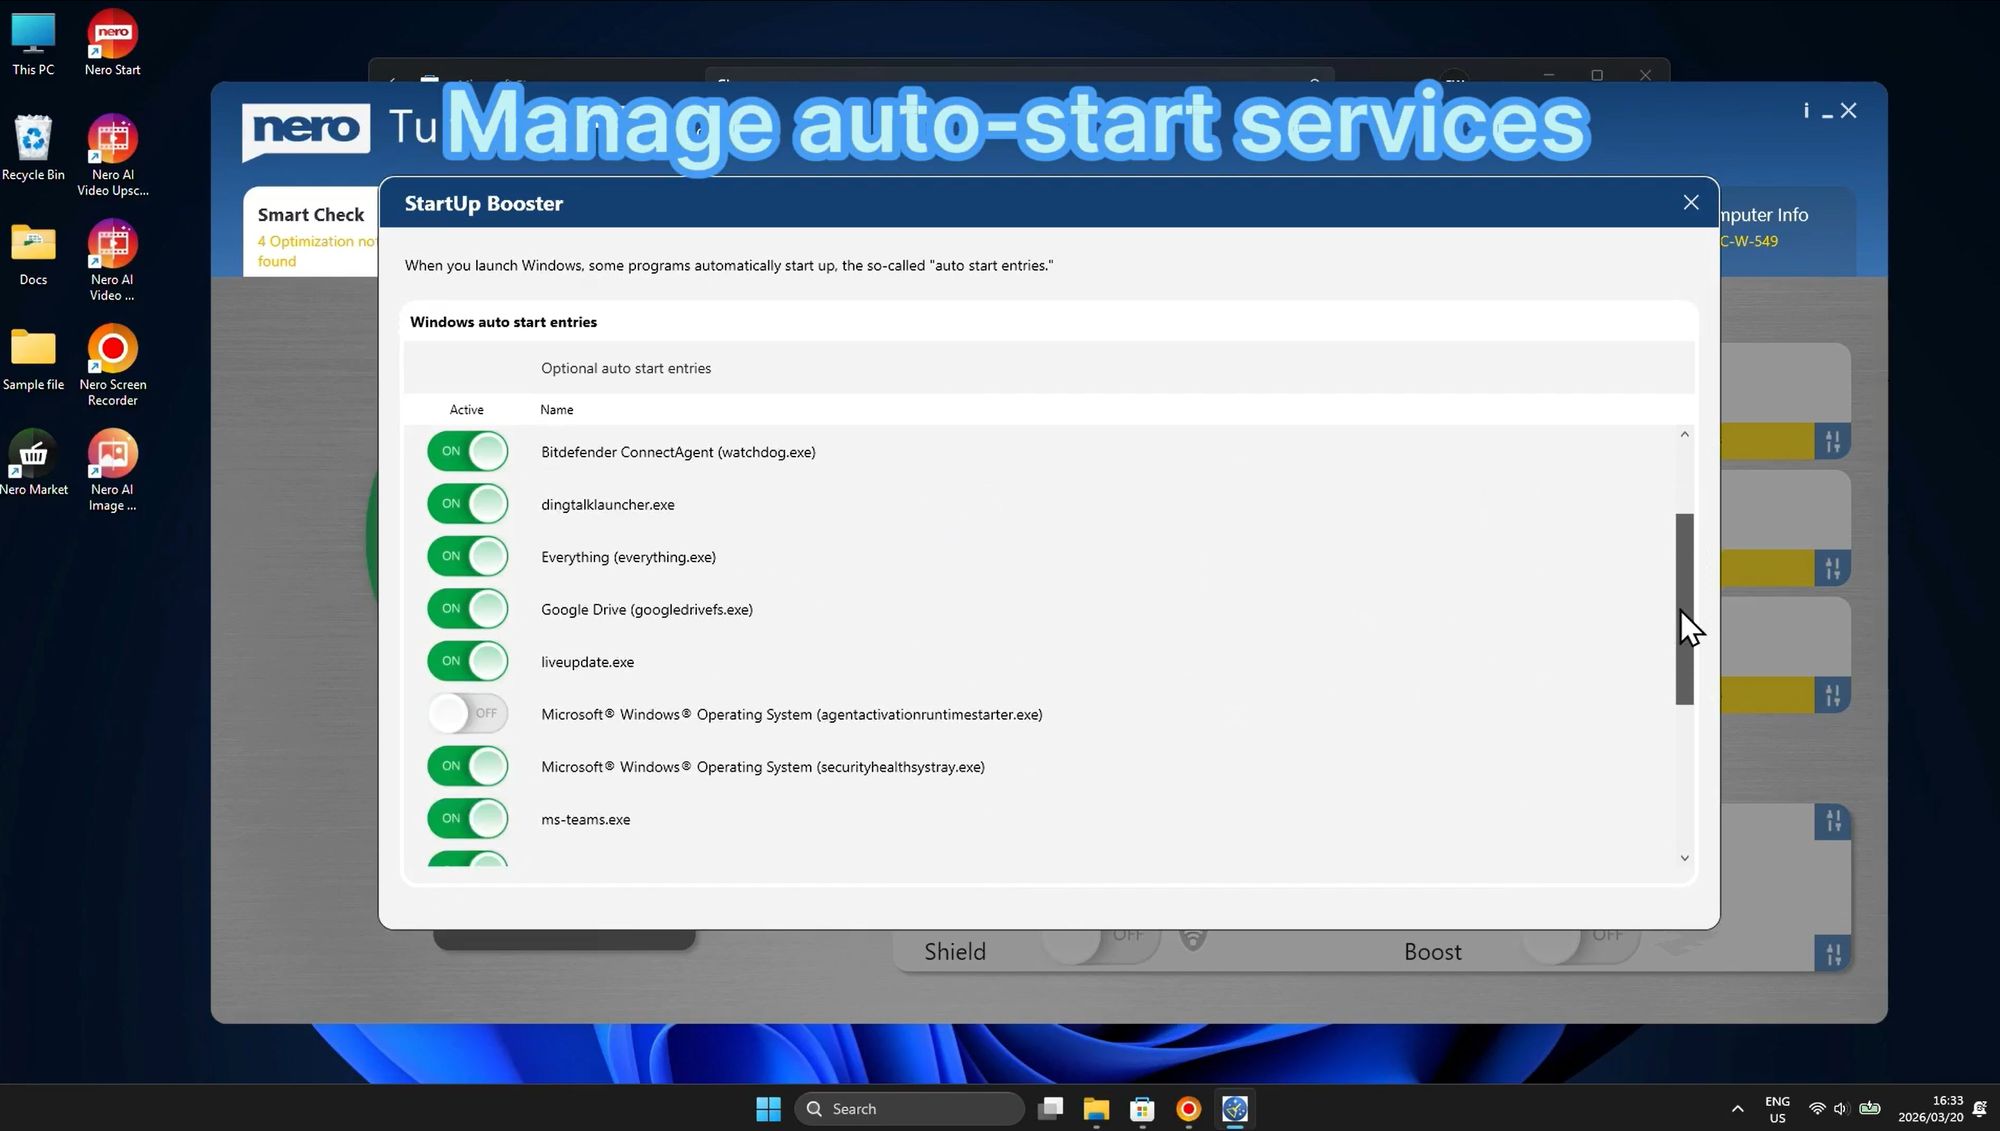
One of the most common complaints about Windows computers is slow startup time. The primary culprit is usually too many programs launching automatically when Windows starts. The StartUp Booster feature gives you complete control over which programs run at startup, dramatically reducing boot time.
How StartUp Booster works:
The tool displays a comprehensive list of all programs configured to launch automatically when you start your computer. Each entry shows the program name and executable file, with a simple toggle switch (ON/OFF) to enable or disable auto-start.
Common startup programs you might see:
Bitdefender ConnectAgent (watchdog.exe) - Antivirus software component
dingtalk launcher.exe - Communication software
Everything (everything.exe) - File search utility
Google Drive (googledrivefs.exe) - Cloud storage sync client
liveupdate.exe - Software updater
Microsoft Windows Operating System services - Various system components
ms-teams.exe - Microsoft Teams
Benefits of optimizing startup programs:
Significantly faster boot times (often 50% or more improvement)
Reduced initial system load
More available RAM after startup
Smoother Windows startup experience
Best practices for startup management:
Keep essential security software (antivirus, firewall) enabled
Disable programs you use occasionally but not daily
Disable updater programs that can run on-demand instead
Keep cloud sync services enabled only if you need real-time syncing
By carefully managing your startup programs, you can transform a slow, frustrating boot process into a quick, efficient startup. Many users report reducing their boot time from several minutes to under 30 seconds simply by disabling unnecessary startup programs.
Step 5: Fix Registry Errors
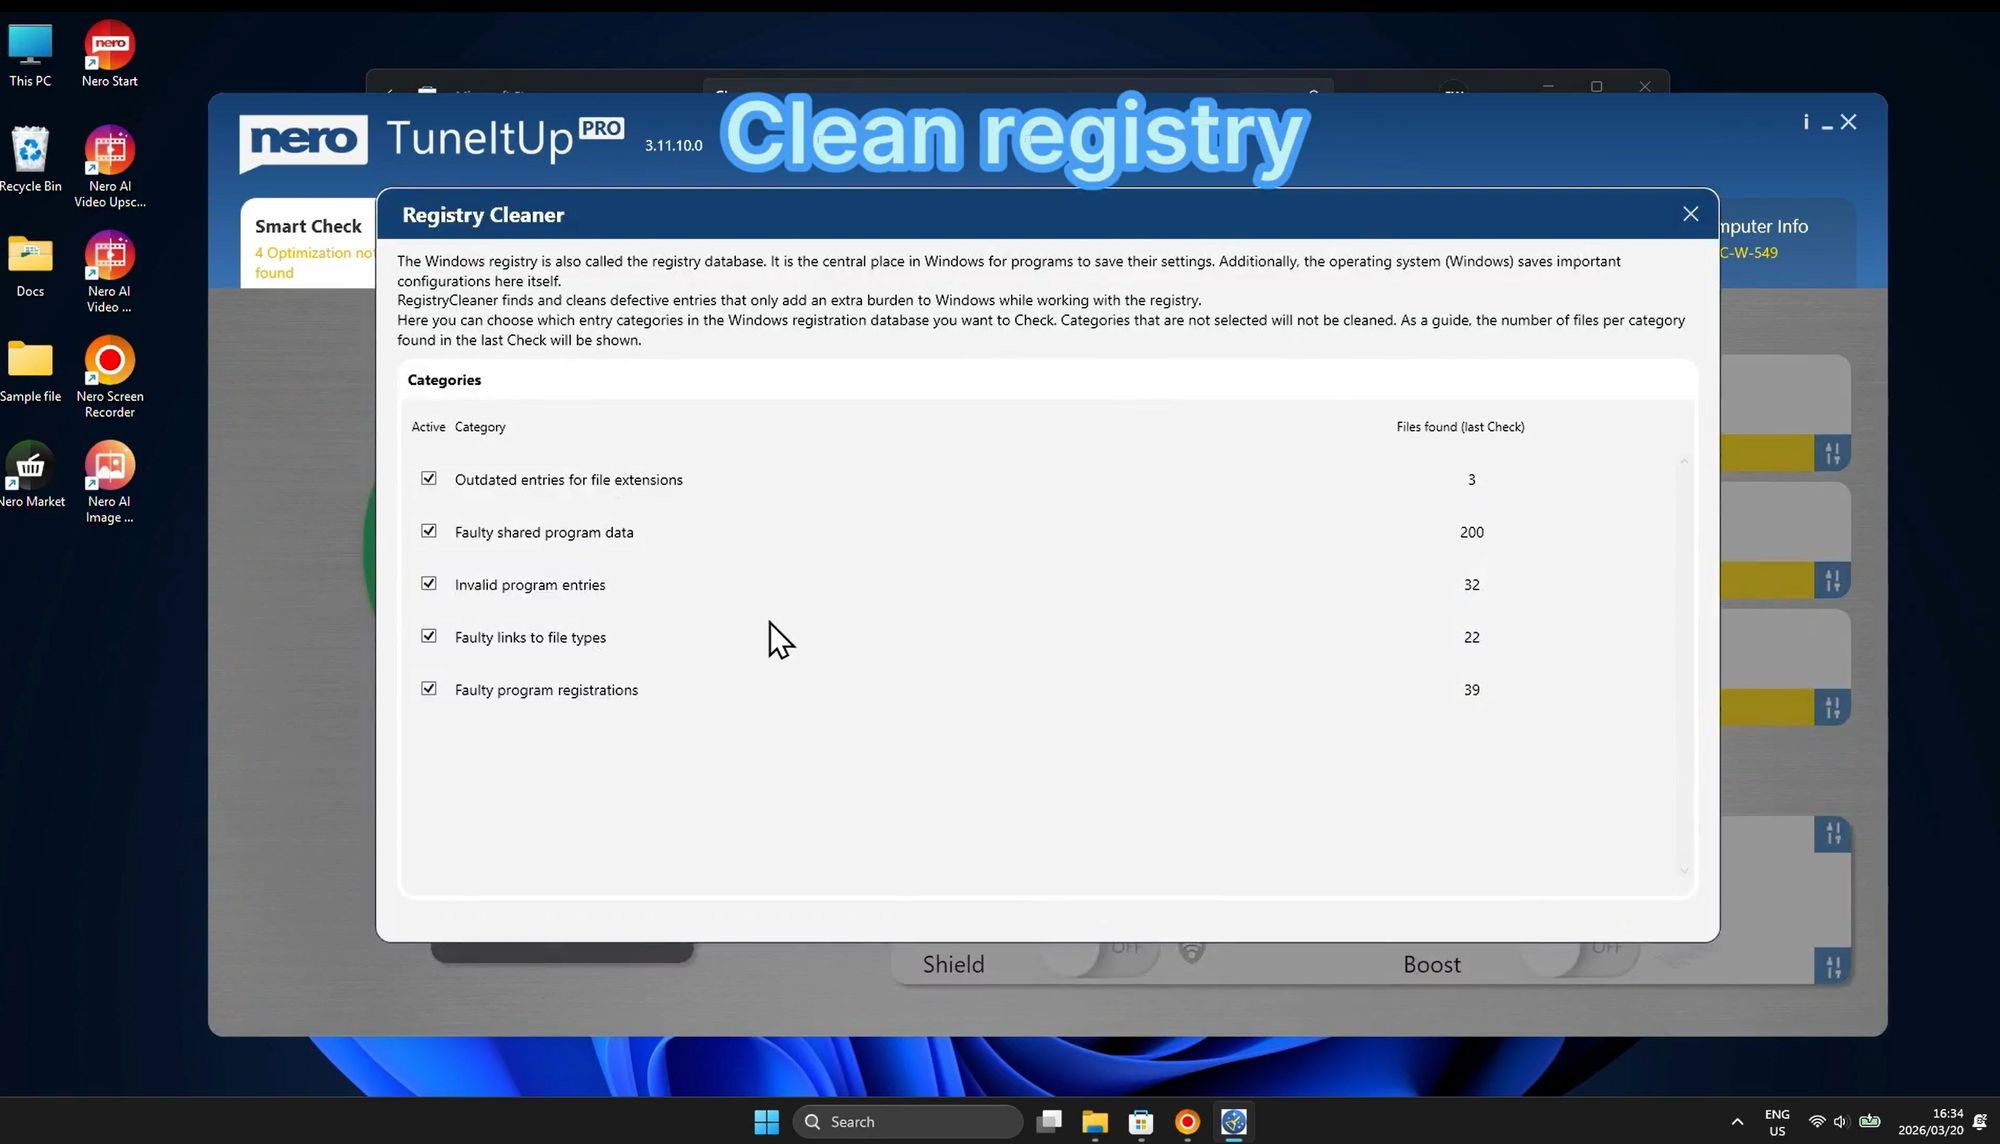
The Windows Registry is a critical database that stores configuration settings for your operating system and installed applications. Over time, the registry accumulates obsolete, corrupted, or invalid entries that can cause system instability, errors, and performance degradation. The Registry Cleaner feature safely identifies and removes these problematic entries.
Types of registry issues detected:
Outdated File Extensions - Registry entries for file types that are no longer used or associated with uninstalled programs
Faulty Shared Program Data - Broken references to shared DLL files and program components that no longer exist
Invalid Program Entries - Registry keys pointing to uninstalled applications or moved program files
Orphaned startup entries - References to programs that no longer exist
Invalid font references - Broken font registry entries
Broken shortcuts - Invalid shortcut references
Obsolete help file associations - Old help file registry entries
How Registry Cleaner works:
The tool performs a comprehensive scan of your Windows Registry, analyzing thousands of entries to identify problems. Each category of issue is displayed with a count of how many problematic entries were found during the last check. You can select which categories to clean by checking the boxes next to each item.
Benefits of regular registry cleaning:
Improved system stability and fewer crashes
Faster application launch times
Reduced error messages
Better overall system performance
Smaller registry size for faster access
Safety features:
Nero TuneItUp's Registry Cleaner is designed with safety in mind. It only targets entries that are clearly obsolete or invalid, avoiding critical system settings. The tool creates automatic backups before making changes, allowing you to restore the registry if any issues occur.
It's recommended to run the Registry Cleaner monthly or after uninstalling multiple programs. Regular maintenance keeps your registry lean and efficient, contributing to a faster, more stable Windows experience.
Part 3: Managing Programs & Files
Step 1: Uninstall Unwanted Programs
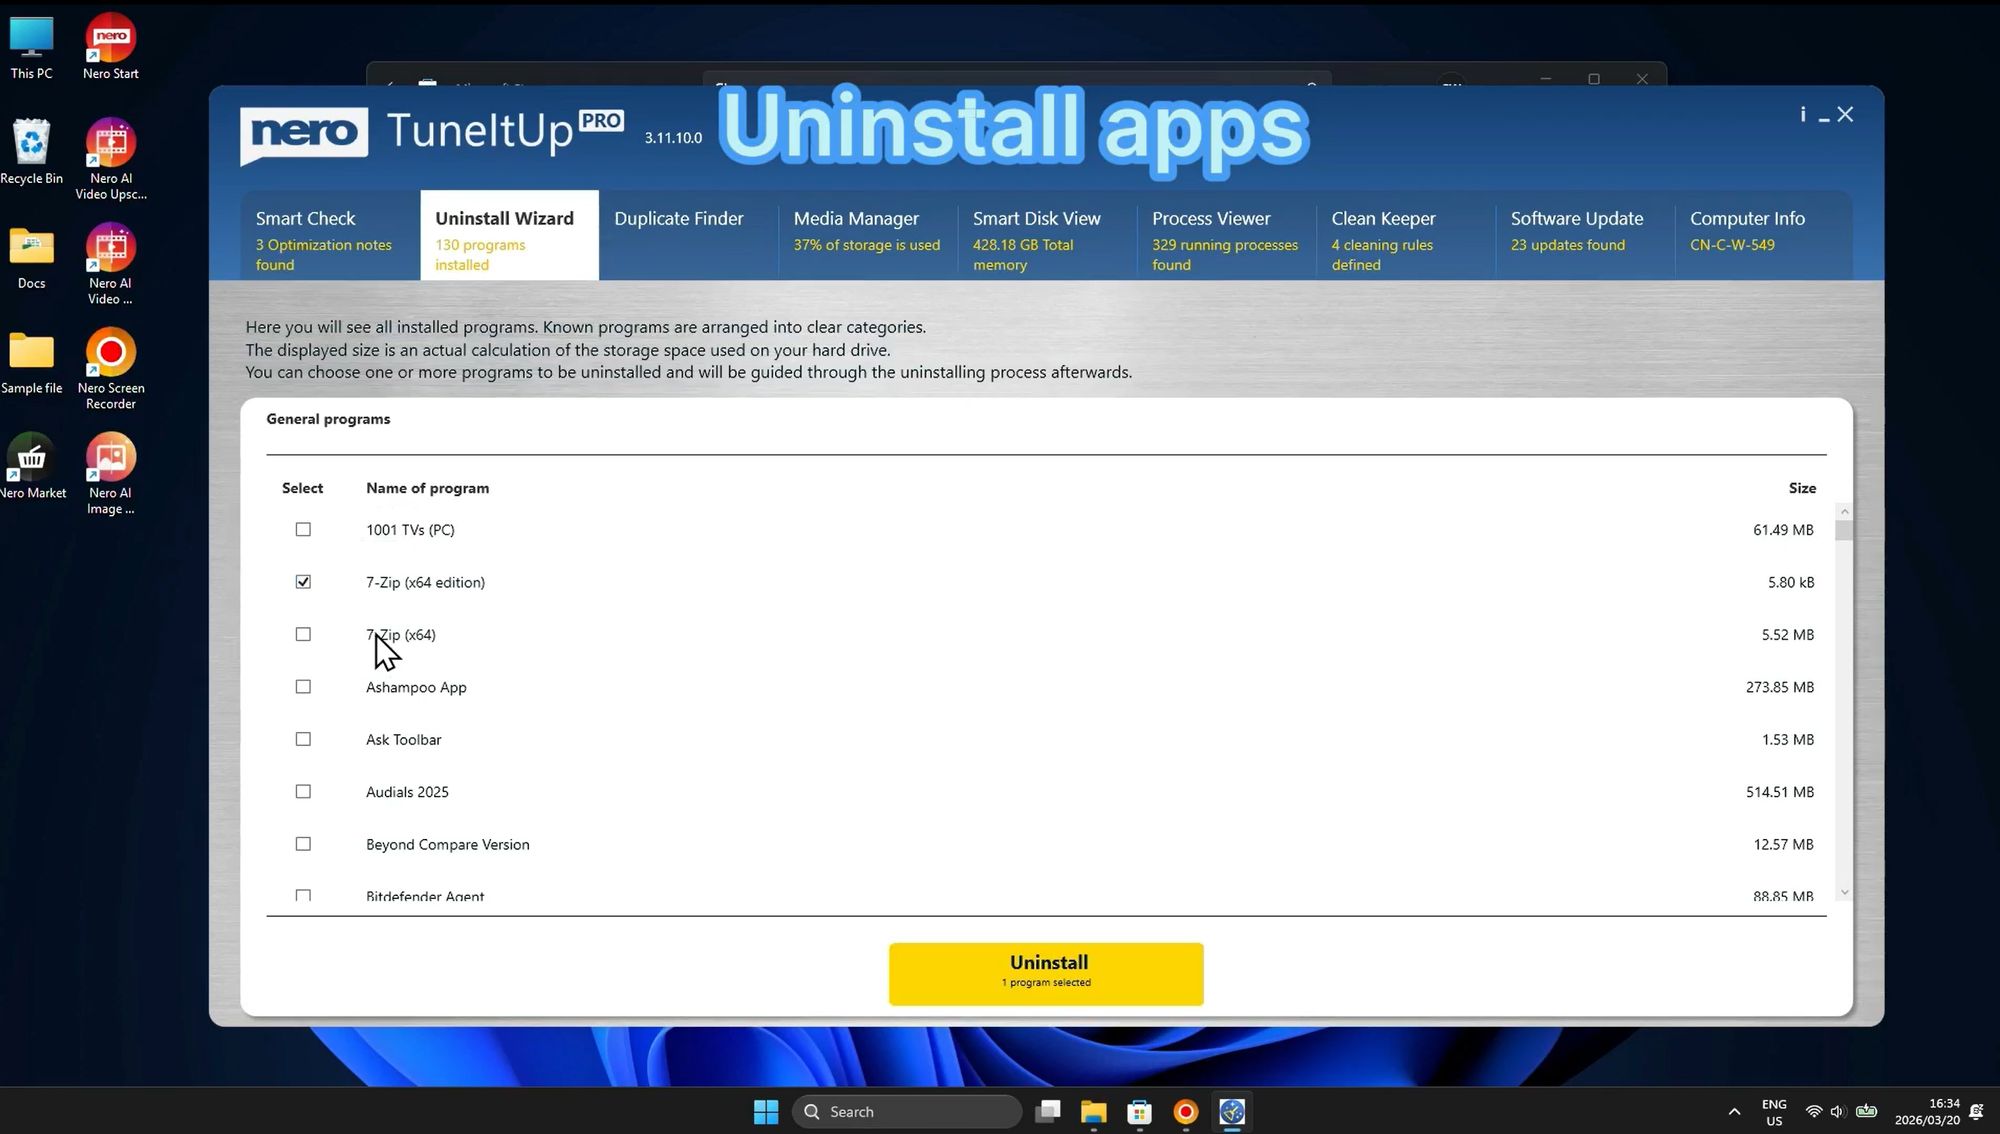
Over time, computers accumulate software that you no longer use. These unused programs waste disk space, can slow down your system, and may even run background processes that consume resources. The Uninstall Wizard provides a more thorough uninstallation process than Windows' built-in uninstaller.
Why use Uninstall Wizard instead of Windows uninstaller?
Standard Windows uninstallation often leaves behind:
Registry entries
Temporary files
Configuration files
Cached data
Shortcuts and references
The Uninstall Wizard performs a "deep uninstall" that removes not just the program itself, but all associated files, registry entries, and leftover data that standard uninstallation misses.
How to use Uninstall Wizard:
The interface displays a comprehensive list of all installed programs, showing:
Program name (e.g., "7-Zip (x64 edition)", "Ashampoo App")
File size
Installation date (when available)
Simply check the box next to any program you want to remove, and the yellow "Uninstall" button at the bottom will show how many programs are selected for removal. In this example, "7-Zip (x64 edition)" is selected for uninstallation.
Benefits of regular program cleanup:
Recover significant disk space (some programs can be several gigabytes)
Reduce system clutter
Eliminate potential security vulnerabilities from outdated software
Improve system performance by removing background processes
Faster system scans and backups
Best practices:
Review your installed programs quarterly
Remove trial software you no longer use
Uninstall old versions when you've upgraded to newer ones
Remove bloatware that came pre-installed with your PC
Keep only programs you actively use
Step 2: Find and Remove Duplicate Files
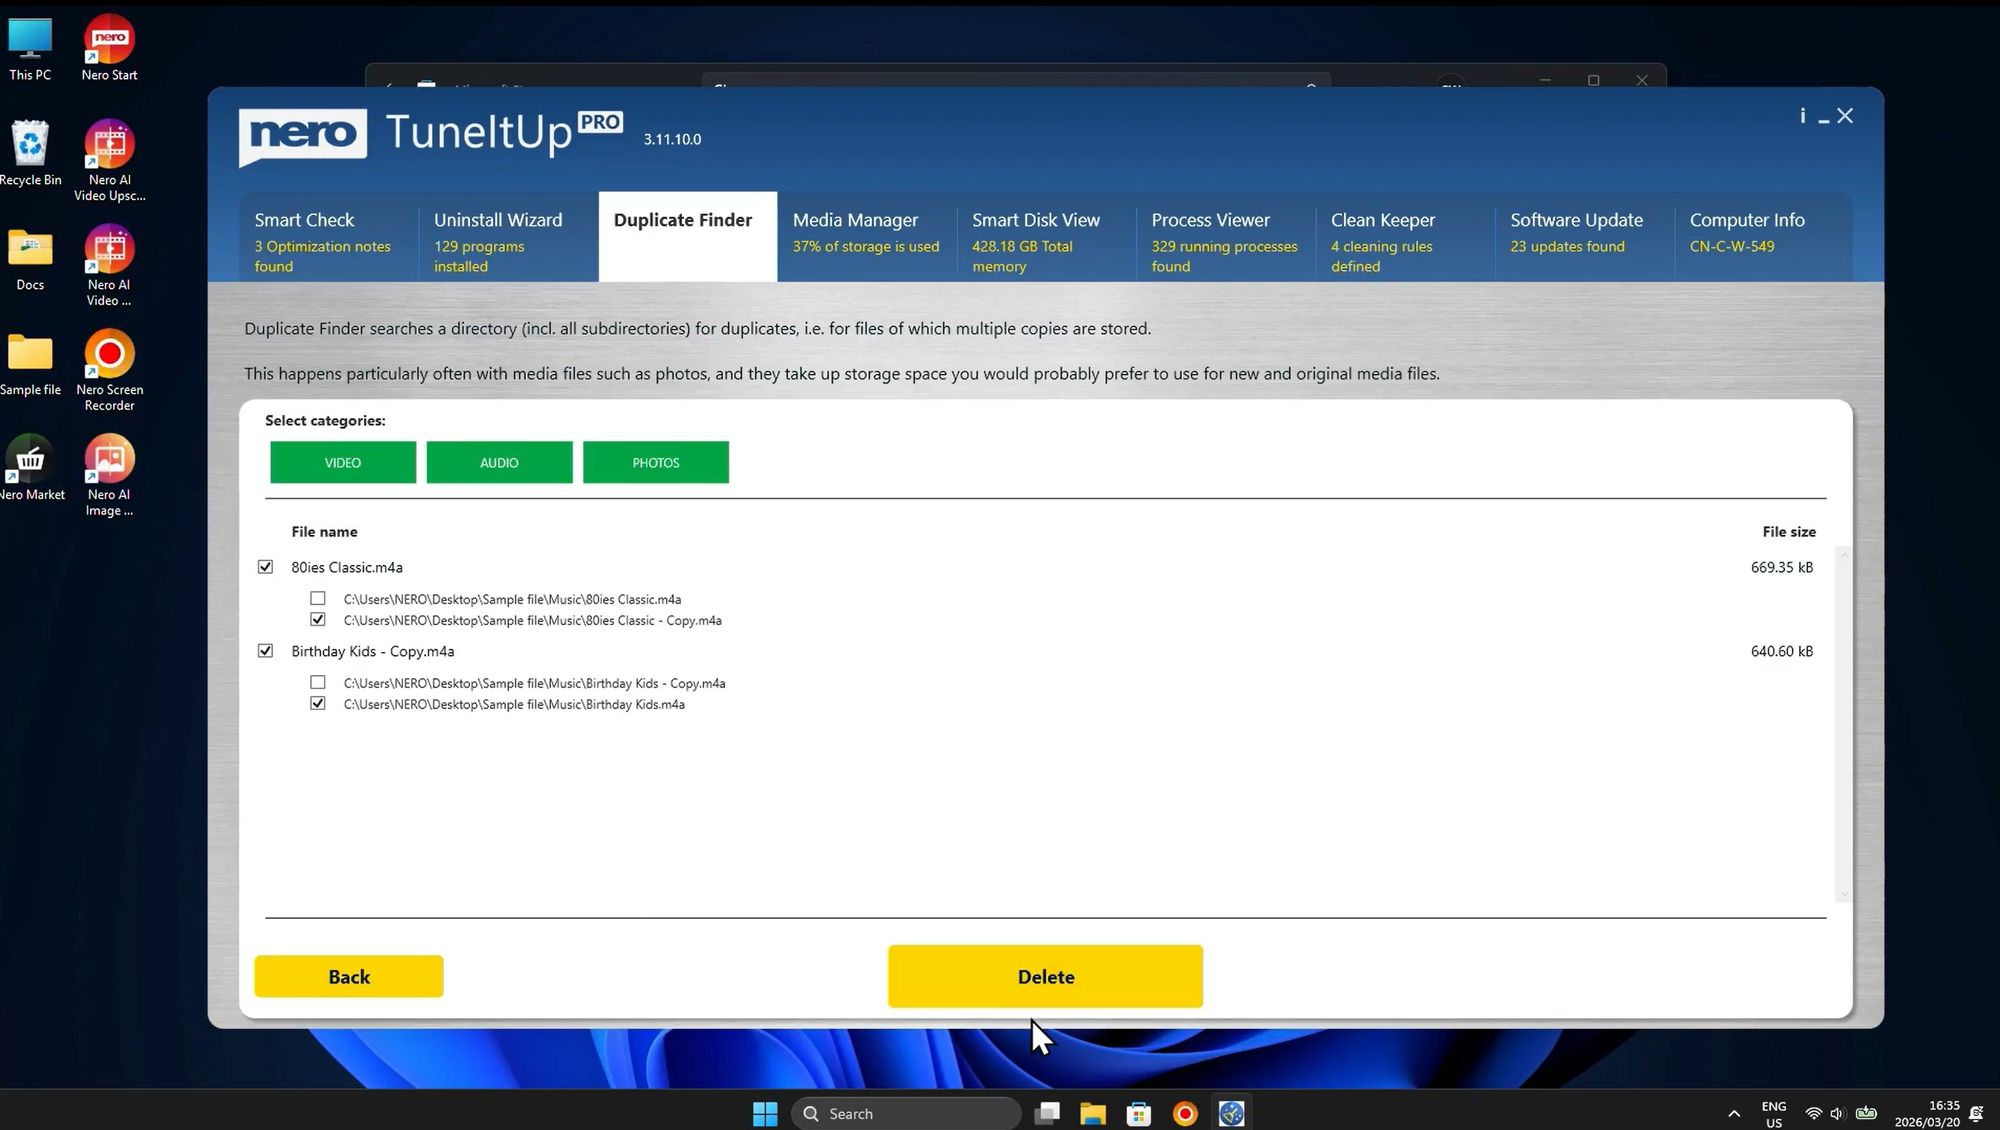
Duplicate files are a common problem that wastes valuable storage space. Whether from multiple downloads, backup copies, or file syncing issues, duplicates can accumulate quickly. The Duplicate Finder tool helps you locate and remove these redundant files efficiently.
How Duplicate Finder works:
The tool scans your system for identical files across three main categories:
Video - Duplicate movie files, recordings, and video clips
Audio - Duplicate music files, podcasts, and sound recordings
Photos - Duplicate images and pictures
In the example shown, the tool has identified duplicate audio files:
"80ies Classic.m4a" - appears in multiple locations
"Birthday Kids - Copy.m4a" - an obvious duplicate with "Copy" in the filename
Features of Duplicate Finder:
Smart Detection - The tool doesn't just compare filenames; it analyzes file content to find true duplicates, even if they have different names or are in different folders
File Path Display - Each duplicate is shown with its complete file path, helping you decide which copy to keep and which to delete
Selective Deletion - You can choose exactly which duplicates to remove
Category Filtering - Switch between video, audio, and photo categories to focus on specific types of duplicates
Benefits of removing duplicates:
Free up significant disk space (often several gigabytes)
Organize your file system more effectively
Reduce confusion about which file is the "real" one
Speed up file searches and backups
Improve cloud storage efficiency
Best practices for duplicate management:
Run Duplicate Finder monthly if you frequently download files
Keep the file in the most logical location (e.g., in your organized folders rather than Downloads)
Be cautious with system files - focus on media files in user directories
Consider keeping one backup of important files, but remove excessive copies
Step 3: Manage Large Media Files
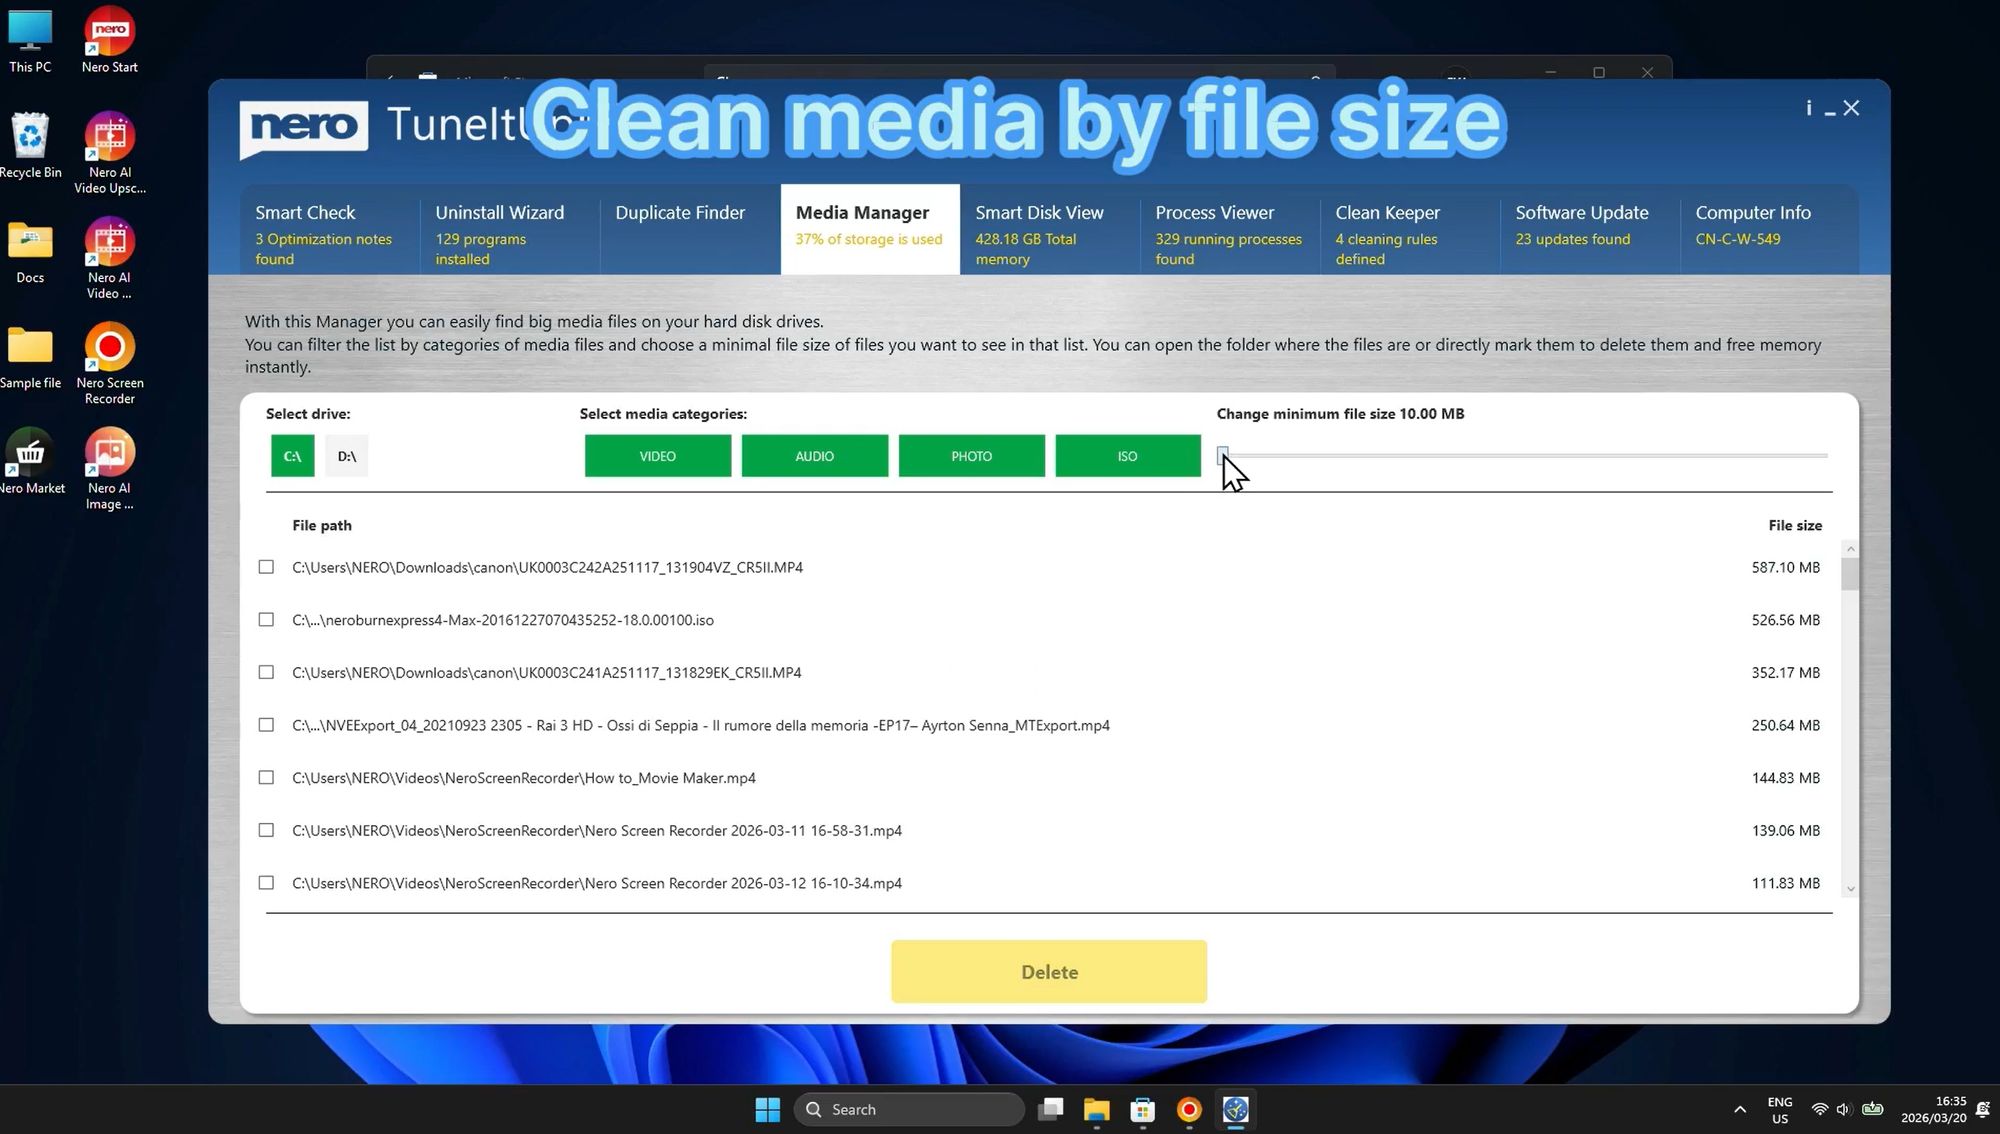
Running out of disk space? Large media files are often the culprit. The Media Manager feature helps you identify the biggest files on your hard drive, making it easy to decide what to keep, move, or delete.
What Media Manager does:
This powerful tool scans your drives and identifies large files in several categories:
Videos - Movie files, recordings, and video projects
Audio - Music collections, podcasts, and audio files
Photos - High-resolution images and photo collections
ISO Files - Disk images and installation files
How to use Media Manager:
Select Drive - Choose which hard drive or partition to scan (shown: "C:" selected)
Select Category - Filter by file type (video, audio, photos, or ISO)
Review Results - See a list of large files with their complete paths and sizes
Make Decisions - Choose which files to delete, move, or keep
The interface displays each file's complete path, making it easy to locate the file on your system. File sizes are clearly shown, helping you prioritize which files will free up the most space.
Common large files you might find:
Video Files - Modern video files, especially 4K content, can be several gigabytes each
ISO Files - Software installation images often remain on your system long after installation (4-8 GB or larger)
Audio Collections - Lossless audio formats like FLAC can be much larger than compressed MP3 files
Photo Libraries - RAW photo files from professional cameras can be 25-50 MB each
Storage management tips:
Move old videos to external drives or cloud storage
Delete ISO files after software installation
Convert lossless audio to compressed formats if quality difference is negligible
Archive old photo projects you've already edited
Media Manager is an invaluable tool for anyone struggling with limited disk space. By identifying the largest files on your system, it helps you make strategic decisions about storage management.
Step 4: Automate File Organization
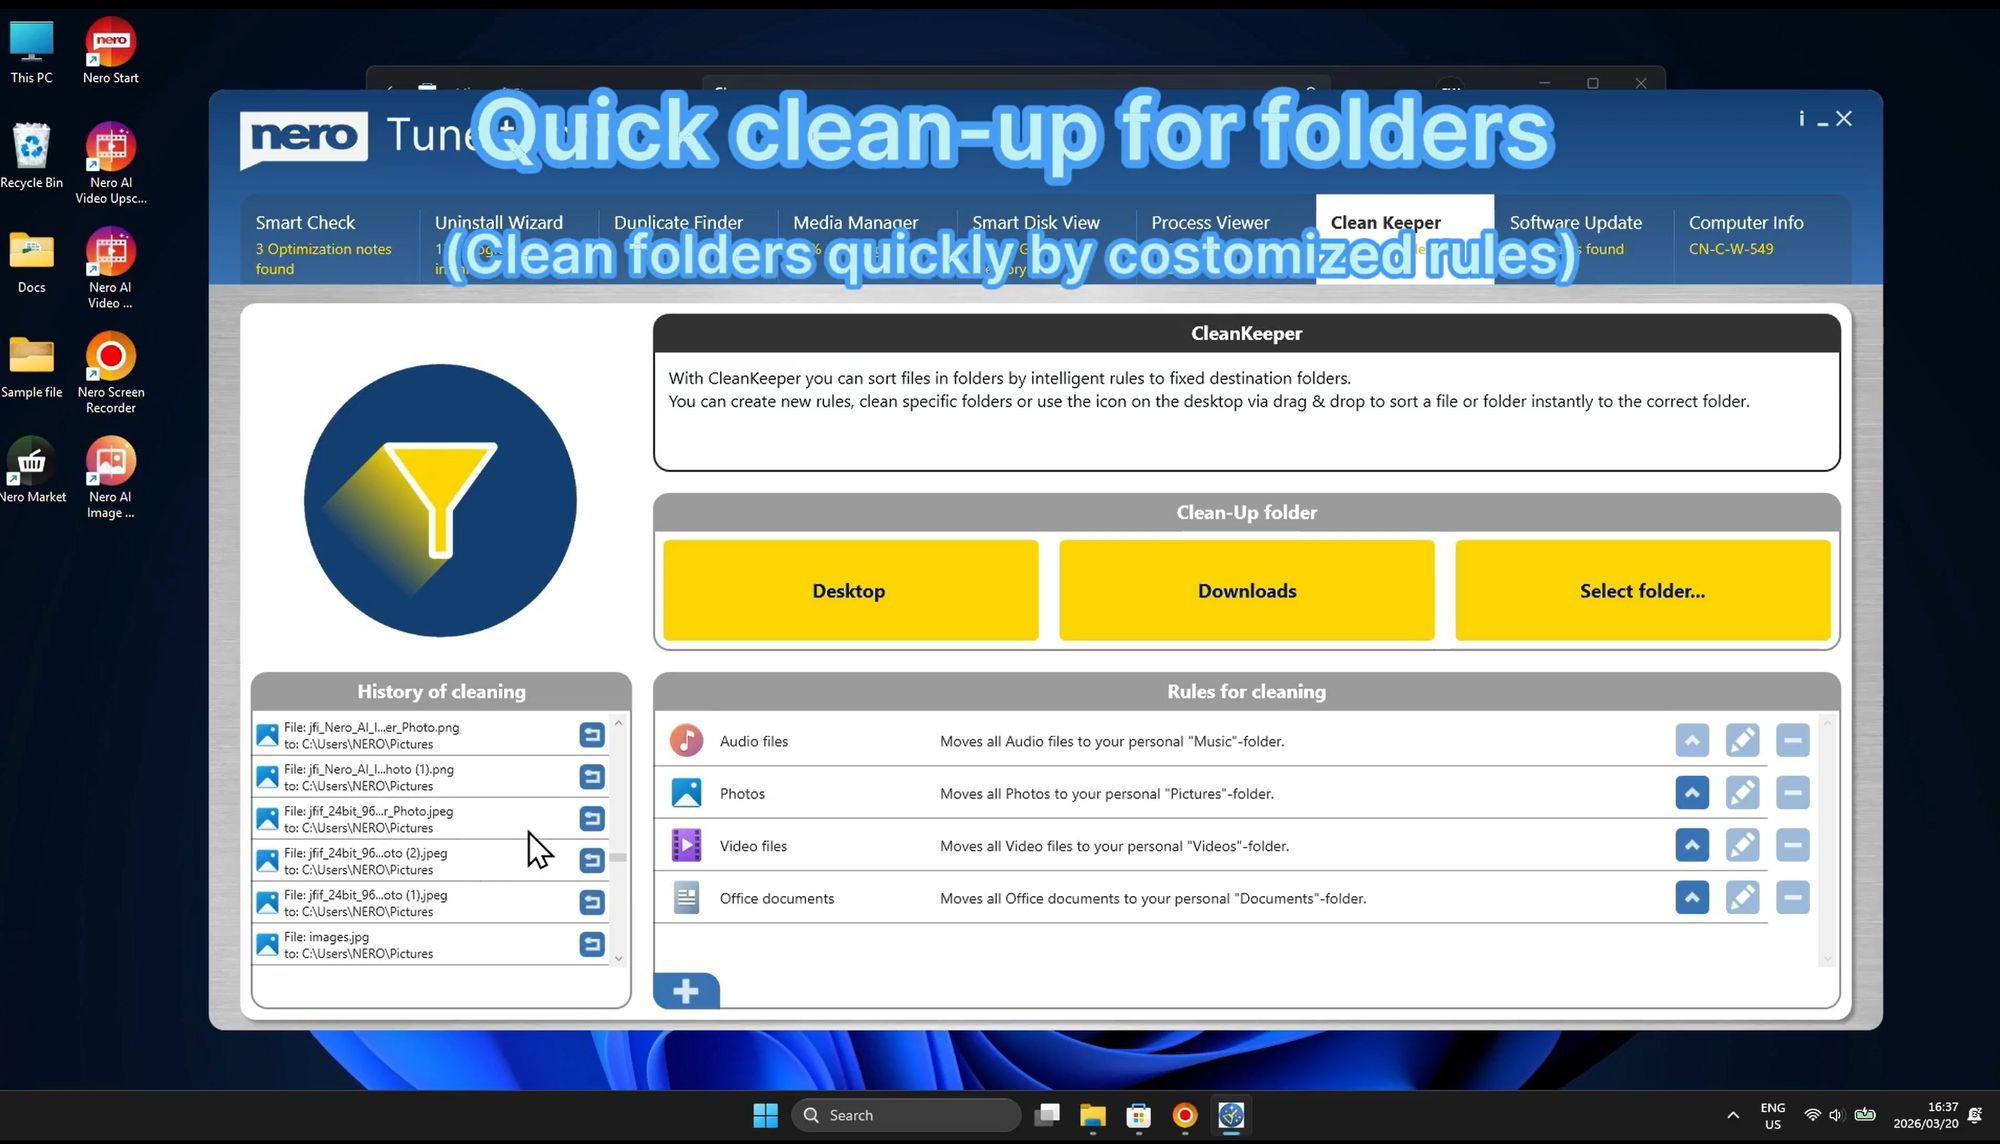
Keeping your files organized can be a time-consuming task. Nero CleanKeeper automates this process by automatically sorting files into designated folders based on customizable rules.
How CleanKeeper works:
CleanKeeper monitors specific folders and automatically organizes files according to rules you define. The interface is divided into three main sections:
1. Folder Selection - Choose which folders to monitor and clean:
Desktop - Automatically organize files on your desktop
Downloads - Sort downloaded files into appropriate folders
Select folder... - Choose any custom folder to monitor
2. History of Cleaning - View a log of recently sorted files, showing:
What files were moved
When they were moved
Where they were moved to
This history helps you track CleanKeeper's actions and verify that files were sorted correctly.
3. Rules for Cleaning - Define how different file types should be organized:
Audio - Music files (MP3, FLAC, WAV) moved to designated music folder
Photos - Image files (JPG, PNG, GIF) sorted into pictures folder
Video - Video files (MP4, AVI, MKV) organized into videos folder
Office - Documents (DOC, XLS, PDF) filed in documents folder
Each rule shows the target folder where files will be moved, and you can customize these destinations to match your preferred folder structure.
Benefits of using CleanKeeper:
Automatically maintain organized folders
Save time on manual file sorting
Never lose files in cluttered Downloads folder
Keep desktop clean and professional
Reduce time spent searching for files
Ideal use cases:
Organizing Downloads folder automatically
Keeping desktop clutter-free
Managing project files across multiple folders
Sorting media files by type
Maintaining consistent folder structure
CleanKeeper is perfect for users who download many files or struggle to keep folders organized. By automating the sorting process, it ensures your files are always in the right place without requiring constant manual intervention.
Part 4: Monitoring & Maintenance
Step 1: Monitor Running Processes
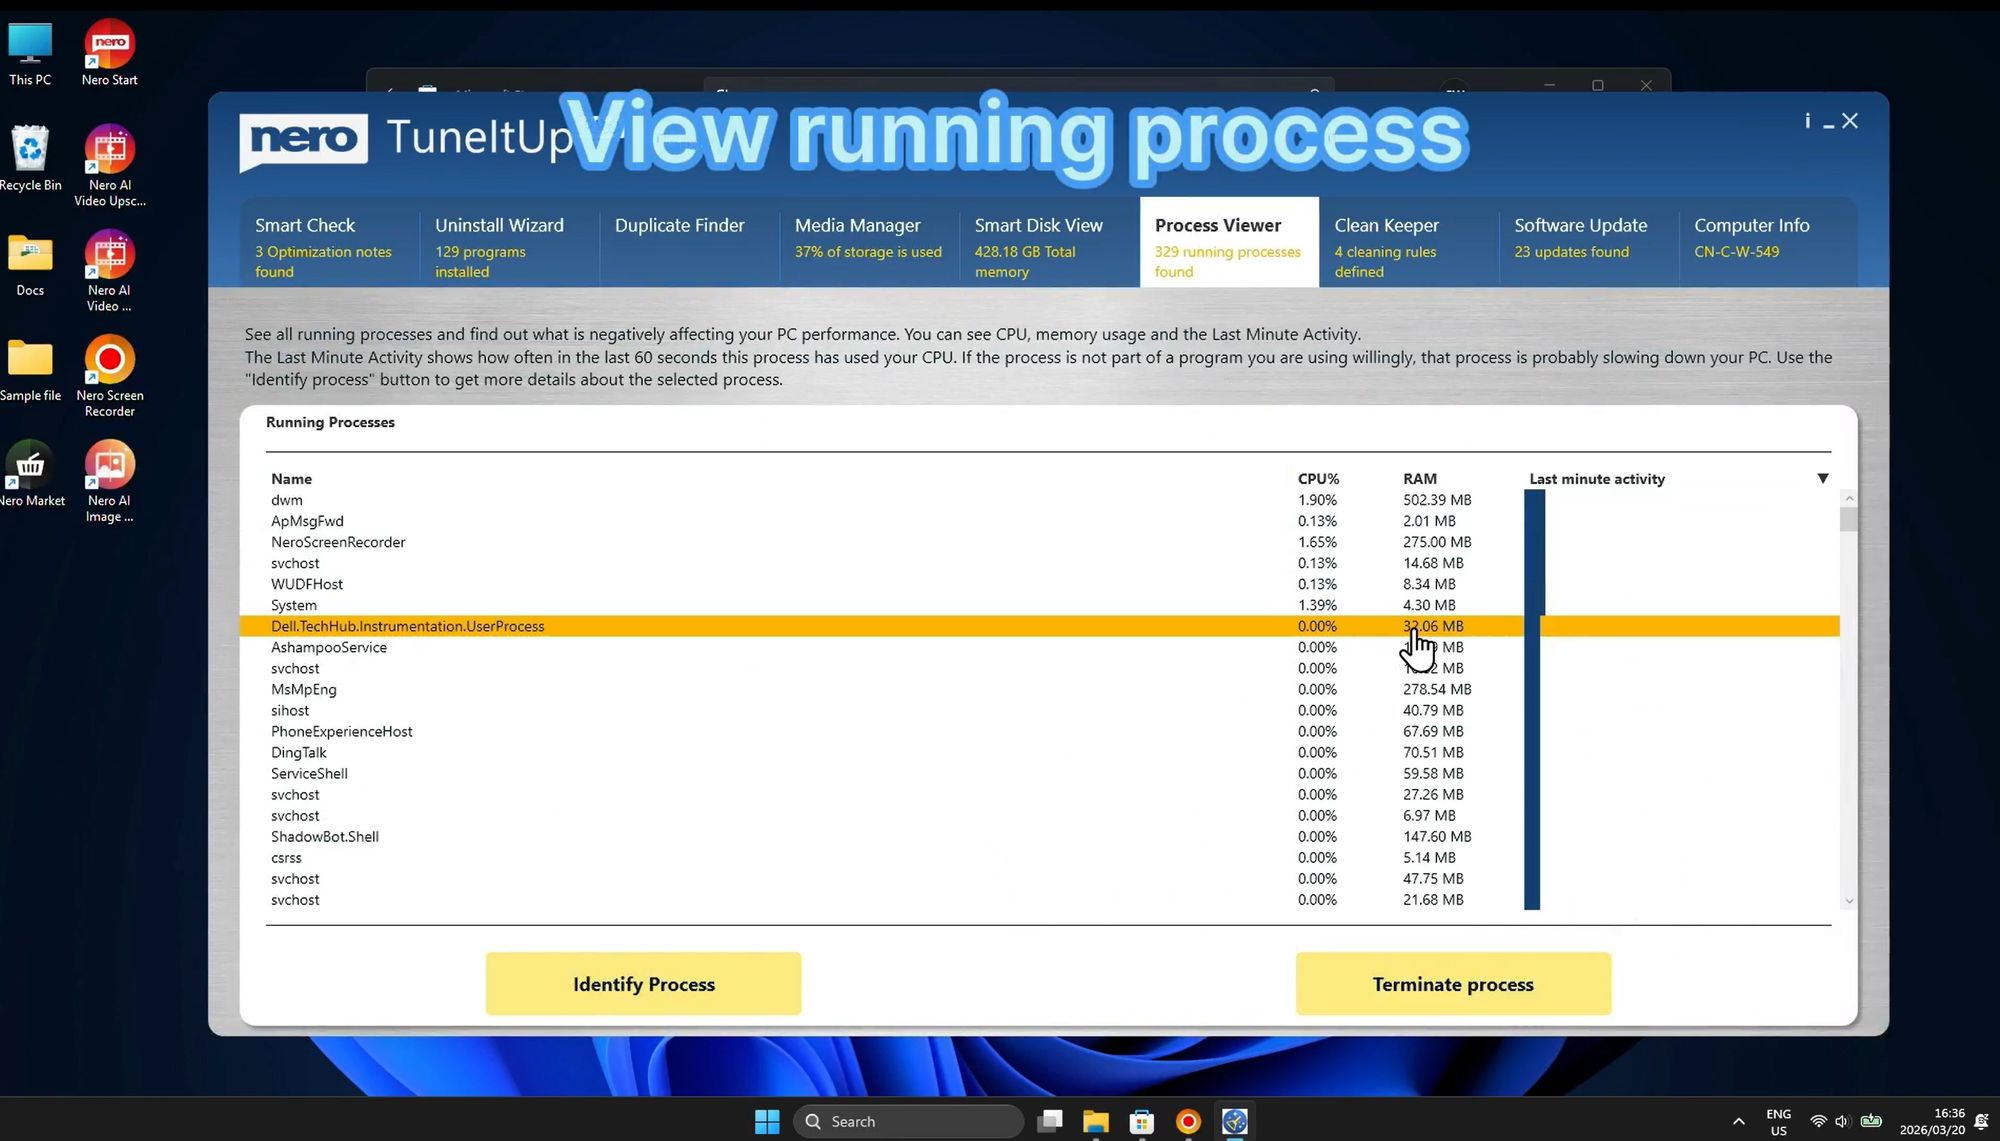
Understanding what's running on your computer is essential for troubleshooting performance issues. The Process Viewer provides detailed information about every active process, helping you identify resource-hungry applications and potential problems.
What Process Viewer shows:
Process Name - The executable file name
CPU Usage - How much processor power each process is consuming
RAM Consumption - Memory usage for each process
How to use Process Viewer:
When your computer is running slowly, open Process Viewer to identify the culprit. Processes are listed with their resource usage, making it easy to spot applications consuming excessive CPU or RAM.
Features:
Identify Process - Select any process to get more information about what it does
Terminate Process - End unresponsive or problematic processes
Real-time Monitoring - Watch resource usage update in real-time
Sort by Usage - Organize processes by CPU or RAM consumption
Common scenarios where Process Viewer helps:
High CPU Usage - If your computer's fan is running constantly or the system feels sluggish, Process Viewer can identify which application is maxing out your processor
Memory Leaks - Some applications gradually consume more RAM over time. Process Viewer helps you spot these memory leaks before they crash your system
Unknown Processes - See an unfamiliar process running? Process Viewer helps you identify it and determine if it's legitimate or potentially malicious
Application Not Responding - When a program freezes, you can use Process Viewer to terminate it without restarting your entire computer
Benefits of monitoring processes:
Quickly diagnose performance problems
Identify resource-hungry applications
Detect malware or suspicious processes
Optimize system resource allocation
Make informed decisions about which programs to close
Best practices:
Check Process Viewer when your system feels slow
Learn to recognize normal system processes
Be cautious about terminating unfamiliar processes
Use it alongside Task Manager for comprehensive monitoring
Step 2: Keep Software Updated
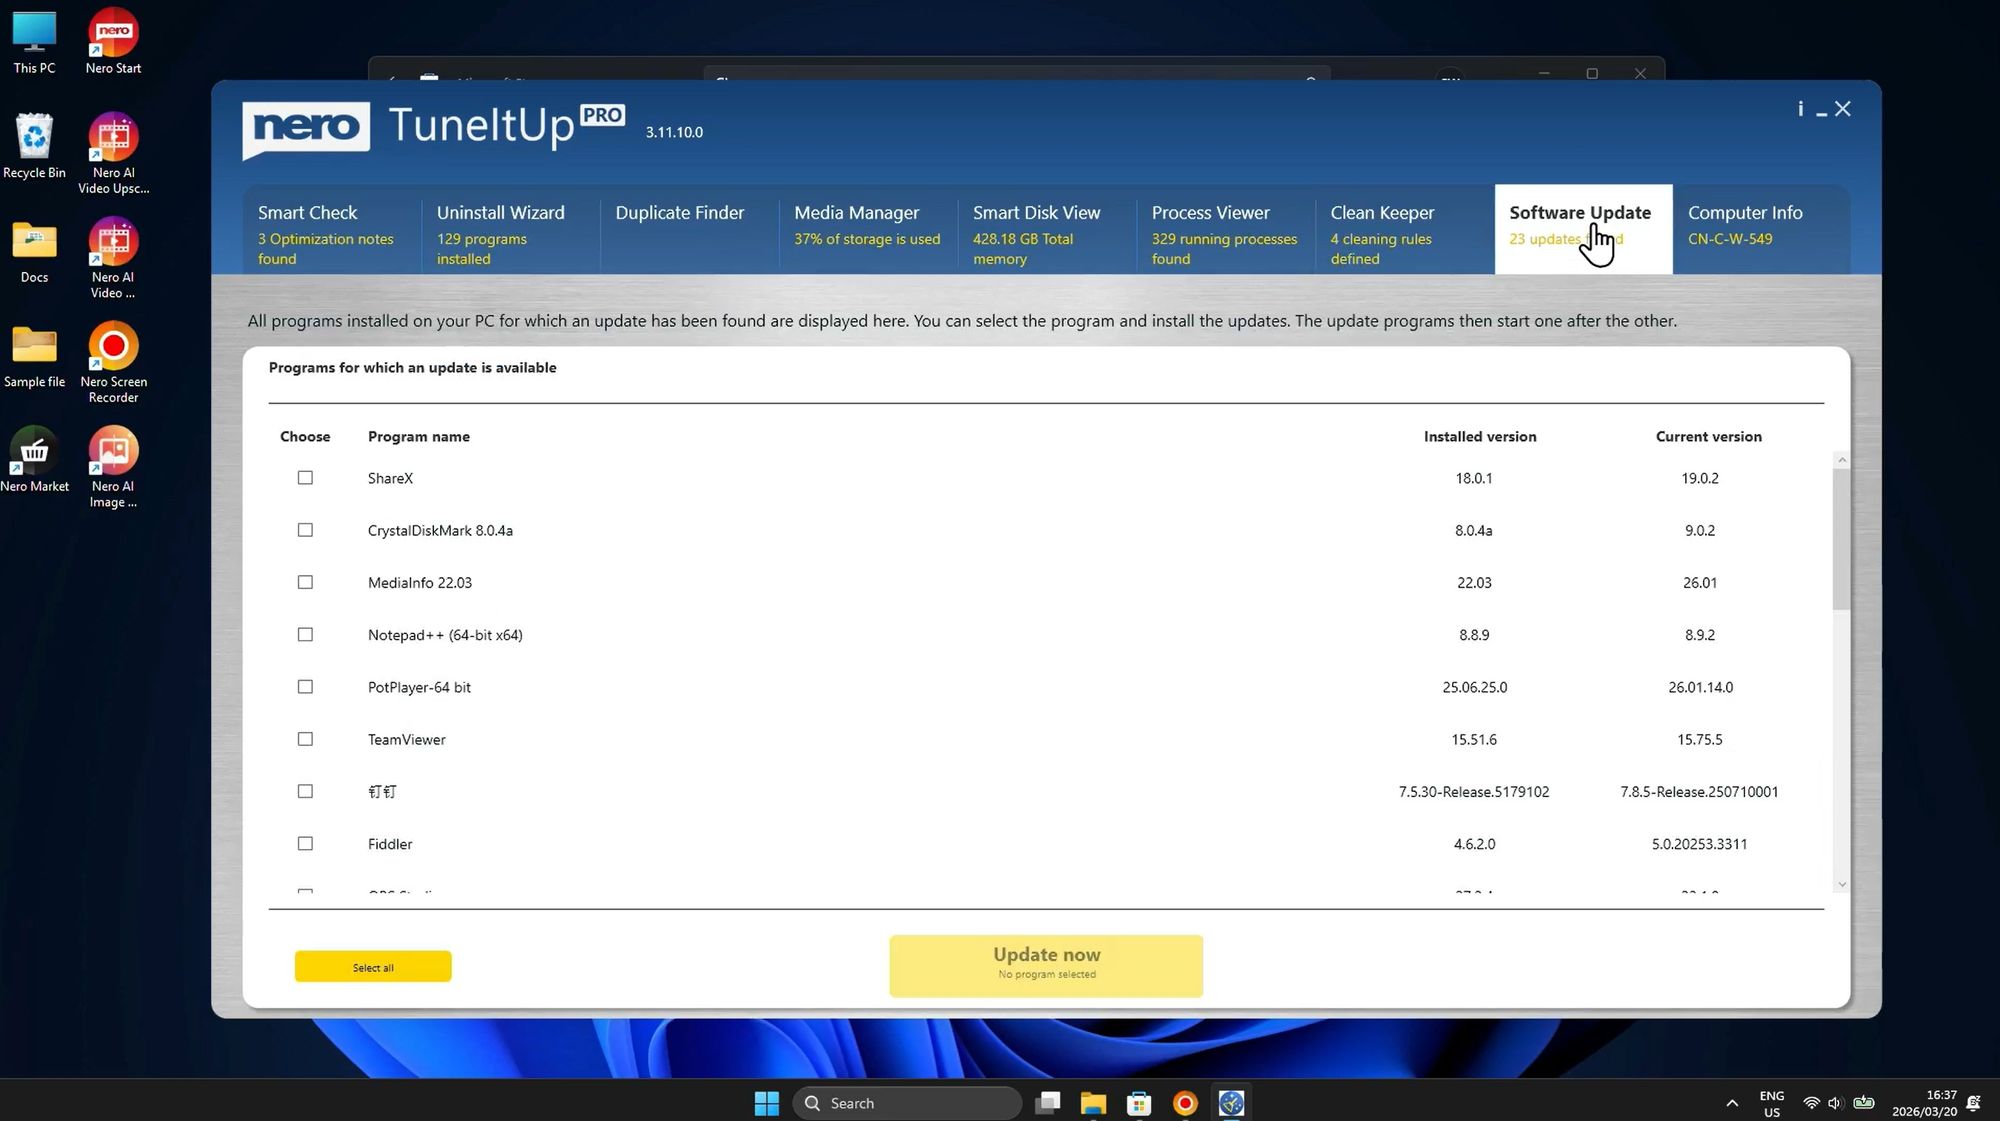
Keeping your software up to date is crucial for security, stability, and performance. However, manually checking for updates across dozens of programs is tedious. The Software Update feature automates this process, identifying outdated programs and updating them with a single click.
How Software Update works:
The tool scans all installed programs and compares their versions against the latest available releases. It then presents a clear list showing:
Program Name - The software that has an update available
Installed Version - The version currently on your system
Current Version - The latest version available
Programs shown in the example:
ShareX - Screenshot and screen recording tool
CrystalDiskMark - Disk benchmarking utility
MediaInfo - Media file information tool
Notepad++ - Advanced text editor
PotPlayer - Media player
TeamViewer - Remote desktop software
Fiddler - Web debugging proxy
Features:
Select All - Quickly select all programs for updating
Selective Updates - Choose specific programs to update
Update Now - Install selected updates with one click
Version Comparison - Easily see how outdated your software is
Why keeping software updated matters:
Security - Outdated software often contains security vulnerabilities that hackers can exploit. Regular updates patch these security holes, protecting your system from malware and attacks
Stability - Updates fix bugs and crashes, making your applications more reliable and stable
Performance - Newer versions often include performance optimizations that make programs run faster and use fewer resources
New Features - Updates add new functionality and improvements that enhance your productivity
Compatibility - Updated software works better with the latest Windows updates and other programs
Benefits of centralized updating:
Save time by updating multiple programs at once
Never miss critical security updates
Avoid the hassle of visiting multiple websites
Ensure all software is current with minimal effort
Reduce security risks from outdated software
Best practices:
Run Software Update weekly or monthly
Prioritize security software and web browsers
Read update notes for major version changes
Create a system restore point before major updates
Keep at least your most-used programs current
Step 3: Check System Information
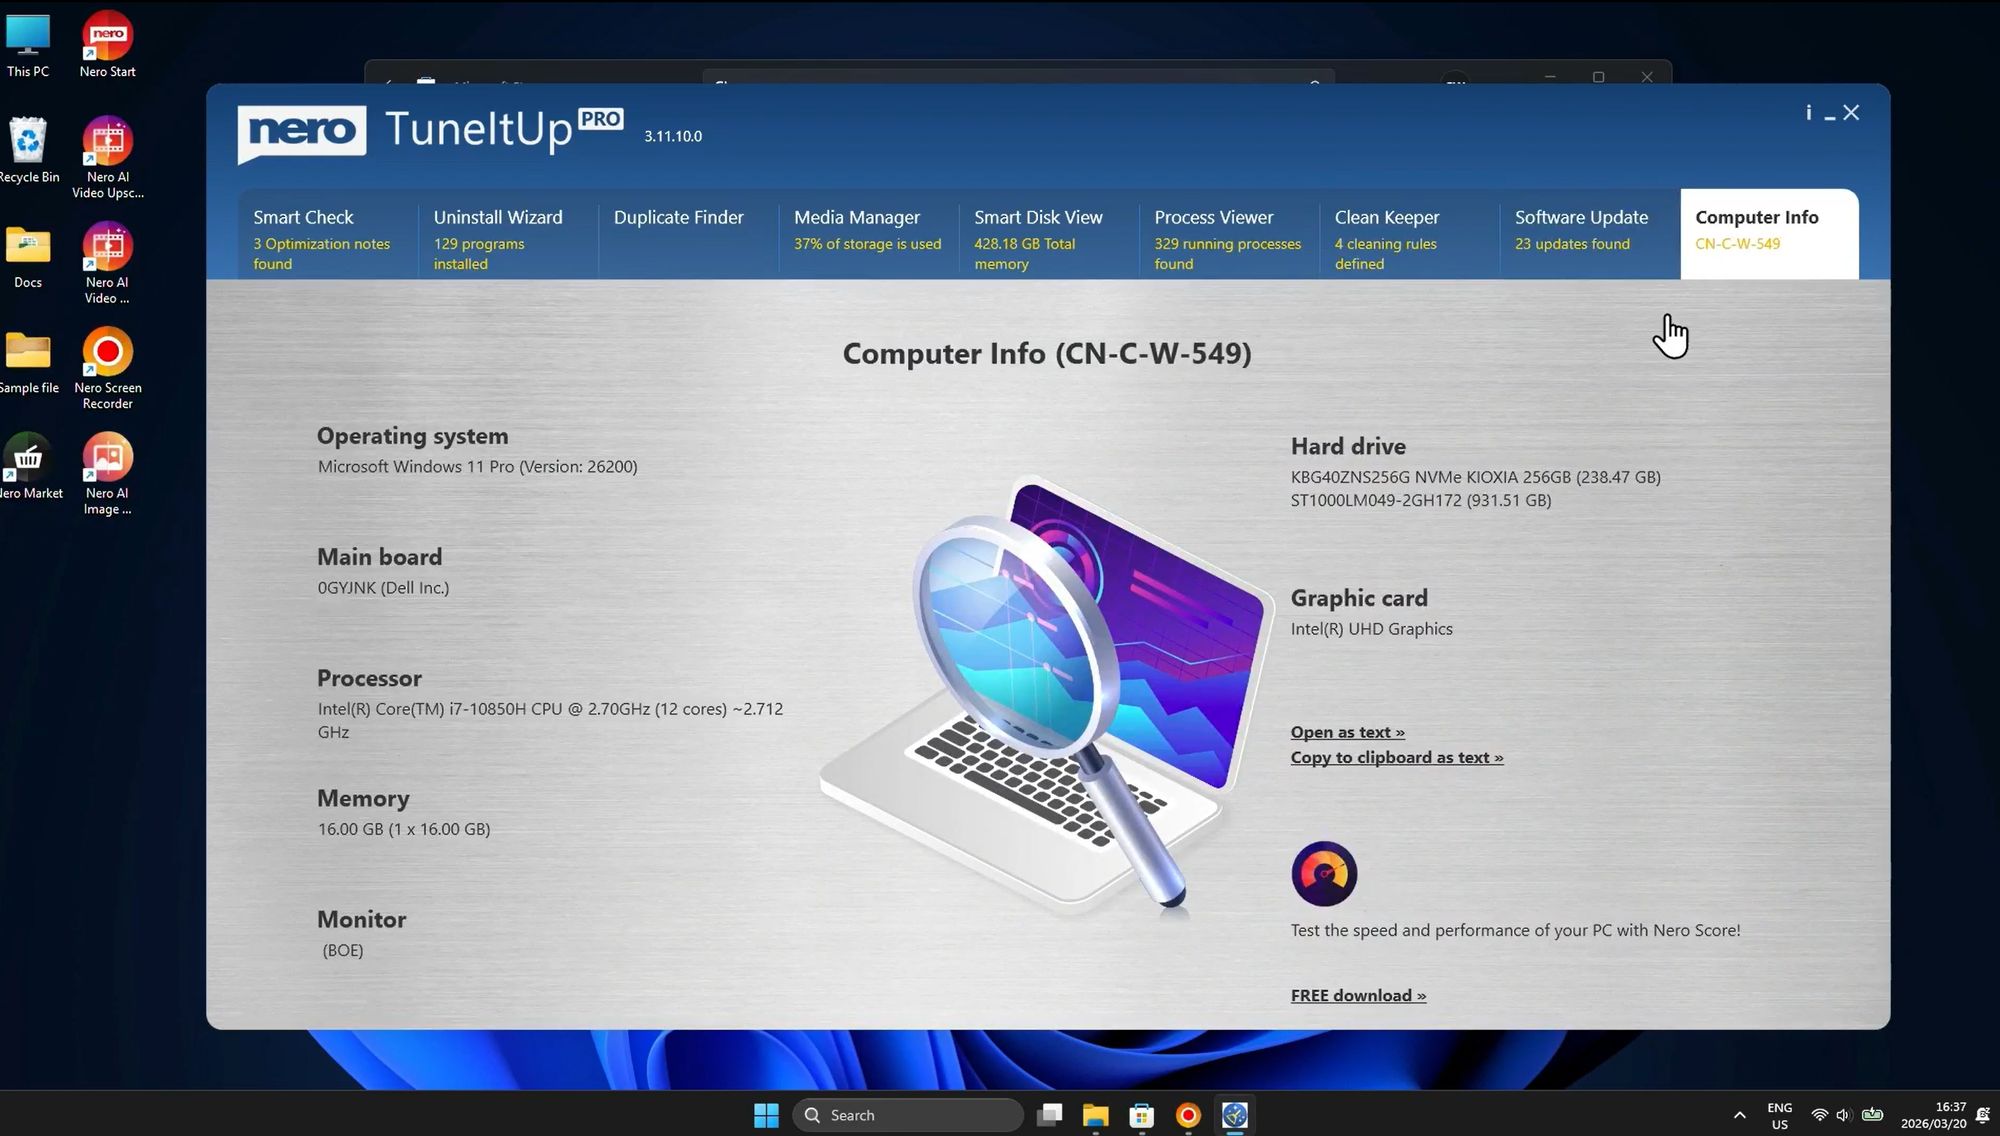
Understanding your computer's hardware specifications is essential for troubleshooting, upgrading, and optimizing performance. The Computer Info feature provides a comprehensive overview of your system's hardware components.
System Information Displayed:
Operating System
Microsoft Windows 11 Pro - Knowing your Windows version helps determine software compatibility and available features
Motherboard
Dell - The motherboard manufacturer and model, important for driver updates and compatibility
Processor
Intel Core i7-10850H with 12 cores running at 2.70 GHz
This high-performance processor is excellent for multitasking and demanding applications
Memory (RAM)
16 GB - Sufficient RAM for most tasks, including professional applications and gaming
Monitor
Display information for troubleshooting graphics issues
Hard Drive
Drive 1: 256 GB NVMe KIOXIA (Fast SSD for operating system)
Drive 2: 931.51 GB ST1000LM049-2GH172 (Large HDD for storage)
This dual-drive setup combines speed (SSD) with capacity (HDD)
Graphic Card
Intel UHD Graphics - Integrated graphics suitable for general use and light gaming
Why Computer Info is useful:
Troubleshooting - When seeking technical support, you'll need to provide system specifications. Computer Info gives you all this information in one place
Upgrade Planning - Thinking about upgrading RAM or adding storage? Computer Info shows your current configuration, helping you make informed decisions
Software Compatibility - Before installing new software, check if your system meets the requirements using the information provided here
Performance Optimization - Understanding your hardware helps you optimize settings for best performance
Driver Updates - Knowing your exact hardware models makes it easier to find and install the correct drivers
Benefits:
Quick access to all system specifications
No need to dig through Windows settings
Useful for technical support calls
Helps with upgrade decisions
Essential for troubleshooting hardware issues
Conclusion: Maintaining Peak PC Performance
Optimizing your Windows 11 or Windows 10 PC doesn't have to be complicated. With Nero TuneItUp PRO, you have access to a comprehensive suite of tools that make system maintenance straightforward and effective.
Key takeaways from this guide:
Start with Diagnosis - Use Smart Check to identify the most critical issues affecting your system before taking action
Clean Systematically - Follow the four-part approach: Diagnose → Clean & Optimize → Manage Programs & Files → Monitor & Maintain
Regular Maintenance is Essential - Don't wait until your PC is unbearably slow. Perform weekly or monthly maintenance to keep your system running smoothly
Use the Right Tool for Each Task - Nero TuneItUp provides specialized tools for every optimization need, from junk file removal to process monitoring
Stay Updated - Keep your software current using the Software Update feature to maintain security and stability
Recommended maintenance schedule:
Weekly:
Run Smart Check
Clean browser data
Check Process Viewer if experiencing slowdowns
Monthly:
Clean trash and junk files
Run Registry Cleaner
Check for software updates
Review startup programs
Quarterly:
Use Duplicate Finder
Review installed programs with Uninstall Wizard
Use Media Manager to identify large files
Review and update CleanKeeper rules
Benefits you'll experience:
Faster boot times (often 50% or more improvement)
More responsive applications
Increased available storage space (often several GB)
Improved system stability
Better privacy protection
Enhanced overall performance
By following the techniques outlined in this guide and using Nero TuneItUp's powerful optimization tools, you can keep your Windows PC running like new. Whether you're a casual user or a power user, these tools provide everything you need to maintain peak performance.
Get Started with Nero TuneItUp Today
Ready to speed up your PC? Download Nero TuneItUp and experience the difference proper optimization can make.
📥 Download Nero TuneItUp (PC Cleaner):
Get it from Microsoft Store
💎 Learn More:
Visit Nero PC Cleaner
💎 Upgrade to Nero TuneItUp PRO (Special Discount):
Buy Now with Special Pricing
Transform your slow, cluttered PC into a fast, efficient machine with Nero TuneItUp PRO. Your computer will thank you!


