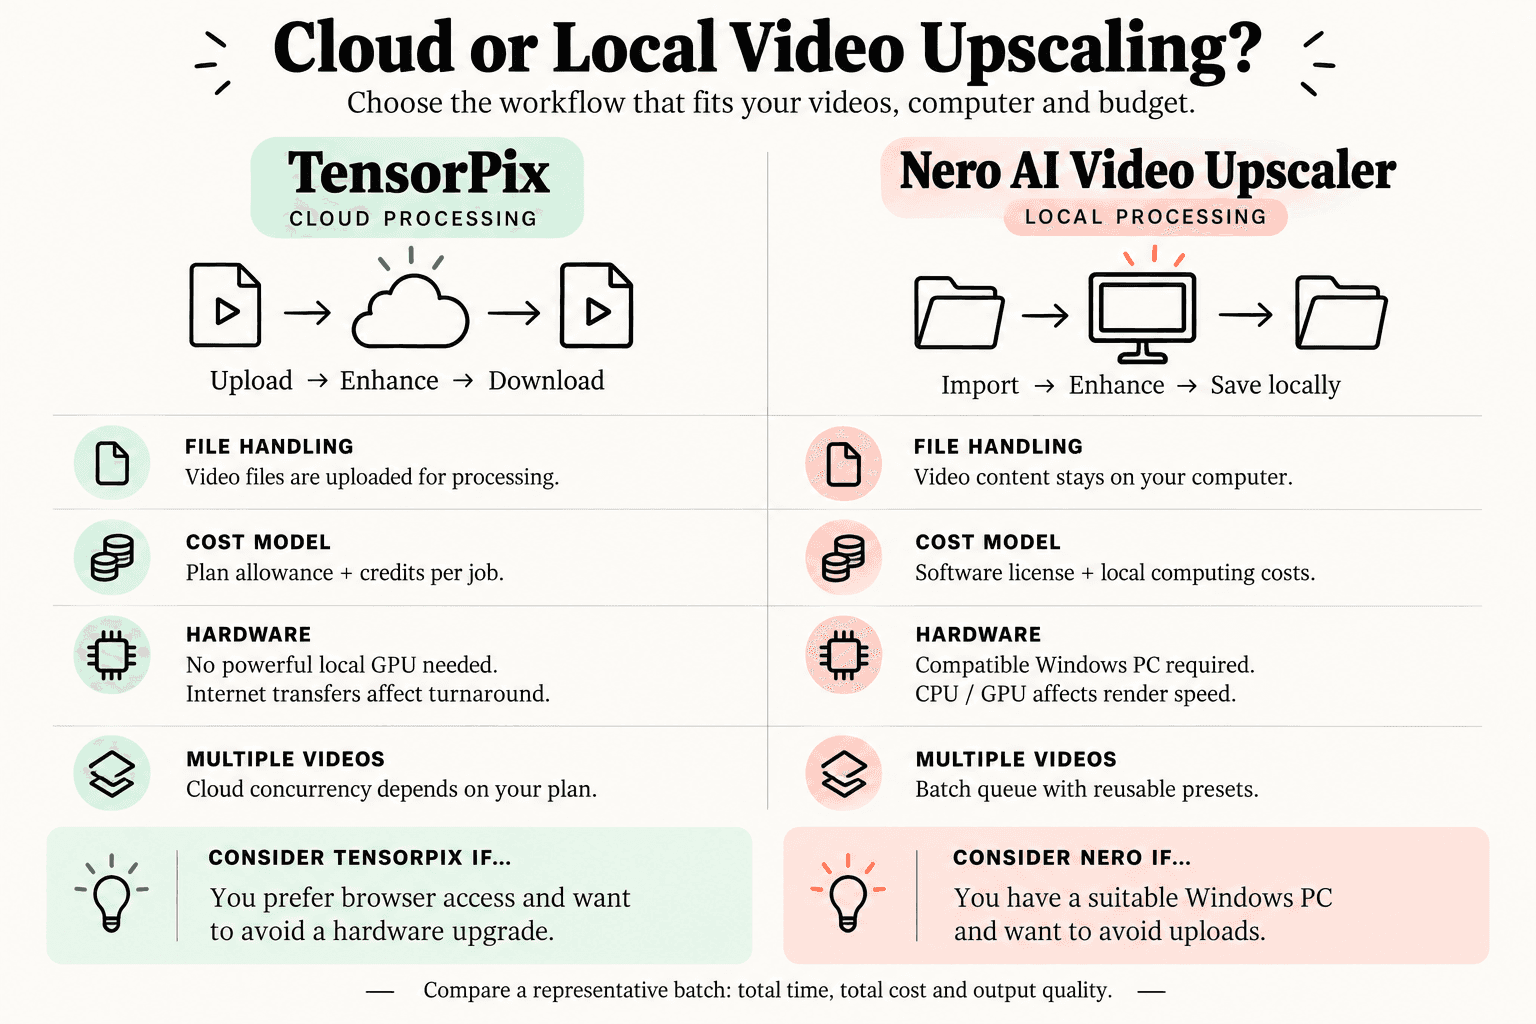
TensorPix and Nero AI Video Upscaler offer two different ways to enhance video: upload it for cloud processing, or process it locally on your computer.
TensorPix is worth considering if you want browser access without relying on a powerful local GPU. Nero is a better fit if you have a suitable Windows PC and want to enhance videos without uploading them. In our comparison, we preferred Nero’s output.
That makes Nero a compelling TensorPix alternative for this type of footage. However, choosing a tool for your entire workflow involves more than one quality comparison. Upload time, credit costs, hardware requirements and how you handle multiple videos can all change the decision. See the TensorPix overview and Nero processing FAQ for more details.
Here is how the two approaches compare—and what our test adds to the picture.
TensorPix vs Nero at a Glance
Decision factor | TensorPix | Nero AI Video Upscaler |
|---|---|---|
Processing | Cloud GPUs | Local CPU or GPU |
Access | Web browser | Windows desktop application |
File workflow | Upload, enhance, download | Import, enhance, save locally |
Multiple videos | Cloud batch enhancement | Batch import and export queue |
Main dependency | Internet transfers and cloud availability | Local hardware and storage |
Best reason to consider it | Access cloud processing without upgrading your PC | Keep video processing on your computer |
Our test | Tested with 4x Upscale 3 | Preferred result using Anime Upscale |
Both tools support working with multiple videos. Their practical difference is where the work happens and which resources you need to manage. Compare the TensorPix video enhancer with the Nero feature list.
If you already know you want local processing, download Nero AI Video Upscaler for Windows and try it with a representative clip.
Video Comparison: Nero Wins Our Test
Video Comparison: Nero Wins Our Test
For our comparison, we used Steamboat Willie footage and compared TensorPix’s 4x Upscale 3 with Nero AI Video Upscaler’s Animation Upscale.
We preferred Nero’s result. For the footage tested here, Nero produced the better-looking output and was our choice for the final upscale.
TensorPix setting: 4x Upscale 3.
Nero setting: 4x Animation Upscale.
This gives readers looking for a TensorPix alternative for video upscaling a concrete reason to try Nero. Watch the comparison at full size and during playback to decide whether you prefer the same result.
The conclusion applies to this footage and these settings. It does not establish that Nero will outperform every TensorPix model on live-action footage, faces or heavily compressed recordings.
What the TensorPix Workflow Capture Shows
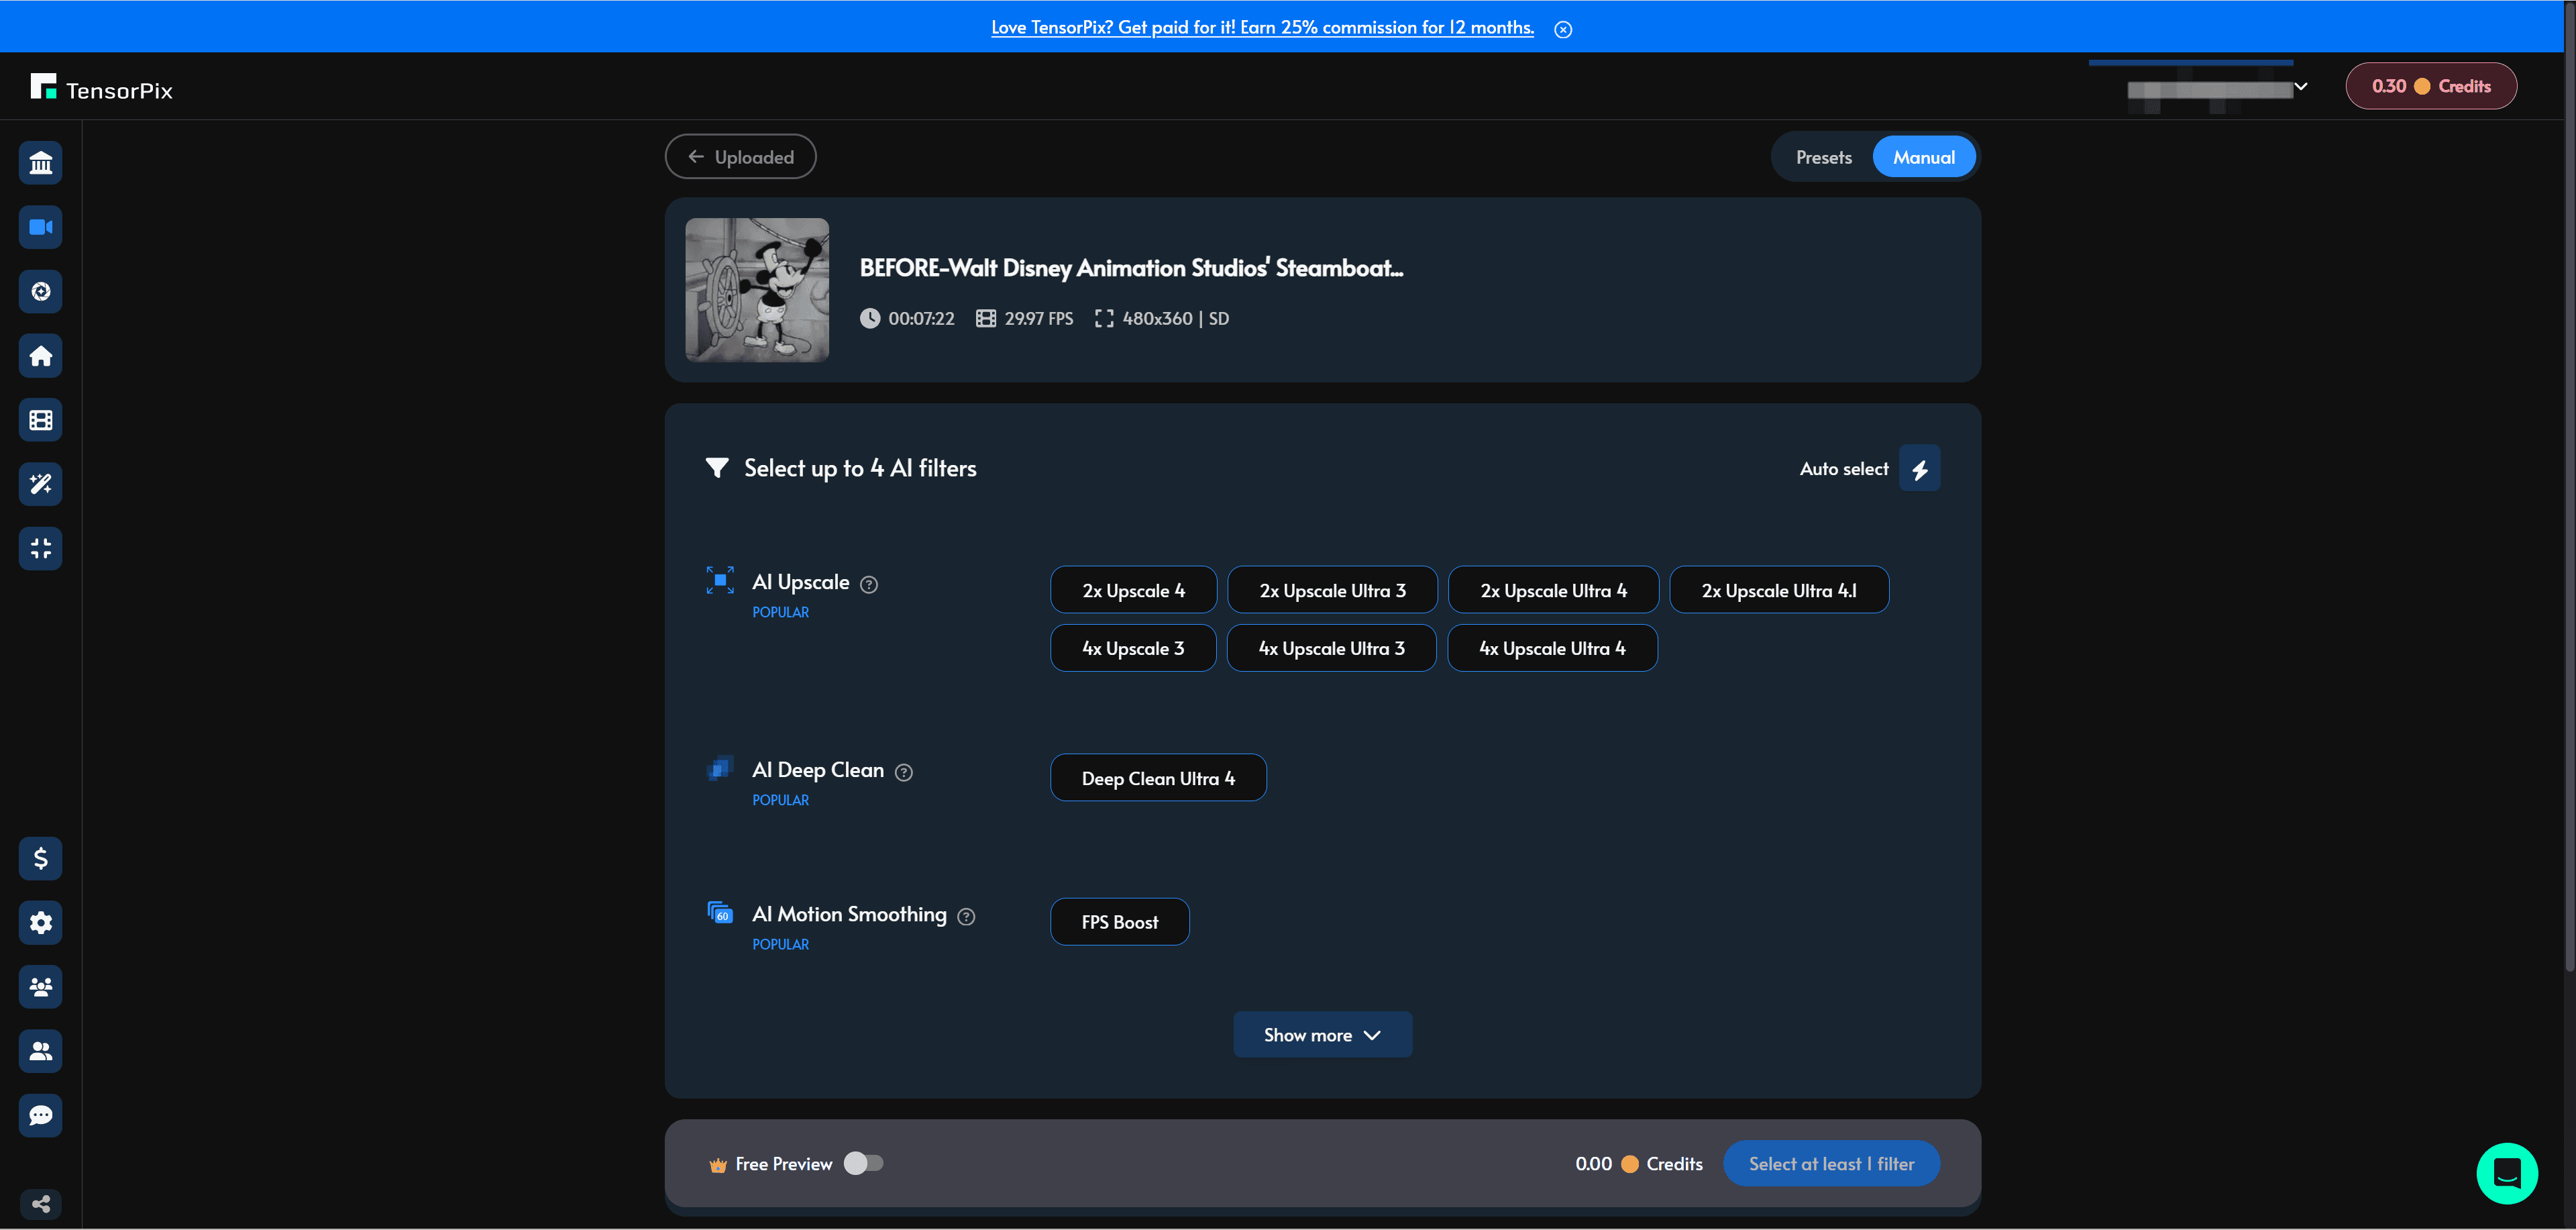
The supplied source-file screen shows 480 × 360 resolution at 29.97 FPS, with a source duration of 7 minutes 22 seconds. The processing capture shows:
AI filter: 4x Upscale 3.
Codec: H.264.
Film grain: No added film grain.
Additional resize: None.
Displayed task cost: 0.291 credits.
The cost belongs to the displayed task. Because the processing capture does not identify the selected segment’s duration, it should not be treated as a verified price for enhancing the entire source file.
Also, 4× upscaling does not automatically mean 4K. Scaling 480 × 360 by four produces 1920 × 1440 pixels. TensorPix’s separate resize setting uses conventional resizing, so any additional resizing should be disclosed when comparing outputs. See TensorPix’s advanced settings.
Nero AI Video Upscaler: Choose a Model, Preview and Process Locally
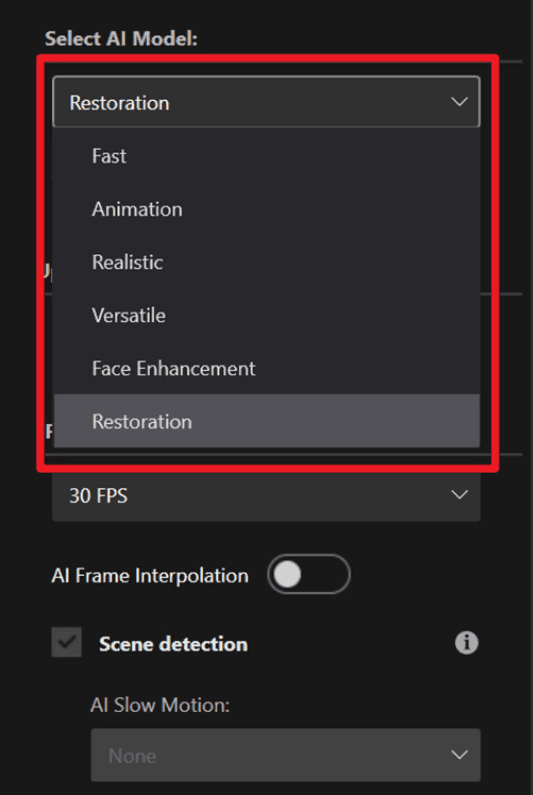
Nero AI Video Upscaler organizes enhancement around models suited to different footage. Its model menu includes Fast, Animation, Realistic, Versatile, Face Enhancement and Restoration. For our Steamboat Willie comparison, we used Animation with 4× upscaling.
The desktop interface places the original and enhanced preview alongside the upscaling settings. You can choose an output resolution, adjust the frame-rate settings and mark a specific section on the timeline. This makes it practical to check a short sample before processing a longer video. Nero also provides side-by-side and split comparison views, plus reusable presets for subsequent jobs. See the Nero quick-start guide.
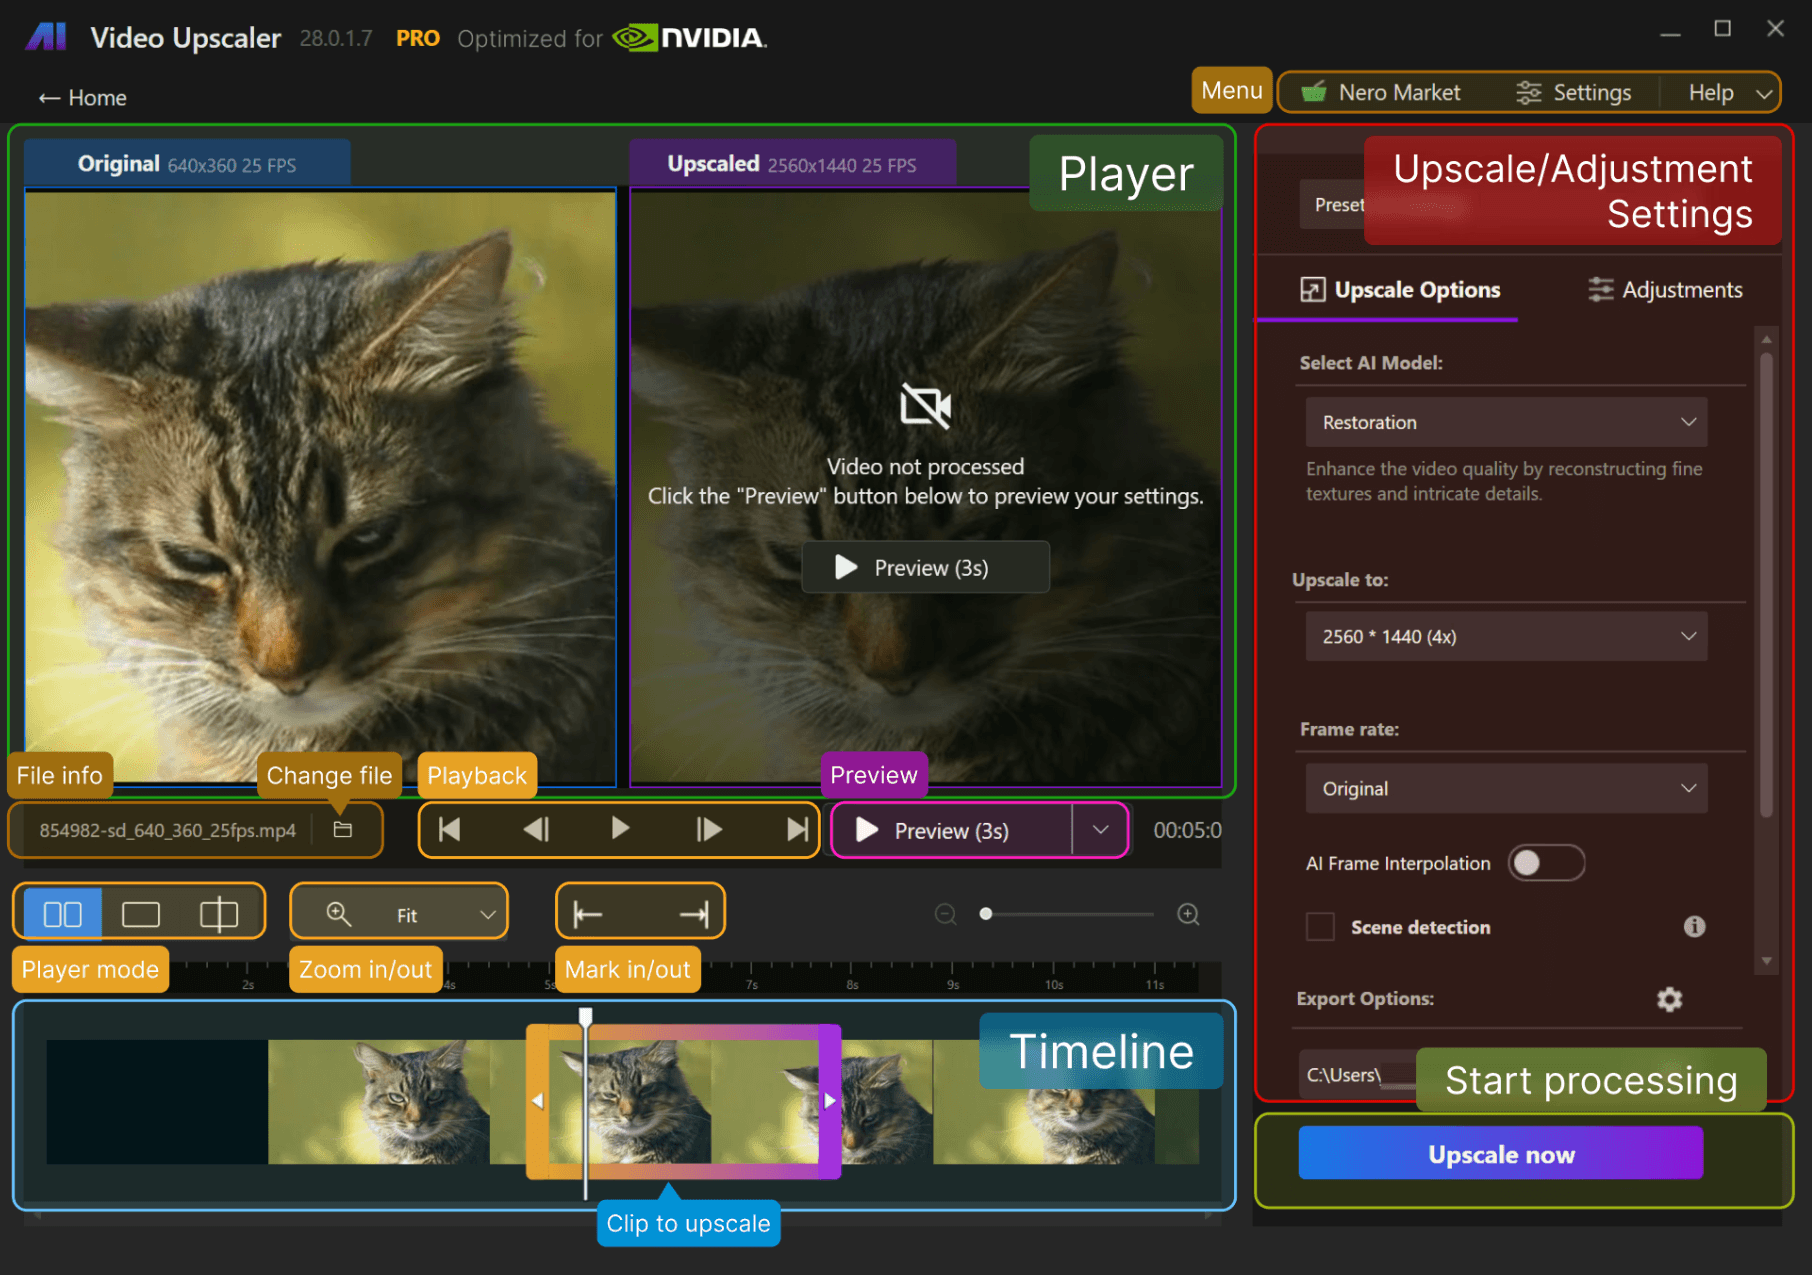
Nero AI Video Upscaler’s workspace, showing preview controls, model selection and timeline-based clip selection. This interface example uses separate footage with Restoration selected; our comparison used Animation.
For readers comparing cloud and local workflows, the key advantage is that Nero processes the video on your own computer. You can preview different settings and save the output locally without uploading the footage, while processing speed depends on your CPU or GPU. See the Nero processing FAQ.
Download Nero AI Video Upscaler for Windows to try the models and preview workflow with your own videos.
TensorPix Pricing vs Nero: What Are You Paying For?
Prices checked September 14, 2026. Promotions, regional pricing and checkout totals may change.
TensorPix Pricing

TensorPix offers a Free plan, paid subscriptions and additional credit purchases.
Plan | Monthly billing | Monthly equivalent, billed annually | Included monthly credits | Additional credits |
|---|---|---|---|---|
Free | $0 | — | Signup and weekly login credits | $3 each |
Standard | $12 | $5.50 | 10 | $1.50 each |
Premium | $27 | $12.42 | 35 | $1.20 each |
Elite | $66 | $30.25 | 110 | $0.80 each |
The annual figures are monthly equivalents, not month-to-month prices. Check the billing period and total before purchasing. See the current TensorPix pricing.
How the TensorPix Credit System Works
TensorPix charges credits for enhancement tasks. Its help center identifies source resolution, frame rate and duration as cost factors, and the app shows the required credits before processing begins.
Unused credits roll over, but purchased credits have a one-year validity period. A subscription therefore provides an allowance, rather than unlimited rendering. See the TensorPix credit FAQ.
The most useful way to estimate your spending is to configure a representative job and record its quote. If your collection contains different resolutions or frame rates, check several examples before estimating the cost of the whole library.
TensorPix also provides short, watermarked free previews without consuming credits. These can help you choose settings before paying for an export. See the details on TensorPix free previews.
Nero AI Video Upscaler Pricing
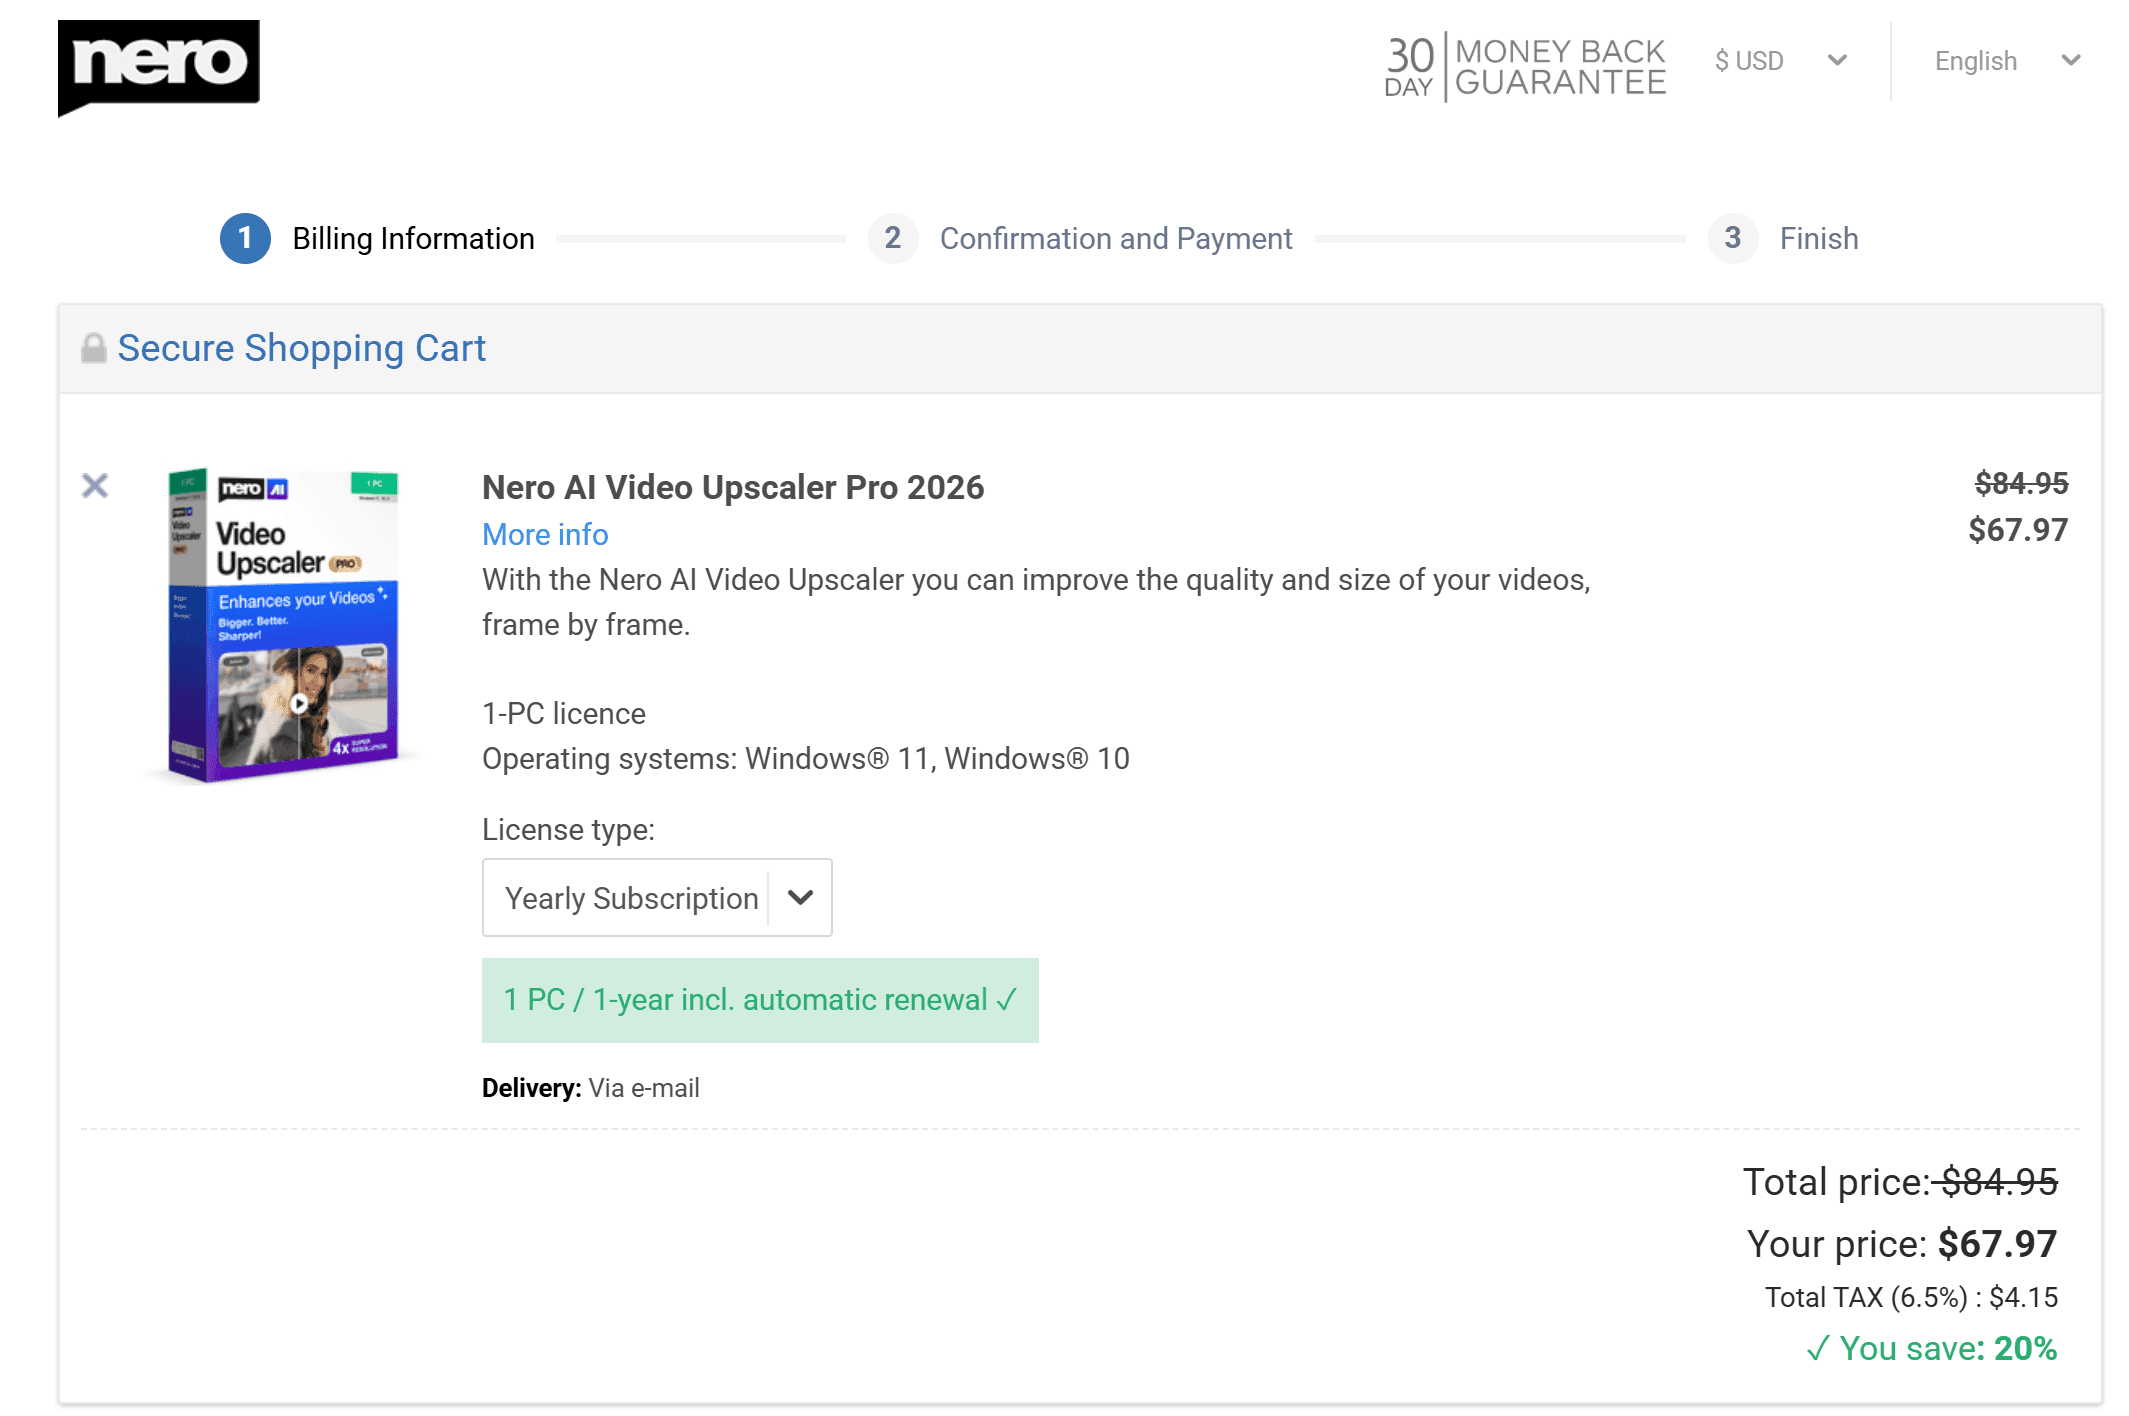
At the time of checking, Nero’s official sale page advertised $67.96 per year, reduced from $84.95 per year, with the displayed offer marked tax-inclusive. This is a promotional annual price; check regional checkout pricing and renewal terms separately through the Nero official offer.
Nero’s local video enhancement workflow does not use a per-minute cloud credit meter. The cost centers on the software license and the computer performing the work. See this Nero desktop workflow comparison.
For frequent enhancement, that can make budgeting more predictable. Trying another setting still takes rendering time, but it does not follow TensorPix’s job-by-job credit model.
Which Approach Offers Better Value?
For a few occasional clips, cloud processing may be economical if it avoids a hardware upgrade. For repeated enhancement on a capable PC you already own, local processing becomes more attractive.
Compare costs over the same period and include:
The subscription or license payment.
Additional cloud credits you expect to purchase.
How often you rerender clips.
Any hardware expense needed for local processing.
The time your computer will spend occupied by enhancement.
A low subscription price is only useful if its included resources cover your workload. Equally, local software is only practical if your machine delivers acceptable results in an acceptable time.
Uploads, Video Length and Hardware Requirements
TensorPix: Include Transfers in Your Time Estimate
With TensorPix, you upload footage, select settings, submit the job and download the result. Processing continues after you close the page, and TensorPix says it sends an email when the output is ready. See the TensorPix getting started guide.
The full turnaround is therefore:
Upload time + queue time + processing time + download time.
This matters when comparing cloud processing against a local render. A short enhancement estimate does not necessarily mean a short end-to-end workflow.
TensorPix recommends an upload speed of at least 10 Mbit/s. At a constant 10 Mbit/s, uploading a 1 GB file would take approximately 13 minutes and 20 seconds under ideal conditions, before queueing or processing. Real transfers can take longer. See TensorPix’s upload guidance.
Check Input Limits Separately from Video Duration
TensorPix lists input resolutions up to 720p on Free and 4K on paid consumer plans. Account storage is 1 GB, 10 GB, 100 GB and 500 GB, respectively. See the TensorPix plan limits.
These are input-resolution and total-storage limits. They do not establish a universal maximum duration or per-file size.
The reviewed plan table does not provide one general duration ceiling. If you intend to enhance a long recording, check its acceptance and full-job quote in the app before committing to a plan.
Nero: Check Your Windows PC First
Nero removes the cloud-upload step, but your computer must do the enhancement work.
Its published minimum requirements include:
Operating system: Windows 10 or 11, 64-bit.
Processor: AMD Ryzen or Intel Core released after 2017.
Memory: 8 GB RAM.
Disk space: 20 GB.
GPU for Full HD-to-4K work: AMD Radeon 500 series or NVIDIA GeForce GTX 900 series or newer, with 4 GB VRAM.
More demanding 4K-to-8K work has higher recommendations. Check the full Nero system requirements.
If your computer falls below the requirements, TensorPix’s cloud approach deserves consideration. If you already have suitable hardware, test Nero with the source resolution and output settings you actually plan to use.
Batch Processing: Cloud Jobs or a Local Queue?
Batch processing is available in both tools, but the experience differs.
TensorPix lists 1, 3, 5 or 7 concurrent video enhancements across Free, Standard, Premium and Elite. See the TensorPix concurrency limits.
That can be useful when you want several cloud jobs running while your computer remains available for editing or other work. Uploads, credits and queue conditions still affect how quickly the collection finishes.
Nero supports batch import and export through a local queue. You can save settings as presets and apply them to one video or all videos in the queue. See the Nero quick-start guide.
This is useful for a collection of similar files that need the same enhancement settings. You can establish a preferred treatment and reuse it.
A batch queue is not the same as simultaneous processing. To compare the tools meaningfully, run a small representative batch and measure the time until every output is ready. Include setup, transfers and any clips that require another pass.
Privacy: Do Your Videos Need to Stay Local?
TensorPix states that it does not use uploaded videos or images to train its AI models, and that users retain ownership of their content. See the TensorPix privacy FAQ.
Its plan table lists 30-day file retention on Free, while paid-plan files remain stored until the user deletes them. Cloud storage and deletion should therefore be considered when planning your workflow. See the TensorPix retention details.
Nero states that video processing happens locally and that it does not upload video content to its servers for processing or storage. Account login and product authorization are separate from handling the footage. See the Nero video privacy FAQ.
If your requirement is “this footage must stay on my computer,” Nero fits that processing requirement more directly.
If uploading is acceptable, TensorPix remains an option. The relevant decision is whether its stated handling and retention conditions fit your project.
Which Video Upscaler Should You Choose?
Choose TensorPix for Browser Access and Cloud Processing
TensorPix is worth considering when you want to enhance videos without installing a desktop application or relying on a suitable local GPU.
It can fit occasional jobs, work across browser-accessible devices, or situations where you want your computer available while enhancement happens elsewhere. Before paying, check the quote for your actual footage and include upload and download time in your expectations.
Choose Nero for Local Processing
Nero AI Video Upscaler is worth considering when you have a suitable Windows PC, want to avoid uploading video content and regularly work through files using repeatable settings.
For the footage in our comparison, Nero’s Anime Upscale was our preferred result. Combined with local processing and reusable presets, that makes it a strong option for readers exploring a TensorPix alternative.
Start with one representative clip, confirm the quality and rendering time, and then expand to a batch.
Download Nero AI Video Upscaler for Windows to try it with your own footage. Nero currently advertises a seven-day free trial with no credit card required. See the Nero trial details.
Frequently Asked Questions
Is Nero a Good TensorPix Alternative?
Yes, particularly if you want local video enhancement on Windows. We preferred Nero’s Anime Upscale in our comparison. TensorPix remains worth considering when browser access and avoiding local GPU requirements matter more to your workflow.
Is TensorPix Free?
TensorPix offers free credits and free previews. The preview feature produces short, watermarked samples, so it is useful for checking settings before committing to a paid render. It should not be treated as unlimited free enhancement. See the details on TensorPix free previews.
Does Nero AI Video Upscaler Work Offline?
Nero says video enhancement runs locally. Account login and product authorization are separate requirements, so local processing should not be interpreted as a promise that installation and every account function work without internet access. See the Nero FAQ.
Can Both Tools Process Multiple Videos?
Yes. TensorPix supports cloud enhancement with plan-dependent concurrency. Nero supports batch import and export through a local queue. Choose based on the total time, cost and file handling involved in your own collection, rather than the batch label alone.
Which Tool Produced Better Results in the Test?
We preferred Nero AI Video Upscaler using Anime Upscale over TensorPix using 4x Upscale 3 for the footage tested here. See the embedded comparison for the actual output, and test your own source material before applying the same conclusion to other video types.